一起學 WebGL:三角形加上漸變色

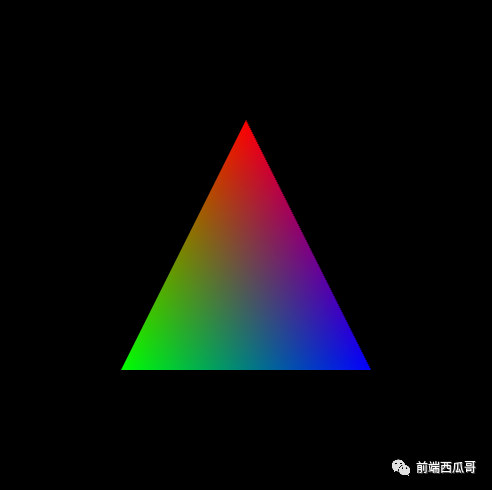
大家好,我是前端西瓜哥。之前教大家繪制一個紅色的三角形,這次我們來畫個有漸變的三角形。
原來的寫法,顏色是在片元著色器中寫死的,這次我們來像傳頂點數據一樣,聲明一個顏色數據傳遞過去。
顏色需要在片元著色器中賦值給內部變量 gl_FragColor,但 attribute 動態類型卻不能在片元著色器中使用。
這時候就要用到一個新的類型 varying 了。(意思為:“變化的“)
varying 用于從頂點著色器中將變量傳遞到片元著色器中。
兩個緩沖區對象的寫法
著色器代碼:
const vertexShaderSrc = `
attribute vec4 a_Position;
attribute vec4 a_Color;
varying vec4 v_Color;
void main() {
 gl_Position = a_Position;
 v_Color = a_Color;
}
`;

const fragmentShaderSrc = `
precision mediump float;
varying vec4 v_Color;
void main() {
  gl_FragColor = v_Color;
}
`;
這里我們需要在兩種著色器中同時聲明 varing 變量,后面的類型也必須是相同的 vec4,變量名也要一致,只能說是完全相同了。
頂點著色器中需要通過 v_Color = a_Color; 賦值。然后在片元著色器中,再將同步過來的 v_Color 賦值給 gl_FragColor。
然后是新增的顏色數組的聲明,以及對應緩存區的創建。
/**** 顏色數據 ****/
// prettier-ignore
const colors = new Float32Array([
  1, 0, 0, // 紅色
  0, 1, 0, // 綠色
  0, 0, 1, // 藍色
])
const colorBuffer = gl.createBuffer();
gl.bindBuffer(gl.ARRAY_BUFFER, colorBuffer);
gl.bufferData(gl.ARRAY_BUFFER, colors, gl.STATIC_DRAW);
const a_Color = gl.getAttribLocation(gl.program, "a_Color");
gl.vertexAttribPointer(a_Color, 3, gl.FLOAT, false, 0, 0);
gl.enableVertexAttribArray(a_Color);
貼一下完整代碼:
/** @type {HTMLCanvasElement} */
const canvas = document.querySelector("canvas");
const gl = canvas.getContext("webgl");

const vertexShaderSrc = `
attribute vec4 a_Position;
attribute vec4 a_Color;
varying vec4 v_Color;
void main() {
 gl_Position = a_Position;
 v_Color = a_Color;
}
`;

const fragmentShaderSrc = `
precision mediump float;
varying vec4 v_Color;
void main() {
  gl_FragColor = v_Color;
}
`;

/**** 渲染器生成處理 ****/
// 創建頂點渲染器
const vertexShader = gl.createShader(gl.VERTEX_SHADER);
gl.shaderSource(vertexShader, vertexShaderSrc);
gl.compileShader(vertexShader);
// 創建片元渲染器
const fragmentShader = gl.createShader(gl.FRAGMENT_SHADER);
gl.shaderSource(fragmentShader, fragmentShaderSrc);
gl.compileShader(fragmentShader);
// 程序對象
const program = gl.createProgram();
gl.attachShader(program, vertexShader);
gl.attachShader(program, fragmentShader);
gl.linkProgram(program);
gl.useProgram(program);
gl.program = program;

// 頂點數據
// prettier-ignore
const vertices = new Float32Array([
  0, 0.5,  // 第一個點
  -0.5, -0.5,  // 第二個點
  0.5, -0.5,  // 第三個點
]);

// 創建緩存對象
const vertexBuffer = gl.createBuffer();
// 綁定緩存對象到上下文
gl.bindBuffer(gl.ARRAY_BUFFER, vertexBuffer);
// 向緩存區寫入數據
gl.bufferData(gl.ARRAY_BUFFER, vertices, gl.STATIC_DRAW);

// 獲取 a_Position 變量地址
const a_Position = gl.getAttribLocation(gl.program, "a_Position");
// 將緩沖區對象分配給 a_Position 變量
gl.vertexAttribPointer(a_Position, 2, gl.FLOAT, false, 0, 0);

// 允許訪問緩存區
gl.enableVertexAttribArray(a_Position);

/**** 顏色數據 ****/
// prettier-ignore
const colors = new Float32Array([
  1, 0, 0, // 紅色
  0, 1, 0, // 綠色
  0, 0, 1, // 藍色
])
const colorBuffer = gl.createBuffer();
gl.bindBuffer(gl.ARRAY_BUFFER, colorBuffer);
gl.bufferData(gl.ARRAY_BUFFER, colors, gl.STATIC_DRAW);
const a_Color = gl.getAttribLocation(gl.program, "a_Color");
gl.vertexAttribPointer(a_Color, 3, gl.FLOAT, false, 0, 0);
gl.enableVertexAttribArray(a_Color);

/*** 繪制 ***/
// 清空畫布,并指定顏色
gl.clearColor(0, 0, 0, 1);
gl.clear(gl.COLOR_BUFFER_BIT);
// 繪制三角形
gl.drawArrays(gl.TRIANGLES, 0, 3);
demo 地址:
https://codesandbox.io/s/uqbjsu?file=/index.js。
渲染結果:

我們其實只是給三個頂點設置了紅、綠、藍三個顏色,然后 WebGL 會基于它們計算出中間的過內插顏色,將它們填充滿三個點圍成區域的像素點。
單緩沖區的實現
前面的實現用了兩個緩沖區對象分別保存位置信息和顏色信息。
但實際上可以將它們組合在一起,讓數據更緊湊放在一個緩沖區里。
浮點數數組為:
// prettier-ignore
const verticesColors = new Float32Array([
  0, 0.5, 1, 0, 0,  // 點 1 的位置和顏色信息
  -0.5, -0.5, 0, 1, 0,  // 點 2
  0.5, -0.5, 0, 0, 1,  // 點 3
]);
然后是和前一種寫法有一些不同的地方:
// 每個數組元素的字節數
const SIZE = verticesColors.BYTES_PER_ELEMENT;

// 獲取 a_Position 變量地址
const a_Position = gl.getAttribLocation(gl.program, "a_Position");
gl.vertexAttribPointer(a_Position, 2, gl.FLOAT, false, SIZE * 5, 0);
gl.enableVertexAttribArray(a_Position);

const a_Color = gl.getAttribLocation(gl.program, "a_Color");
gl.vertexAttribPointer(a_Color, 3, gl.FLOAT, false, SIZE * 5, SIZE * 2);
gl.enableVertexAttribArray(a_Color);
主要是 gl.vertexAttribPointer 方法的最后兩個參數 stride 和 offset。
我們看下面這個:
gl.vertexAttribPointer(a_Color, 3, gl.FLOAT, false, SIZE * 5, SIZE * 2);stride 為 SIZE * 5(單位為字節,所以要乘以一個數組元素的字節大小),表示 5 個數組元素為一趟,然后 offset 為 SIZE * 2,表示從第 2 個元素,取 3 個元素作為這一趟的數據內容。
完整代碼實現:
/** @type {HTMLCanvasElement} */
const canvas = document.querySelector("canvas");
const gl = canvas.getContext("webgl");

const vertexShaderSrc = `
attribute vec4 a_Position;
attribute vec4 a_Color;
varying vec4 v_Color;
void main() {
 gl_Position = a_Position;
 v_Color = a_Color;
}
`;

const fragmentShaderSrc = `
precision mediump float;
varying vec4 v_Color;
void main() {
  gl_FragColor = v_Color;
}
`;

/**** 渲染器生成處理 ****/
// 創建頂點渲染器
const vertexShader = gl.createShader(gl.VERTEX_SHADER);
gl.shaderSource(vertexShader, vertexShaderSrc);
gl.compileShader(vertexShader);
// 創建片元渲染器
const fragmentShader = gl.createShader(gl.FRAGMENT_SHADER);
gl.shaderSource(fragmentShader, fragmentShaderSrc);
gl.compileShader(fragmentShader);
// 程序對象
const program = gl.createProgram();
gl.attachShader(program, vertexShader);
gl.attachShader(program, fragmentShader);
gl.linkProgram(program);
gl.useProgram(program);
gl.program = program;

// 頂點數據
// prettier-ignore
const verticesColors = new Float32Array([
  0, 0.5, 1, 0, 0,  // 點 1 的位置和顏色信息
  -0.5, -0.5, 0, 1, 0,  // 點 2
  0.5, -0.5, 0, 0, 1,  // 點 3
]);
// 每個數組元素的字節數
const SIZE = verticesColors.BYTES_PER_ELEMENT;

// 創建緩存對象
const vertexColorBuffer = gl.createBuffer();
// 綁定緩存對象到上下文
gl.bindBuffer(gl.ARRAY_BUFFER, vertexColorBuffer);
// 向緩存區寫入數據
gl.bufferData(gl.ARRAY_BUFFER, verticesColors, gl.STATIC_DRAW);

// 獲取 a_Position 變量地址
const a_Position = gl.getAttribLocation(gl.program, "a_Position");
gl.vertexAttribPointer(a_Position, 2, gl.FLOAT, false, SIZE * 5, 0);
gl.enableVertexAttribArray(a_Position);

const a_Color = gl.getAttribLocation(gl.program, "a_Color");
gl.vertexAttribPointer(a_Color, 3, gl.FLOAT, false, SIZE * 5, SIZE * 2);
gl.enableVertexAttribArray(a_Color);

/*** 繪制 ***/
// 清空畫布,并指定顏色
gl.clearColor(0, 0, 0, 1);
gl.clear(gl.COLOR_BUFFER_BIT);
// 繪制三角形
gl.drawArrays(gl.TRIANGLES, 0, 3);
demo 地址:
https://codesandbox.io/s/bvkv20?file=/index.js。
結尾
本節講了 varying 的能力:將頂點著色器中的變量傳遞給片元著色器。并演示了使用兩個緩沖區對象,位置數據和顏色數據,以及將它們組合成一個緩沖區對象的實現。


