快速學習一個算法,Vision Transformer
Vision Transformer(ViT)是一種基于自注意力機制的神經網絡架構,主要用于處理圖像數據。
它是由谷歌研究人員在 2020 年提出的,標志著「將自然語言處理(NLP)中廣泛使用的 Transformer 模型成功應用于計算機視覺領域的一個重要進展。」

基本原理和架構
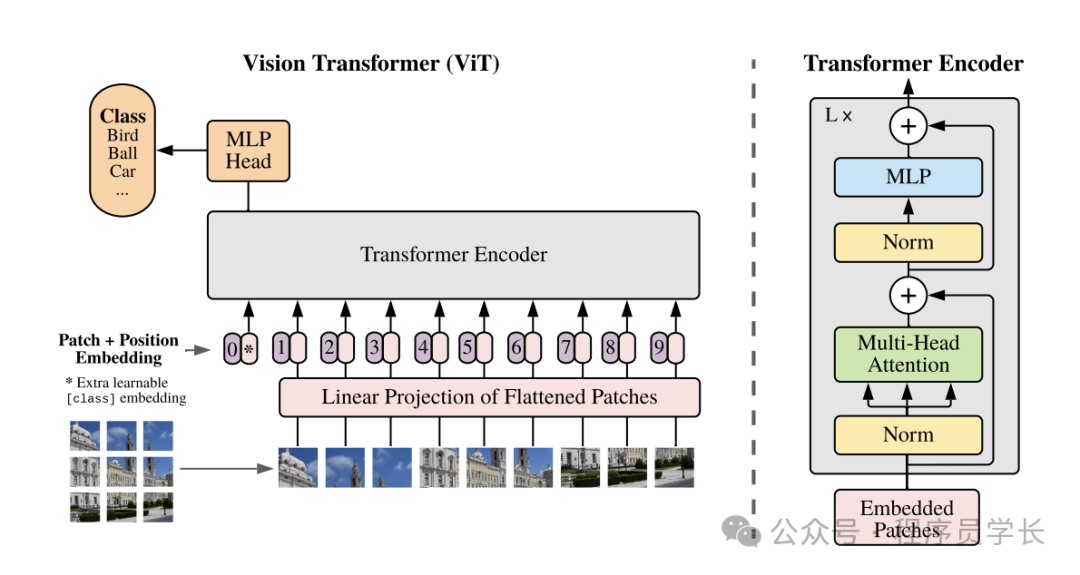
Vision Transformer 的核心思想是將圖像分解為一系列的小塊(稱為 patches),這些小塊在輸入網絡之前被展平并映射到高維空間。這與傳統的卷積神經網絡(CNN)不同,后者通常會使用卷積層來處理整個圖像并提取局部特征。
 圖片
圖片
1.圖像分塊
首先,ViT 將輸入圖像切割成固定大小的小塊(例如,16x16像素的塊)。每個塊被視為一個 “token”,與 NLP 中的單詞類似。
2.嵌入層
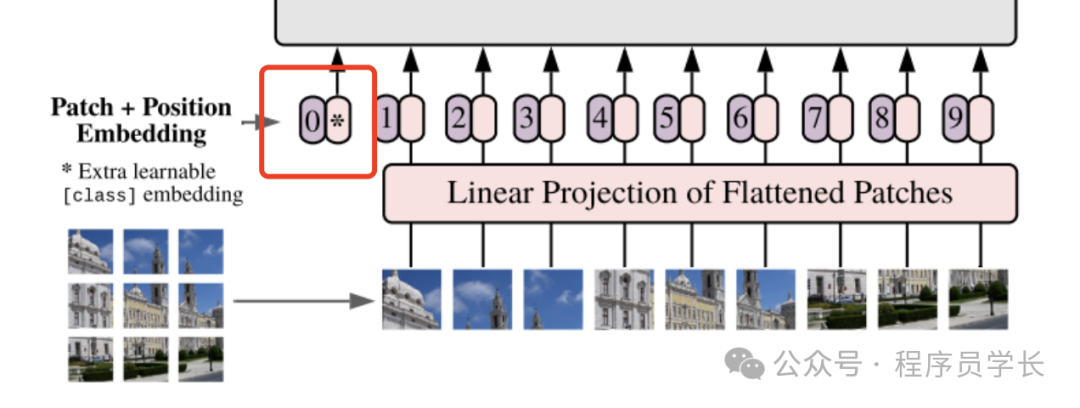
這些圖像塊(patches)被展平并通過一個線性層轉換成一系列的嵌入向量。
此外,還會添加一個可學習的 “class” 嵌入,用于聚合全局信息。
 圖片
圖片
3.位置編碼
為了保留圖像塊的位置信息,ViT 在嵌入向量中加入位置編碼,這是 Transformer 架構中的一個關鍵組成部分。
4.Transformer 編碼器
經過嵌入的圖像塊(現在作為序列的一部分)輸入到標準的 Transformer編碼器中。
編碼器使用多頭自注意力機制和前饋神經網絡來處理序列,允許模型捕獲塊之間的復雜關系。
5.分類頭
對于分類任務,Transformer 的輸出(特別是 [CLS] token 的輸出)會傳遞到一個前饋網絡(即分類頭),該網絡輸出最終的類別預測。
優缺點分析
優點
- 強大的全局信息處理能力
通過自注意力機制,ViT 可以在圖像的任何部分之間建立直接的聯系,有效捕捉全局依賴關系。 - 高度靈活性
ViT 模型可以很容易地調整到不同大小的輸入,且模型架構可擴展性強。 - 更適合大規模數據集
ViT 在大規模數據集上表現通常優于傳統 CNN,可以學習更復雜的視覺模式。
缺點
- 需要更多的訓練數據
ViT 依賴大量數據來訓練,以防止過擬合,對于數據較少的情況可能不如 CNN 有效。 - 計算成本高
由于需要計算長距離的依賴關系,ViT 在計算和內存需求上通常比CNN要高。
代碼實現
下面,我們一起來看一下如何使用 VIT 來預測一張圖片的類別
1.圖像分塊
import os
import copy
import math
import typing
import cv2
import numpy as np
import matplotlib.pyplot as plt
import torch
import torch.nn as nn
mountains = np.load('mountains.npy')
H = mountains.shape[0]
W = mountains.shape[1]
print('Mountain at Dusk is H =', H, 'and W =', W, 'pixels.')
P = 20
N = int((H*W)/(P**2))
print('There will be', N, 'patches, each', P, 'by', str(P)+'.')
fig = plt.figure(figsize=(10,6))
plt.imshow(mountains, cmap='Purples_r')
plt.hlines(np.arange(P, H, P)-0.5, -0.5, W-0.5, color='w')
plt.vlines(np.arange(P, W, P)-0.5, -0.5, H-0.5, color='w')
plt.xticks(np.arange(-0.5, W+1, 10), labels=np.arange(0, W+1, 10))
plt.yticks(np.arange(-0.5, H+1, 10), labels=np.arange(0, H+1, 10))
x_text = np.tile(np.arange(9.5, W, P), 3)
y_text = np.repeat(np.arange(9.5, H, P), 5)
for i in range(1, N+1):
plt.text(x_text[i-1], y_text[i-1], str(i), color='w', fnotallow='xx-large', ha='center')
plt.text(x_text[2], y_text[2], str(3), color='k', fnotallow='xx-large', ha='center');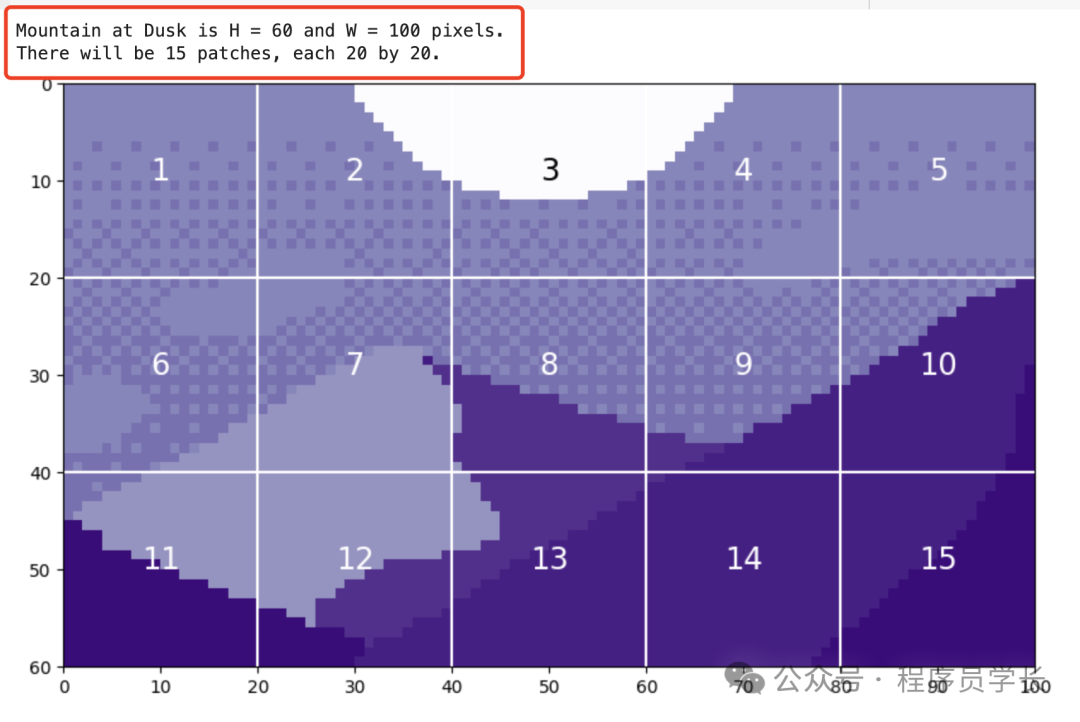 圖片
圖片
通過展平這些色塊,我們可以看到生成的 token。我們以色塊 12 為例,因為它包含四種不同的色調。
print('Each patch will make a token of length', str(P**2)+'.')

patch12 = mountains[40:60, 20:40]
token12 = patch12.reshape(1, P**2)
fig = plt.figure(figsize=(10,1))
plt.imshow(token12, aspect=10, cmap='Purples_r')
plt.clim([0,1])
plt.xticks(np.arange(-0.5, 401, 50), labels=np.arange(0, 401, 50))
plt.yticks([])
圖片
圖片
2.嵌入層
從圖像中提取 token 后,通常使用線性投影來更改 token 的長度。
class Patch_Tokenization(nn.Module):
    def __init__(self,
                img_size: tuple[int, int, int]=(1, 1, 60, 100),
                patch_size: int=50,
                token_len: int=768):

        super().__init__()
        self.img_size = img_size
        C, H, W = self.img_size
        self.patch_size = patch_size
        self.token_len = token_len
        assert H % self.patch_size == 0, 'Height of image must be evenly divisible by patch size.'
        assert W % self.patch_size == 0, 'Width of image must be evenly divisible by patch size.'
        self.num_tokens = (H / self.patch_size) * (W / self.patch_size)

        ## Defining Layers
        self.split = nn.Unfold(kernel_size=self.patch_size, stride=self.patch_size, padding=0)
        self.project = nn.Linear((self.patch_size**2)*C, token_len)

    def forward(self, x):
        x = self.split(x).transpose(1,0)
        x = self.project(x)
        return x
請注意,這兩個 assert 語句確保圖像尺寸可以被塊大小整除。實際分割成塊的操作是使用 torch.nn.Unfold 層實現的。
x = torch.from_numpy(mountains).unsqueeze(0).unsqueeze(0).to(torch.float32)
token_len = 768
print('Input dimensions are\n\tbatchsize:', x.shape[0], '\n\tnumber of input channels:', x.shape[1], '\n\timage size:', (x.shape[2], x.shape[3]))
# Define the Module
patch_tokens = Patch_Tokenization(img_size=(x.shape[1], x.shape[2], x.shape[3]),
patch_size = P,
token_len = token_len)
x = patch_tokens.split(x).transpose(2,1)
print('After patch tokenization, dimensions are\n\tbatchsize:', x.shape[0], '\n\tnumber of tokens:', x.shape[1], '\n\ttoken length:', x.shape[2])
x = patch_tokens.project(x)
print('After projection, dimensions are\n\tbatchsize:', x.shape[0], '\n\tnumber of tokens:', x.shape[1], '\n\ttoken length:', x.shape[2])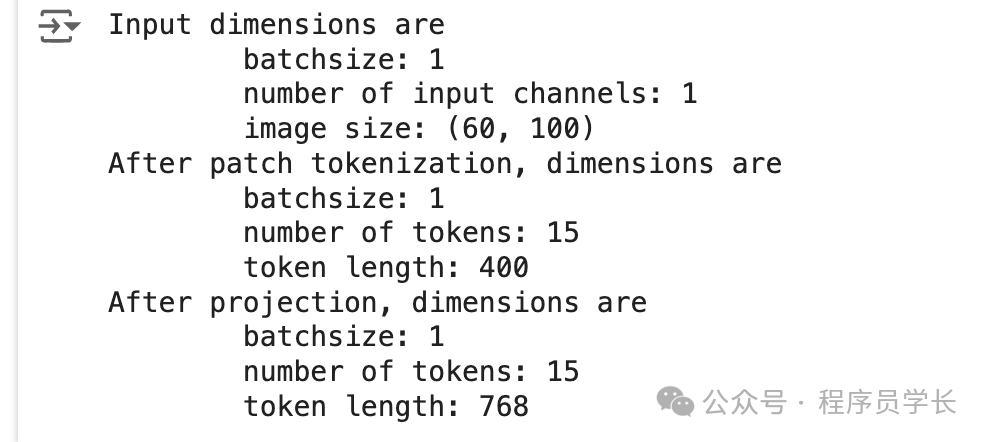 圖片
圖片
從上圖可以看到,經過線性投影層后,token 的維度變成了 768 維。
3.位置編碼
接下來將一個空白 token(稱為預測標記)添加到圖像 token 之前。「此 token 將在編碼器的輸出中用于進行預測。」
它從空白(相當于零)開始,以便它可以從其他圖像 token 中獲取信息。
pred_token = torch.zeros(1, 1, x.shape[2]).expand(x.shape[0], -1, -1)
x = torch.cat((pred_token, x), dim=1)
然后,我們為 token 添加一個位置嵌入。
位置嵌入允許 transformer 理解圖像標記的順序。
def get_sinusoid_encoding(num_tokens, token_len):

    def get_position_angle_vec(i):
        return [i / np.power(10000, 2 * (j // 2) / token_len) for j in range(token_len)]

    sinusoid_table = np.array([get_position_angle_vec(i) for i in range(num_tokens)])
    sinusoid_table[:, 0::2] = np.sin(sinusoid_table[:, 0::2])
    sinusoid_table[:, 1::2] = np.cos(sinusoid_table[:, 1::2])

    return torch.FloatTensor(sinusoid_table).unsqueeze(0)


PE = get_sinusoid_encoding(x.shape[1]+1, x.shape[2])
print('Position embedding dimensions are\n\tnumber of tokens:', PE.shape[1], '\n\ttoken length:', PE.shape[2])

x = x + PE
print('Dimensions with Position Embedding are\n\tbatchsize:', x.shape[0], '\n\tnumber of tokens:', x.shape[1], '\n\ttoken length:', x.shape[2])
4.編碼器
編碼器是模型實際從圖像 token 中學習的地方。
編碼器主要由注意力模塊和神經網絡模塊組成。
NoneFloat = typing.Union[None, float]
class Attention(nn.Module):
    def __init__(self,
                dim: int,
                chan: int,
                num_heads: int=1,
                qkv_bias: bool=False, qk_scale: Nnotallow=None):

        super().__init__()


        self.num_heads = num_heads
        self.chan = chan
        self.head_dim = self.chan // self.num_heads
        self.scale = qk_scale or self.head_dim ** -0.5

        self.qkv = nn.Linear(dim, chan * 3, bias=qkv_bias)
        self.proj = nn.Linear(chan, chan)

    def forward(self, x):
        if self.chan % self.num_heads != 0:
            raise ValueError('"Chan" must be evenly divisible by "num_heads".')
        B, N, C = x.shape
        qkv = self.qkv(x).reshape(B, N, 3, self.num_heads, self.head_dim).permute(2, 0, 3, 1, 4)

        q, k, v = qkv[0], qkv[1], qkv[2]

        ## Calculate Attention
        attn = (q * self.scale) @ k.transpose(-2, -1)
        attn = attn.softmax(dim=-1)

        x = (attn @ v).transpose(1, 2).reshape(B, N, self.chan)
        x = self.proj(x)

        ## Skip Connection Layer
        v = v.transpose(1, 2).reshape(B, N, self.chan)
        x = v + x
        return x

class NeuralNet(nn.Module):
    def __init__(self,
       in_chan: int,
       hidden_chan: Nnotallow=None,
       out_chan: Nnotallow=None,
       act_layer = nn.GELU):

        super().__init__()

        ## Define Number of Channels
        hidden_chan = hidden_chan or in_chan
        out_chan = out_chan or in_chan

        ## Define Layers
        self.fc1 = nn.Linear(in_chan, hidden_chan)
        self.act = act_layer()
        self.fc2 = nn.Linear(hidden_chan, out_chan)

    def forward(self, x):
        x = self.fc1(x)
        x = self.act(x)
        x = self.fc2(x)
        return x

class Encoding(nn.Module):
    def __init__(self,
       dim: int,
       num_heads: int=1,
       hidden_chan_mul: float=4.,
       qkv_bias: bool=False,
       qk_scale: Nnotallow=None,
       act_layer=nn.GELU,
       norm_layer=nn.LayerNorm):

        super().__init__()

        ## Define Layers
        self.norm1 = norm_layer(dim)
        self.attn = Attention(dim=dim,
                            chan=dim,
                            num_heads=num_heads,
                            qkv_bias=qkv_bias,
                            qk_scale=qk_scale)
        self.norm2 = norm_layer(dim)
        self.neuralnet = NeuralNet(in_chan=dim,
                                hidden_chan=int(dim*hidden_chan_mul),
                                out_chan=dim,
                                act_layer=act_layer)

    def forward(self, x):
        x = x + self.attn(self.norm1(x))
        x = x + self.neuralnet(self.norm2(x))
        return x
現在,我們將通過一個注意力模塊。
E = Encoding(dim=x.shape[2], num_heads=4, hidden_chan_mul= 1.5 , qkv_bias= False , qk_scale= None , act_layer=nn.GELU, norm_layer=nn.LayerNorm)
y = E.norm1(x)
print('After norm, dimensions are\n\tbatchsize:', y.shape[0], '\n\tnumber of tokens:', y.shape[1], '\n\ttoken size:', y.shape[2])
y = E.attn(y)
print('After attention, dimensions are\n\tbatchsize:', y.shape[0], '\n\tnumber of tokens:', y.shape[1], '\n\ttoken size:', y.shape[2])
y = y + x
print('After split connection, dimensions are\n\tbatchsize:', y.shape[0], '\n\tnumber of tokens:', y.shape[1], '\n\ttoken size:', y.shape[2])
接下來,我們經過一個神經網絡模塊。
z = E.norm2(y)
print('After norm, dimensions are\n\tbatchsize:', z.shape[0], '\n\tnumber of tokens:', z.shape[1], '\n\ttoken size:', z.shape[2])
z = E.neuralnet(z)
print('After neural net, dimensions are\n\tbatchsize:', z.shape[0], '\n\tnumber of tokens:', z.shape[1], '\n\ttoken size:', z.shape[2])
z = z + y
print('After split connection, dimensions are\n\tbatchsize:', z.shape[0], '\n\tnumber of tokens:', z.shape[1], '\n\ttoken size:', z.shape[2])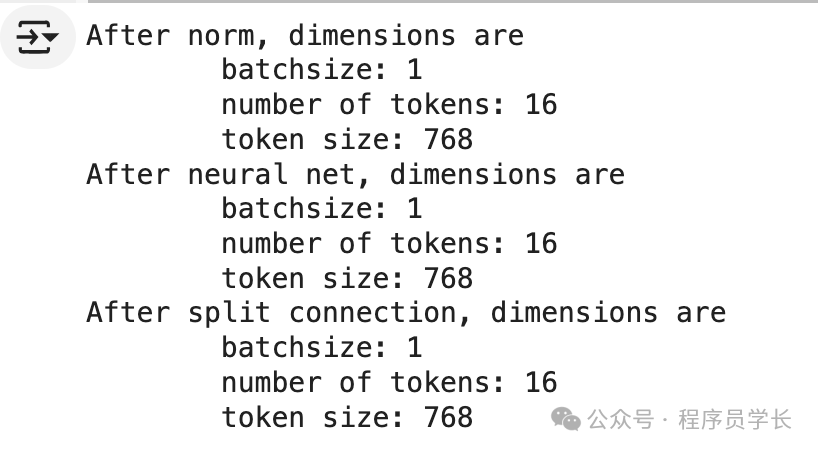 圖片
圖片
「這就是單個編碼器的全部內容!由于最終尺寸與初始尺寸相同,因此模型可以輕松地將 token 傳遞到多個編碼器。」
5.分類頭
經過編碼器后,模型要做的最后一件事就是進行預測。
norm = nn.LayerNorm(token_len)
z = norm(z)
pred_token = z[:, 0]
head = nn.Linear(pred_token.shape[-1], 1)
pred = head(pred_token)
print('Length of prediction:', (pred.shape[0], pred.shape[1]))
print('Prediction:', float(pred))


