?審校 | 孫淑娟
開篇
本文通過分步驟的指南,說明如何在React Native中整合圖片編輯,并實(shí)現(xiàn)類Instagram濾鏡的效果。

在Instagram上,你可以很容易地使用濾鏡功能,并迅速得到想要的結(jié)果。濾鏡功能很好地修改照片,讓人們得到想要的效果。一些用戶想要在自定義的React Native中實(shí)現(xiàn)類似的濾鏡效果。也就是說將Instagram的濾鏡應(yīng)用到React Native 程序中。
為了滿足這個(gè)要求,本文編寫了一個(gè)分步驟的指南,說明如何在React Native中整合圖片編輯,實(shí)現(xiàn)類似Instagram濾鏡的功能。
我們的開發(fā)人員在對(duì)React Native中的各種過濾器庫(kù)進(jìn)行廣泛研究之后,并沒有找到理想的實(shí)現(xiàn)效果。于是,他們想出了在React Native中構(gòu)建圖像濾鏡的特別指南。
就讓我們手捧指南,從這里出發(fā)吧!
前提條件
沒有特別的要求,只要確保React Native已經(jīng)安裝,并保證項(xiàng)目已經(jīng)創(chuàng)建。
雖然,安裝React Native和設(shè)置并非易事,由于本文主題在如何進(jìn)行圖片編輯,因此不展開說React Native和設(shè)置,如果有需要可以訪問??React Native官網(wǎng)??,獲取更多信息。
安裝相關(guān)庫(kù)
在應(yīng)用程序中,需要三個(gè)主要功能;裁剪、過濾和下載。為了實(shí)現(xiàn)這些功能,我們的開發(fā)人員已經(jīng)選擇了三個(gè)最好的庫(kù)來支持React Native中的濾鏡功能。
1.圖像裁剪
圖像裁剪允許按照尺寸自由調(diào)整裁剪圖像。它是移動(dòng)應(yīng)用開發(fā)不可獲缺的重要組成部分。我們可以通過??Crop Picker Library??來獲得裁剪圖片的功能。該庫(kù)還提供了視頻編輯功能。
2.圖像過濾器
我們使用 ??React Native Image Filter Kit?? 來處理應(yīng)用程序中的圖像過濾。基于該工具包,我們創(chuàng)建了一個(gè)特殊的代碼來生成20多個(gè)過濾器。
3.圖片下載
為了分享修改后的圖片,人們需要將其下載到手機(jī)上。這個(gè)功能可以從 ??React Native Cameraroll Library?? 庫(kù)中獲得,該庫(kù)可以幫助開發(fā)者將過濾后的圖片保存在iOS和Android的照片庫(kù)中。
核心功能開發(fā)指南
一旦上述庫(kù)安裝好之后,就可以開始核心功能的開發(fā)了。接下來,讓我們進(jìn)入編碼部分,實(shí)現(xiàn)既定的里程碑。
如圖 1 所示,這里列出了文件夾結(jié)構(gòu),它可以幫助我們理解文件之間的關(guān)系以及需要實(shí)現(xiàn)的功能。
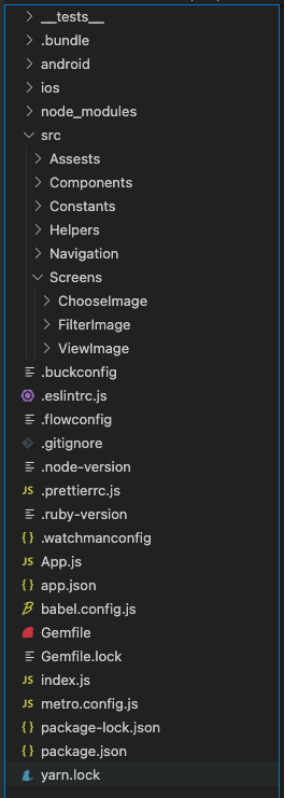
圖1:代碼文件結(jié)構(gòu)
第1步:調(diào)用手機(jī)相冊(cè)
創(chuàng)建文件夾名為 "ChooseImage"。接下來,添加 "index.jsx "文件。為了從手機(jī)圖庫(kù)中獲取圖片,在'index.jsx'文件中添加以下代碼。
輸出
一旦完成上述代碼,并將其添加到之后,你就可以看到如圖2所示內(nèi)容。
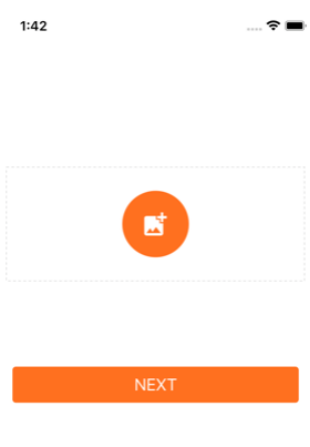
圖2:調(diào)用手機(jī)相冊(cè)
第2步:圖像裁剪和調(diào)整大小
在第一步中,我們已經(jīng)在NEXT "按鈕上添加了一段代碼。因此,當(dāng)你點(diǎn)擊“NEXT”對(duì)照片進(jìn)行裁剪時(shí),就會(huì)打開對(duì)應(yīng)的用戶界面。用戶可以調(diào)整圖片的大小,也可以旋轉(zhuǎn)它,總之可以對(duì)其進(jìn)行編輯。
選擇器提供各種圖像比例供用戶選取。一旦用戶點(diǎn)擊了選項(xiàng)按鈕,就會(huì)出現(xiàn)一個(gè)動(dòng)作表視圖。現(xiàn)在,用戶可以選擇一個(gè)預(yù)定義的比例對(duì)照片進(jìn)行裁剪了。
第3步:創(chuàng)建圖像過濾器
現(xiàn)在,選擇和裁剪功能已經(jīng)準(zhǔn)備好了。接下來,是時(shí)候添加圖像過濾功能了。現(xiàn)在讓我們創(chuàng)建一個(gè)新的文件夾,并命名為Filter Image"。再次,在新文件夾下面創(chuàng)建一個(gè)文件
輸出
完成上述代碼之后,如圖3所示,應(yīng)用程序的所有過濾器都是可見的了,用戶可以選擇任意一個(gè)濾鏡對(duì)圖片進(jìn)行處理了。
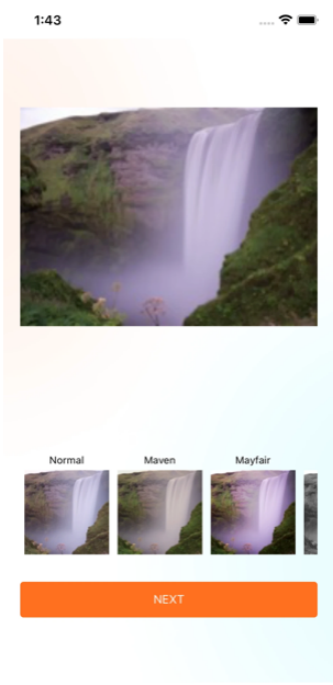
圖 3:圖片過濾器應(yīng)用
第4步:圖像保存和下載
完成上述功能之后,接著就需要編寫保存/下載圖片的功能,否則應(yīng)用是玩不轉(zhuǎn)的。由于我們?cè)谏弦徊竭^濾器的基礎(chǔ)上添加下載功能的代碼。
和前面兩個(gè)步驟一樣,創(chuàng)建一個(gè)名為自定義圖片。
輸出結(jié)果如圖4 所示。
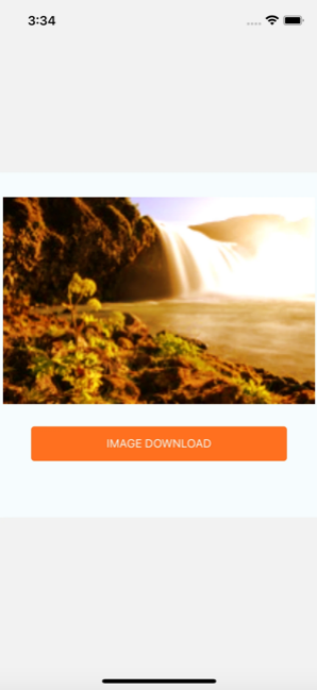
圖4:圖片下載
總結(jié)
根據(jù)上述指南,你已經(jīng)完成了代碼的編寫。這里對(duì)整個(gè)指南稍做總結(jié),在保證React Native安裝和配置的前提下,分別安裝圖像裁剪、圖像過濾和圖片下載的相關(guān)庫(kù)。然后,根據(jù)四步實(shí)現(xiàn)濾鏡功能的開發(fā),包括:調(diào)用手機(jī)相冊(cè)、圖像裁剪和調(diào)整圖片大小、創(chuàng)建圖像過濾器以及保存和下載圖像。
譯者介紹
崔皓,51CTO社區(qū)編輯,資深架構(gòu)師,擁有18年的軟件開發(fā)和架構(gòu)經(jīng)驗(yàn),10年分布式架構(gòu)經(jīng)驗(yàn)。
原文標(biāo)題:??A Guide to Implement Instagram-Like Filters in React Native??,作者:Kiran Beladiya