React中組件邏輯復用的那些事兒
基本每個開發者都需要考慮邏輯復用的問題,否則你的項目中將充斥著大量的重復代碼。那么 React 是怎么復用組件邏輯的呢?本文將一一介紹 React 復用組件邏輯的幾種方法,希望你讀完之后能夠有所收獲。如果你對這些內容已經非常清楚,那么略過本文即可。
我已盡量對文中的代碼和內容進行了校驗,但是因為自身知識水平限制,難免有錯誤,歡迎在評論區指正。
1. Mixins
Mixins 事實上是 React.createClass 的產物了。當然,如果你曾經在低版本的 react 中使用過 Mixins,例如 react-timer-mixin, react-addons-pure-render-mixin,那么你可能知道,在 React 的新版本中我們其實還是可以使用 mixin,雖然 React.createClass 已經被移除了,但是仍然可以使用第三方庫 create-react-class,來繼續使用 mixin。甚至,ES6 寫法的組件,也同樣有方式去使用 mixin。當然啦,這不是本文討論的重點,就不多做介紹了,如果你維護的老項目在升級的過程中遇到這類問題,可以與我探討。
新的項目中基本不會出現 Mixins,但是如果你們公司還有一些老項目要維護,其中可能就應用了 Mixins,因此稍微花點時間,了解下 Mixins 的使用方法和原理,還是有必要的。倘若你完全沒有這方面的需求,那么跳過本節亦是可以的。
Mixins 的使用
React 15.3.0 版本中增加了 PureComponent。而在此之前,或者如果你使用的是 React.createClass 的方式創建組件,那么想要同樣的功能,就是使用 react-addons-pure-render-mixin,例如:
- //下面代碼在新版React中可正常運行,因為現在已經無法使用 `React.createClass`,我就不使用 `React.createClass` 來寫了。
- const createReactClass = require('create-react-class');
- const PureRenderMixin = require('react-addons-pure-render-mixin');
- const MyDialog = createReactClass({
- displayName: 'MyDialog',
- mixins: [PureRenderMixin],
- //other code
- render() {
- return (
- <div>
- {/* other code */}
- </div>
- )
- }
- });
首先,需要注意,mixins 的值是一個數組,如果有多個 Mixins,那么只需要依次放在數組中即可,例如: mixins: [PureRenderMixin, TimerMixin]。
Mixins 的原理
Mixins 的原理可以簡單理解為將一個 mixin 對象上的方法增加到組件上。類似于 $.extend 方法,不過 React 還進行了一些其它的處理,例如:除了生命周期函數外,不同的 mixins 中是不允許有相同的屬性的,并且也不能和組件中的屬性和方法同名,否則會拋出異常。另外即使是生命周期函數,constructor 、render 和 shouldComponentUpdate 也是不允許重復的。
而如 compoentDidMount 的生命周期,會依次調用 Mixins,然后再調用組件中定義的 compoentDidMount。
例如,上面的 PureRenderMixin 提供的對象中,有一個 shouldComponentUpdate 方法,即是將這個方法增加到了 MyDialog 上,此時 MyDialog 中不能再定義 shouldComponentUpdate,否則會拋出異常。
- //react-addons-pure-render-mixin 源碼
- var shallowEqual = require('fbjs/lib/shallowEqual');
- module.exports = {
- shouldComponentUpdate: function(nextProps, nextState) {
- return (
- !shallowEqual(this.props, nextProps) ||
- !shallowEqual(this.state, nextState)
- );
- },
- };
Mixins 的缺點
- Mixins 引入了隱式的依賴關系。
例如,每個 mixin 依賴于其他的 mixin,那么修改其中一個就可能破壞另一個。
2. Mixins 會導致名稱沖突
如果兩個 mixin 中存在同名方法,就會拋出異常。另外,假設你引入了一個第三方的 mixin,該 mixin 上的方法和你組件的方法名發生沖突,你就不得不對方法進行重命名。
3. Mixins 會導致越來越復雜
mixin 開始的時候是簡單的,但是隨著時間的推移,容易變得越來越復雜。例如,一個組件需要一些狀態來跟蹤鼠標懸停,為了保持邏輯的可重用性,將 handleMouseEnter()、handleMouseLeave() 和 isHovering() 提取到 HoverMixin() 中。
然后其他人可能需要實現一個提示框,他們不想復制 HoverMixin() 的邏輯,于是他們創建了一個使用 HoverMixin 的 TooltipMixin,TooltipMixin 在它的 componentDidUpdate 中讀取 HoverMixin() 提供的 isHovering() 來決定顯示或隱藏提示框。
幾個月之后,有人想將提示框的方向設置為可配置的。為了避免代碼重復,他們將 getTooltipOptions() 方法增加到了 TooltipMixin 中。結果過了段時間,你需要再同一個組件中顯示多個提示框,提示框不再是懸停時顯示了,或者一些其他的功能,你需要解耦 HoverMixin() 和 TooltipMixin 。另外,如果很多組件使用了某個 mixin,mixin 中新增的功能都會被添加到所有組件中,事實上很多組件完全不需要這些新功能。
漸漸地,封裝的邊界被侵蝕了,由于很難更改或移除現有的mixin,它們變得越來越抽象,直到沒有人理解它們是如何工作的。
React 官方認為在 React 代碼庫中,Mixin 是不必要的,也是有問題的。推薦開發者使用高階組件來進行組件邏輯的復用。
2. HOC
React 官方文檔對 HOC 進行了如下的定義:高階組件(HOC)是 React 中用于復用組件邏輯的一種高級技巧。HOC 自身不是 React API 的一部分,它是一種基于 React 的組合特性而形成的設計模式。
簡而言之,高階組件就是一個函數,它接受一個組件為參數,返回一個新組件。
高階組件的定義形如下面這樣:
- //接受一個組件 WrappedComponent 作為參數,返回一個新組件 Proxy
- function withXXX(WrappedComponent) {
- return class Proxy extends React.Component {
- render() {
- return <WrappedComponent {...this.props}>
- }
- }
- }
開發項目時,當你發現不同的組件有相似的邏輯,或者發現自己在寫重復代碼的時候,這時候就需要考慮組件復用的問題了。
這里我以一個實際開發的例子來說明,近期各大APP都在適配暗黑模式,而暗黑模式下的背景色、字體顏色等等和正常模式肯定是不一樣的。那么就需要監聽暗黑模式開啟關閉事件,每個UI組件都需要根據當前的模式來設置樣式。
每個組件都去監聽事件變化來 setState 肯定是不可能的,因為會造成多次渲染。
這里我們需要借助 context API 來做,我以新的 Context API 為例。如果使用老的 context API 實現該功能,需要使用發布訂閱模式來做,最后利用 react-native / react-dom 提供的 unstable_batchedUpdates 來統一更新,避免多次渲染的問題(老的 context API 在值發生變化時,如果組件中 shouldComponentUpdate 返回了 false,那么它的子孫組件就不會重新渲染了)。
順便多說一句,很多新的API出來的時候,不要急著在項目中使用,比如新的 Context API,如果你的 react 版本是 16.3.1, react-dom 版本是16.3.3,你會發現,當你的子組件是函數組件時,即是用 Context.Consumer 的形式時,你是能獲取到 context 上的值,而你的組件是個類組件時,你根本拿不到 context 上的值。
同樣的 React.forwardRef 在該版本食用時,某種情況下也有多次渲染的bug。都是血和淚的教訓,不多說了,繼續暗黑模式這個需求。
我的想法是將當前的模式(假設值為 light / dark)掛載到 context 上。其它組件直接從 context 上獲取即可。不過我們知道的是,新版的 ContextAPI 函數組件和類組件,獲取 context 的方法是不一致的。而且一個項目中有非常多的組件,每個組件都進行一次這樣的操作,也是重復的工作量。于是,高階組件就派上用場啦(PS:React16.8 版本中提供了 useContext 的 Hook,用起來很方便)
當然,這里我使用高階組件還有一個原因,就是我們的項目中還包含老的 context API (不要問我為什么不直接重構下,牽扯的人員太多了,沒法隨便改),新老 context API 在一個項目中是可以共存的,不過我們不能在同一個組件中同時使用。所以如果一個組件中已經使用的舊的 context API,要想從新的 context API 上獲取值,也需要使用高階組件來處理它。
于是,我編寫了一個 withColorTheme 的高階組件的雛形(這里也可以認為 withColorTheme 是一個返回高階組件的高階函數):
- import ThemeContext from './context';
- function withColorTheme(options={}) {
- return function(WrappedComponent) {
- return class ProxyComponent extends React.Component {
- static contextType = ThemeContext;
- render() {
- return (<WrappedComponent {...this.props} colortheme={this.context}/>)
- }
- }
- }
- }
包裝顯示名稱
上面這個雛形存在幾個問題,首先,我們沒有為 ProxyComponent 包裝顯示名稱,因此,為其加上:
- import ThemeContext from './context';
- function withColorTheme(options={}) {
- return function(WrappedComponent) {
- class ProxyComponent extends React.Component {
- static contextType = ThemeContext;
- render() {
- return (<WrappedComponent {...this.props} colortheme={this.context}/>)
- }
- }
- }
- function getDisplayName(WrappedComponent) {
- return WrappedComponent.displayName || WrappedComponent.name || 'Component';
- }
- const displayName = `WithColorTheme(${getDisplayName(WrappedComponent)})`;
- ProxyComponent.displayName = displayName;
- return ProxyComponent;
- }
我們來看一下,不包裝顯示名稱和包裝顯示名稱的區別:
React Developer Tools 中調試
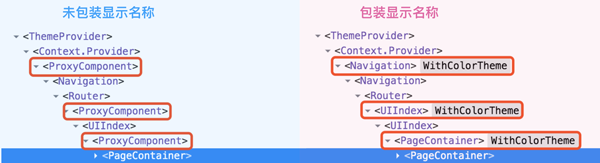
ReactNative的紅屏報錯

復制靜態方法
眾所周知,使用 HOC 包裝組件,需要復制靜態方法,如果你的 HOC 僅僅是某幾個組件使用,沒有靜態方法需要拷貝,或者需要拷貝的靜態方法是確定的,那么你手動處理一下也可以。
因為 withColorTheme 這個高階組件,最終是要提供給很多業務使用的,無法限制別人的組件寫法,因此這里我們必須將其寫得通用一些。
hoist-non-react-statics 這個依賴可以幫助我們自動拷貝非 React 的靜態方法,這里有一點需要注意,它只會幫助你拷貝非 React 的靜態方法,而非被包裝組件的所有靜態方法。我第一次使用這個依賴的時候,沒有仔細看,以為是將 WrappedComponent 上所有的靜態方法都拷貝到 ProxyComponent。然后就遇到了 XXX.propsTypes.style undefined is not an object 的紅屏報錯(ReactNative調試)。因為我沒有手動拷貝 propTypes,錯誤的以為 hoist-non-react-statics 會幫我處理了。
hoist-non-react-statics 的源碼非常短,有興趣的話,可以看一下,我當前使用的 3.3.2 版本。

因此,諸如 childContextTypes、contextType、contextTypes、defaultProps、displayName、getDefaultProps、getDerivedStateFromError、getDerivedStateFromProps
mixins、propTypes、type 等不會被拷貝,其實也比較容易理解,因為 ProxyComponent 中可能也需要設置這些,不能簡單去覆蓋。
- import ThemeContext from './context';
- import hoistNonReactStatics from 'hoist-non-react-statics';
- function withColorTheme(options={}) {
- return function(WrappedComponent) {
- class ProxyComponent extends React.Component {
- static contextType = ThemeContext;
- render() {
- return (<WrappedComponent {...this.props} colortheme={this.context}/>)
- }
- }
- }
- function getDisplayName(WrappedComponent) {
- return WrappedComponent.displayName || WrappedComponent.name || 'Component';
- }
- const displayName = `WithColorTheme(${getDisplayName(WrappedComponent)})`;
- ProxyComponent.displayName = displayName;
- ProxyComponent.WrappedComponent = WrappedComponent;
- ProxyComponent.propTypes = WrappedComponent.propTypes;
- //contextType contextTypes 和 childContextTypes 因為我這里不需要,就不拷貝了
- return ProxyComponent;
- }
現在似乎差不多了,不過呢,HOC 還有一個問題,就是 ref 傳遞的問題。如果不經過任何處理,我們通過 ref 拿到的是 ProxyComponent 的實例,而不是原本想要獲取的 WrappedComponent 的實例。
ref 傳遞
雖然我們已經用無關的 props 進行了透傳,但是 key 和 ref 不是普通的 prop,React 會對它進行特別處理。
所以這里我們需要對 ref 特別處理一下。如果你的 reac-dom 是 16.4.2 或者你的 react-native 版本是 0.59.9 以上,那么可以放心的使用 React.forwardRef 進行 ref 轉發,這樣使用起來也是最方便的。
使用 React.forwardRef 轉發
- import ThemeContext from './context';
- import hoistNonReactStatics from 'hoist-non-react-statics';
- function withColorTheme(options={}) {
- return function(WrappedComponent) {
- class ProxyComponent extends React.Component {
- static contextType = ThemeContext;
- render() {
- const { forwardRef, ...wrapperProps } = this.props;
- return <WrappedComponent {...wrapperProps} ref={forwardRef} colorTheme={ this.context } />
- }
- }
- }
- function getDisplayName(WrappedComponent) {
- return WrappedComponent.displayName || WrappedComponent.name || 'Component';
- }
- const displayName = `WithColorTheme(${getDisplayName(WrappedComponent)})`;
- ProxyComponent.displayName = displayName;
- ProxyComponent.WrappedComponent = WrappedComponent;
- ProxyComponent.propTypes = WrappedComponent.propTypes;
- //contextType contextTypes 和 childContextTypes 因為我這里不需要,就不拷貝了
- if (options.forwardRef) {
- let forwarded = React.forwardRef((props, ref) => (
- <ProxyComponent {...props} forwardRef={ref} />
- ));
- forwarded.displayName = displayName;
- forwarded.WrappedComponent = WrappedComponent;
- forwarded.propTypes = WrappedComponent.propTypes;
- return hoistNonReactStatics(forwarded, WrappedComponent);
- } else {
- return hoistNonReactStatics(ProxyComponent, WrappedComponent);
- }
- }
假設,我們對 TextInput 進行了裝飾,如 export default withColorTheme({forwardRef: true})(TextInput)。
使用: <TextInput ref={v => this.textInput = v}>
如果要獲取 WrappedComponent 的實例,直接通過 this.textInput 即可,和未使用 withColorTheme 裝飾前一樣獲取。
通過方法調用 getWrappedInstance
- import ThemeContext from './context';
- import hoistNonReactStatics from 'hoist-non-react-statics';
- function withColorTheme(options={}) {
- return function(WrappedComponent) {
- class ProxyComponent extends React.Component {
- static contextType = ThemeContext;
- getWrappedInstance = () => {
- if (options.forwardRef) {
- return this.wrappedInstance;
- }
- }
- setWrappedInstance = (ref) => {
- this.wrappedInstance = ref;
- }
- render() {
- const { forwardRef, ...wrapperProps } = this.props;
- let props = {
- ...this.props
- };
- if (options.forwardRef) {
- props.ref = this.setWrappedInstance;
- }
- return <WrappedComponent {...props} colorTheme={ this.context } />
- }
- }
- }
- function getDisplayName(WrappedComponent) {
- return WrappedComponent.displayName || WrappedComponent.name || 'Component';
- }
- const displayName = `WithColorTheme(${getDisplayName(WrappedComponent)})`;
- ProxyComponent.displayName = displayName;
- ProxyComponent.WrappedComponent = WrappedComponent;
- ProxyComponent.propTypes = WrappedComponent.propTypes;
- //contextType contextTypes 和 childContextTypes 因為我這里不需要,就不拷貝了
- if (options.forwardRef) {
- let forwarded = React.forwardRef((props, ref) => (
- <ProxyComponent {...props} forwardRef={ref} />
- ));
- forwarded.displayName = displayName;
- forwarded.WrappedComponent = WrappedComponent;
- forwarded.propTypes = WrappedComponent.propTypes;
- return hoistNonReactStatics(forwarded, WrappedComponent);
- } else {
- return hoistNonReactStatics(ProxyComponent, WrappedComponent);
- }
- }
同樣的,我們對 TextInput 進行了裝飾,如 export default withColorTheme({forwardRef: true})(TextInput)。
使用: <TextInput ref={v => this.textInput = v}>
如果要獲取 WrappedComponent 的實例,那么需要通過 this.textInput.getWrappedInstance() 獲取被包裝組件 TextInput 的實例。
最大化可組合
我先說一下,為什么我將它設計為下面這樣:
- function withColorTheme(options={}) {
- function(WrappedComponent) {
- }
- }
而不是像這樣:
- function withColorTheme(WrappedComponent, options={}) {
- }
主要是使用裝飾器語法比較方便,而且很多業務中也使用了 react-redux:
- @connect(mapStateToProps, mapDispatchToProps)
- @withColorTheme()
- export default class TextInput extends Component {
- render() {}
- }
這樣設計,可以不破壞原本的代碼結構。否則的話,原本使用裝飾器語法的業務改起來就有點麻煩。
回歸到最大化可組合,看看官方文檔怎么說:
像 connect(react-redux 提供) 函數返回的單參數 HOC 具有簽名 Component => Component。輸出類型與輸入類型相同的函數很容易組合在一起。
- // ... 你可以編寫組合工具函數
- // compose(f, g, h) 等同于 (...args) => f(g(h(...args)))
- const enhance = compose(
- // 這些都是單參數的 HOC
- withRouter,
- connect(commentSelector)
- )
- const EnhancedComponent = enhance(WrappedComponent)
compose 的源碼可以看下 redux 的實現,代碼很短。
再復雜化一下就是:
- withRouter(connect(commentSelector)(withColorTheme(options)(WrappedComponent)));
我們的 enhance 可以編寫為:
- const enhance = compose(
- withRouter,
- connect(commentSelector),
- withColorTheme(options)
- )
- const EnhancedComponent = enhance(WrappedComponent)
如果我們是寫成 XXX(WrappedComponent, options) 的形式的話,那么上面的代碼將變成:
- const EnhancedComponent = withRouter(connect(withColorTheme(WrappedComponent, options), commentSelector))
試想一下,如果還有更多的 HOC 要使用,這個代碼會變成什么樣子?
HOC的約定和注意事項
約定
- 將不相關的 props 傳遞給被包裹的組件(HOC應透傳與自身無關的 props)
- 最大化可組合性
- 包裝顯示名稱以便輕松調試
注意事項
- 不要在 render 方法中使用 HOC
React 的 diff 算法(稱為協調)使用組件標識來確定它是應該更新現有子樹還是將其丟棄并掛載新子樹。 如果從 render 返回的組件與前一個渲染中的組件相同(===),則 React 通過將子樹與新子樹進行區分來遞歸更新子樹。 如果它們不相等,則完全卸載前一個子樹。
這不僅僅是性能問題 —— 重新掛載組件會導致該組件及其所有子組件的狀態丟失。
如果在組件之外創建 HOC,這樣一來組件只會創建一次。因此,每次 render 時都會是同一個組件。
- 務必復制靜態方法
- Refs 不會被傳遞(需要額外處理)
3. 反向繼承
React 官方文檔上有這樣一段描述: HOC 不會修改傳入的組件,也不會使用繼承來復制其行為。相反,HOC 通過將組件包裝在容器組件中來組成新組件。HOC 是純函數,沒有副作用。
因此呢,我覺得反向繼承不是 React 推崇的方式,這里我們可以做一下了解,某些場景下也有可能會用到。
- 反向繼承
- function withColor(WrappedComponent) {
- class ProxyComponent extends WrappedComponent {
- //注意 ProxyComponent 會覆蓋 WrappedComponent 的同名函數,包括 state 和 props
- render() {
- //React.cloneElement(super.render(), { style: { color:'red' }})
- return super.render();
- }
- }
- return ProxyComponent;
- }
和上一節不同,反向繼承不會增加組件的層級,并且也不會有靜態屬性拷貝和 refs 丟失的問題。可以利用它來做渲染劫持,不過我目前沒有什么必須要使用反向繼承的場景。
雖然它沒有靜態屬性和 refs的問題,也不會增加層級,但是它也不是那么好用,會覆蓋同名屬性和方法這點就讓人很無奈。另外雖然可以修改渲染結果,但是不好注入 props。
4. render props
首先, render props 是指一種在 React 組件之間使用一個值為函數的 prop 共享代碼的簡單技術。
具有 render prop 的組件接受一個函數,該函數返回一個 React 元素并調用它而不是實現自己的渲染邏輯。
- <Route
- {...rest}
- render={routeProps => (
- <FadeIn>
- <Component {...routeProps} />
- </FadeIn>
- )}
- />
ReactNative 的開發者,其實 render props 的技術使用的很多,例如,FlatList 組件:
- import React, {Component} from 'react';
- import {
- FlatList,
- View,
- Text,
- TouchableHighlight
- } from 'react-native';
- class MyList extends Component {
- data = [{ key: 1, title: 'Hello' }, { key: 2, title: 'World' }]
- render() {
- return (
- <FlatList
- style={{marginTop: 60}}
- data={this.data}
- renderItem={({ item, index }) => {
- return (
- <TouchableHighlight
- onPress={() => { alert(item.title) }}
- >
- <Text>{item.title}</Text>
- </TouchableHighlight>
- )
- }}
- ListHeaderComponent={() => {
- return (<Text>以下是一個List</Text>)
- }}
- ListFooterComponent={() => {
- return <Text>沒有更多數據</Text>
- }}
- />
- )
- }
- }
例如: FlatList 的 renderItem、ListHeaderComponent 就是render prop。
注意,render prop 是因為模式才被稱為 render prop ,你不一定要用名為 render 的 prop 來使用這種模式。render prop 是一個用于告知組件需要渲染什么內容的函數 prop。
其實,我們在封裝組件的時候,也經常會應用到這個技術,例如我們封裝一個輪播圖組件,但是每個頁面的樣式是不一致的,我們可以提供一個基礎樣式,但是也要允許自定義,否則就沒有通用價值了:
- //提供一個 renderPage 的 prop
- class Swiper extends React.PureComponent {
- getPages() {
- if(typeof renderPage === 'function') {
- return this.props.renderPage(XX,XXX)
- }
- }
- render() {
- const pages = typeof renderPage === 'function' ? this.props.renderPage(XX,XXX) : XXXX;
- return (
- <View>
- <Animated.View>
- {pages}
- </Animated.View>
- </View>
- )
- }
- }
注意事項
Render Props 和 React.PureComponent 一起使用時要小心
如果在 render 方法里創建函數,那么 render props,會抵消使用 React.PureComponent 帶來的優勢。因為淺比較 props 的時候總會得到 false,并且在這種情況下每一個 render 對于 render prop 將會生成一個新的值。
- import React from 'react';
- import { View } from 'react-native';
- import Swiper from 'XXX';
- class MySwiper extends React.Component {
- render() {
- return (
- <Swiper
- renderPage={(pageDate, pageIndex) => {
- return (
- <View></View>
- )
- }}
- />
- )
- }
- }
這里應該比較好理解,這樣寫,renderPage 每次都會生成一個新的值,很多 React 性能優化上也會提及到這一點。我們可以將 renderPage 的函數定義為實例方法,如下:
- import React from 'react';
- import { View } from 'react-native';
- import Swiper from 'XXX';
- class MySwiper extends React.Component {
- renderPage(pageDate, pageIndex) {
- return (
- <View></View>
- )
- }
- render() {
- return (
- <Swiper
- renderPage={this.renderPage}
- />
- )
- }
- }
如果你無法靜態定義 prop,則 <Swiper> 應該擴展 React.Component,因為也沒有淺比較的必要了,就不要浪費時間去比較了。
5. Hooks
Hook 是 React 16.8 的新增特性,它可以讓你在不編寫 class 的情況下使用 state 以及其他的 React 特性。HOC 和 render props 雖然都可以
React 已經內置了一些 Hooks,如: useState、useEffect、useContext、useReducer、useCallback、useMemo、useRef 等 Hook,如果你還不清楚這些 Hook,那么可以優先閱讀一下官方文檔。
我們主要是將如何利用 Hooks 來進行組件邏輯復用。假設,我們有這樣一個需求,在開發環境下,每次渲染時,打印出組件的 props。
- import React, {useEffect} from 'react';
- export default function useLogger(componentName,...params) {
- useEffect(() => {
- if(process.env.NODE_ENV === 'development') {
- console.log(componentName, ...params);
- }
- });
- }
使用時:
- import React, { useState } from 'react';
- import useLogger from './useLogger';
- export default function Counter(props) {
- let [count, setCount] = useState(0);
- useLogger('Counter', props);
- return (
- <div>
- <button onClick={() => setCount(count + 1)}>+</button>
- <p>{`${props.title}, ${count}`}</p>
- </div>
- )
- }
另外,官方文檔自定義 Hook 章節也一步一步演示了如何利用 Hook 來進行邏輯復用。我因為版本限制,還沒有在項目中應用 Hook ,雖然文檔已經看過多次。讀到這里,一般都會有一個疑問,那就是 Hook 是否會替代 render props 和 HOC,關于這一點,官方也給出了答案:
通常,render props 和高階組件只渲染一個子節點。我們認為讓 Hook 來服務這個使用場景更加簡單。這兩種模式仍有用武之地,例如,FlatList 組件的 renderItem 等屬性,或者是 一個可見的容器組件或許會有它自己的 DOM 結構。但在大部分場景下,Hook 足夠了,并且能夠幫助減少嵌套。
HOC 最最最討厭的一點就是層級嵌套了,如果項目是基于新版本進行開發,那么需要邏輯復用時,優先考慮 Hook,如果無法實現需求,那么再使用 render props 和 HOC 來解決。