代碼詳解:用Pytorch訓練快速神經網絡的9個技巧
事實上,你的模型可能還停留在石器時代的水平。估計你還在用32位精度或*GASP(一般活動仿真語言)*訓練,甚至可能只在單GPU上訓練。如果市面上有99個加速指南,但你可能只看過1個?(沒錯,就是這樣)。但這份終極指南,會一步步教你清除模型中所有的(GP模型)。
這份指南的介紹從簡單到復雜,一直介紹到你可以完成的大多數PITA修改,以充分利用你的網絡。例子中會包括一些Pytorch代碼和相關標記,可以在 Pytorch-Lightning訓練器中用,以防大家不想自己敲碼!
這份指南針對的是誰? 任何用Pytorch研究非瑣碎的深度學習模型的人,比如工業研究人員、博士生、學者等等……這些模型可能要花費幾天,甚至幾周、幾個月的時間來訓練。
指南(從易到難)
- 使用DataLoader。
- DataLoader中的進程數。
- 批尺寸。
- 累積梯度。
- 保留計算圖。
- 轉至單GPU。
- 16位混合精度訓練。
- 轉至多GPU(模型復制)。
- 轉至多GPU節點(8+GPUs)。
- 有關模型加速的思考和技巧
Pytorch-Lightning
文中討論的各種優化,都可以在名為Pytorch-Lightning
(https://github.com/williamFalcon/pytorch-lightning?source=post_page) 的Pytorch圖書館中找到。
Lightning是基于Pytorch的一個光包裝器,它可以幫助研究人員自動訓練模型,但關鍵的模型部件還是由研究人員完全控制。
參照此篇教程,獲得更有力的范例
(https://github.com/williamFalcon/pytorch-lightning/blob/master/examples/new_project_templates/single_gpu_node_template.py?source=post_page)。
Lightning采用最新、最尖端的方法,將犯錯的可能性降到最低。
MNIST定義的Lightning模型
(https://github.com/williamFalcon/pytorch-lightning/blob/master/examples/new_project_templates/lightning_module_template.py?source=post_page),可適用于訓練器。
- from pytorch-lightning import Trainer
- model = LightningModule(…)
- trainer = Trainer()
- trainer.fit(model)
1. DataLoader
這可能是最容易提速的地方。靠保存h5py或numpy文件來加速數據加載的日子已經一去不復返了。用 Pytorch dataloader
(https://pytorch.org/tutorials/beginner/data_loading_tutorial.html?source=post_page)加載圖像數據非常簡單。(關于NLP數據,請參照TorchText:
https://torchtext.readthedocs.io/en/latest/datasets.html?source=post_page)
- dataset = MNIST(root=self.hparams.data_root, traintrain=train, download=True)
- loader = DataLoader(dataset, batch_size=32, shuffle=True)
- for batch in loader:
- x, y = batch
- model.training_step(x, y)
- ...
在Lightning中,你無需指定一個訓練循環,只需定義dataLoaders,訓練器便會在 需要時調用它們
(https://github.com/williamFalcon/pytorch-lightning/blob/master/examples/new_project_templates/lightning_module_template.py?source=post_page---------------------------#L163-L217)。
2. DataLoaders中的進程數
加快速度的第二個秘訣在于允許批量并行加載。所以,你可以一次加載許多批量,而不是一次加載一個。
- # slow
- loader = DataLoader(dataset, batch_size=32, shuffle=True)
- # fast (use 10 workers)
- loader = DataLoader(dataset, batch_size=32, shuffle=True, num_workers=10)
3. 批量大小(Batch size)
在開始下一步優化步驟之前,將批量大小調高到CPU內存或GPU內存允許的最大值。
接下來的部分將著重于減少內存占用,這樣就可以繼續增加批尺寸。
記住,你很可能需要再次更新學習率。如果將批尺寸增加一倍,最好將學習速度也提高一倍。
4. 累積梯度
假如已經最大限度地使用了計算資源,而批尺寸仍然太低(假設為8),那我們則需為梯度下降模擬更大的批尺寸,以供精準估計。
假設想讓批尺寸達到128。然后,在執行單個優化器步驟前,將執行16次前向和后向傳播(批量大小為8)。
- # clear last step
- optimizer.zero_grad()
- # 16 accumulated gradient steps
- scaled_loss = 0
- for accumulated_step_i in range(16):
- out = model.forward()
- loss = some_loss(out,y)
- loss.backward()
- scaled_loss += loss.item()
- # update weights after 8 steps. effective batch = 8*16
- optimizer.step()
- # loss is now scaled up by the number of accumulated batches
- actual_loss = scaled_loss / 16
而在Lightning中,這些已經自動執行了。只需設置標記:
https://williamfalcon.github.io/pytorch-lightning/Trainer/Training%20Loop/?source=post_page---------------------------#accumulated-gradients
- trainer = Trainer(accumulate_grad_batches=16)
- trainer.fit(model)
5. 保留計算圖
撐爆內存很簡單,只要不釋放指向計算圖形的指針,比如……為記錄日志保存loss。
- losses = []
- ...
- losses.append(loss)
- print(f'current loss: {torch.mean(losses)'})
上述的問題在于,loss仍然有一個圖形副本。在這種情況中,可用.item()來釋放它。
- # bad
- losses.append(loss)
- # good
- losses.append(loss.item())
Lightning會特別注意,讓其無法保留圖形副本 (示例:
https://github.com/williamFalcon/pytorch-lightning/blob/master/pytorch_lightning/models/trainer.py?source=post_page---------------------------#L767-L768)
6. 單GPU訓練
一旦完成了前面的步驟,就可以進入GPU訓練了。GPU的訓練將對許多GPU核心上的數學計算進行并行處理。能加速多少取決于使用的GPU類型。個人使用的話,推薦使用2080Ti,公司使用的話可用V100。
剛開始你可能會覺得壓力很大,但其實只需做兩件事: 1)將你的模型移動到GPU上,2)在用其運行數據時,把數據導至GPU中。
- # put model on GPU
- model.cuda(0)
- # put data on gpu (cuda on a variable returns a cuda copy)
- xx = x.cuda(0)
- # runs on GPU now
- model(x)
如果使用Lightning,則不需要對代碼做任何操作。只需設置標記
(https://williamfalcon.github.io/pytorch-lightning/Trainer/Distributed%20training/?source=post_page---------------------------#single-gpu):
- # ask lightning to use gpu 0 for training
- trainer = Trainer(gpus=[0])
- trainer.fit(model)
在GPU進行訓練時,要注意限制CPU和GPU之間的傳輸量。
- # expensive
- xx = x.cuda(0)
- # very expensive
- xx = x.cpu()
- xx = x.cuda(0)
例如,如果耗盡了內存,不要為了省內存,將數據移回CPU。嘗試用其他方式優化代碼,或者在用這種方法之前先跨GPUs分配代碼。
此外還要注意進行強制GPUs同步的操作。例如清除內存緩存。
- # really bad idea.Stops all the GPUs until they all catch up
- torch.cuda.empty_cache()
但是如果使用Lightning,那么只有在定義Lightning模塊時可能會出現這種問題。Lightning特別注意避免此類錯誤。
7. 16位精度
16位精度可以有效地削減一半的內存占用。大多數模型都是用32位精度數進行訓練的。然而最近的研究發現,使用16位精度,模型也可以很好地工作。混合精度指的是,用16位訓練一些特定的模型,而權值類的用32位訓練。
要想在Pytorch中用16位精度,先從NVIDIA中安裝 apex 圖書館 并對你的模型進行這些更改。
- # enable 16-bit on the model and the optimizer
- model, optimizers = amp.initialize(model, optimizers, opt_level='O2')
- # when doing .backward, let amp do it so it can scale the loss
- with amp.scale_loss(loss, optimizer) as scaled_loss:
- scaled_loss.backward()
amp包會處理大部分事情。如果梯度爆炸或趨于零,它甚至會擴大loss。
在Lightning中, 使用16位很簡單
(https://williamfalcon.github.io/pytorch-lightning/Trainer/Distributed%20training/?source=post_page---------------------------#16-bit-mixed-precision),不需對你的模型做任何修改,也不用完成上述操作。
- trainer = Trainer(amp_level=’O2', use_amp=False)
- trainer.fit(model)
8. 移至多GPU
現在,事情就變得有意思了。有3種(也許更多?)方式訓練多GPU。
(1) 分批量訓練
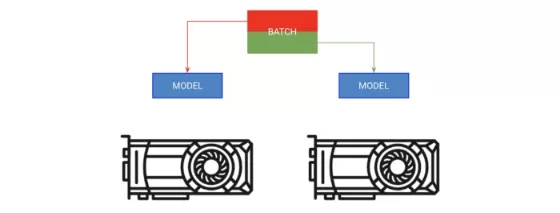
A)在每個GPU上復制模型;B)給每個GPU分配一部分批量。
第一種方法叫做分批量訓練。這一策略將模型復制到每個GPU上,而每個GPU會分到該批量的一部分。
- # copy model on each GPU and give a fourth of the batch to each
- model = DataParallel(model, devices=[0, 1, 2 ,3])
- # out has 4 outputs (one for each gpu)
- out = model(x.cuda(0))
在Lightning中,可以直接指示訓練器增加GPU數量,而無需完成上述任何操作。
- # ask lightning to use 4 GPUs for training
- trainer = Trainer(gpus=[0, 1, 2, 3])
- trainer.fit(model)
(2) 分模型訓練
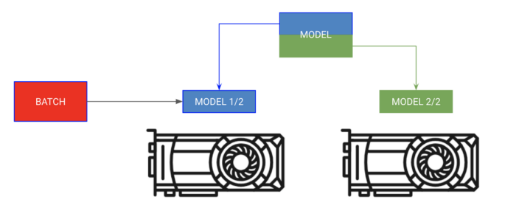
將模型的不同部分分配給不同的GPU,按順序分配批量
有時模型可能太大,內存不足以支撐。比如,帶有編碼器和解碼器的Sequence to Sequence模型在生成輸出時可能會占用20gb的內存。在這種情況下,我們希望把編碼器和解碼器放在單獨的GPU上。
- # each model is sooo big we can't fit both in memory
- encoder_rnn.cuda(0)
- decoder_rnn.cuda(1)
- # run input through encoder on GPU 0
- out = encoder_rnn(x.cuda(0))
- # run output through decoder on the next GPU
- out = decoder_rnn(x.cuda(1))
- # normally we want to bring all outputs back to GPU 0
- outout = out.cuda(0)
對于這種類型的訓練,無需將Lightning訓練器分到任何GPU上。與之相反,只要把自己的模塊導入正確的GPU的Lightning模塊中:
- class MyModule(LightningModule):
- def __init__():
- self.encoder = RNN(...)
- self.decoder = RNN(...)
- def forward(x):
- # models won't be moved after the first forward because
- # they are already on the correct GPUs
- self.encoder.cuda(0)
- self.decoder.cuda(1)
- out = self.encoder(x)
- out = self.decoder(out.cuda(1))
- # don't pass GPUs to trainer
- model = MyModule()
- trainer = Trainer()
- trainer.fit(model)
(3) 混合兩種訓練方法
在上面的例子中,編碼器和解碼器仍然可以從并行化每個操作中獲益。我們現在可以更具創造力了。
- # change these lines
- self.encoder = RNN(...)
- self.decoder = RNN(...)
- # to these
- # now each RNN is based on a different gpu set
- self.encoder = DataParallel(self.encoder, devices=[0, 1, 2, 3])
- self.decoder = DataParallel(self.encoder, devices=[4, 5, 6, 7])
- # in forward...
- out = self.encoder(x.cuda(0))
- # notice inputs on first gpu in device
- sout = self.decoder(out.cuda(4)) # <--- the 4 here
(4) 使用多GPUs時需注意的事項
- 如果該設備上已存在model.cuda(),那么它不會完成任何操作。
- 始終輸入到設備列表中的第一個設備上。
- 跨設備傳輸數據非常昂貴,不到萬不得已不要這樣做。
- 優化器和梯度將存儲在GPU 0上。因此,GPU 0使用的內存很可能比其他處理器大得多。
9. 多節點GPU訓練
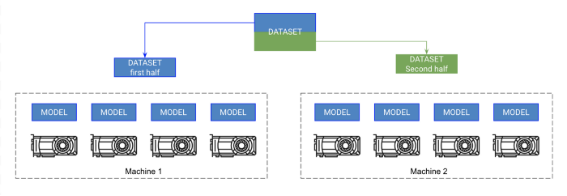
每臺機器上的各GPU都可獲取一份模型的副本。每臺機器分得一部分數據,并僅針對該部分數據進行訓練。各機器彼此同步梯度。
做到了這一步,就可以在幾分鐘內訓練Imagenet數據集了! 這沒有想象中那么難,但需要更多有關計算集群的知識。這些指令假定你正在集群上使用SLURM。
Pytorch在各個GPU上跨節點復制模型并同步梯度,從而實現多節點訓練。因此,每個模型都是在各GPU上獨立初始化的,本質上是在數據的一個分區上獨立訓練的,只是它們都接收來自所有模型的梯度更新。
高級階段:
- 在各GPU上初始化一個模型的副本(確保設置好種子,使每個模型初始化到相同的權值,否則操作會失效。)
- 將數據集分成子集。每個GPU只在自己的子集上訓練。
- On .backward() 所有副本都會接收各模型梯度的副本。只有此時,模型之間才會相互通信。
Pytorch有一個很好的抽象概念,叫做分布式數據并行處理,它可以為你完成這一操作。要使用DDP(分布式數據并行處理),需要做4件事:
- def tng_dataloader():
- d = MNIST()
- # 4: Add distributed sampler
- # sampler sends a portion of tng data to each machine
- dist_sampler = DistributedSampler(dataset)
- dataloader = DataLoader(d, shuffle=False, sampler=dist_sampler)
- def main_process_entrypoint(gpu_nb):
- # 2: set up connections between all gpus across all machines
- # all gpus connect to a single GPU "root"
- # the default uses env://
- world = nb_gpus * nb_nodes
- dist.init_process_group("nccl", rank=gpu_nb, worldworld_size=world)
- # 3: wrap model in DPP
- torch.cuda.set_device(gpu_nb)
- model.cuda(gpu_nb)
- model = DistributedDataParallel(model, device_ids=[gpu_nb])
- # train your model now...
- if __name__ == '__main__':
- # 1: spawn number of processes
- # your cluster will call main for each machine
- mp.spawn(main_process_entrypoint, nprocs=8)
Pytorch團隊對此有一份詳細的實用教程
(https://github.com/pytorch/examples/blob/master/imagenet/main.py?source=post_page---------------------------)。
然而,在Lightning中,這是一個自帶功能。只需設定節點數標志,其余的交給Lightning處理就好。
- # train on 1024 gpus across 128 nodes
- trainer = Trainer(nb_gpu_nodes=128, gpus=[0, 1, 2, 3, 4, 5, 6, 7])
Lightning還附帶了一個SlurmCluster管理器,可助你簡單地提交SLURM任務的正確細節(示例:
https://github.com/williamFalcon/pytorch-lightning/blob/master/examples/new_project_templates/multi_node_cluster_template.py?source=post_page---------------------------#L103-L134)
10. 福利!更快的多GPU單節點訓練
事實證明,分布式數據并行處理要比數據并行快得多,因為其唯一的通信是梯度同步。因此,最好用分布式數據并行處理替換數據并行,即使只是在做單機訓練。
在Lightning中,通過將distributed_backend設置為ddp(分布式數據并行處理)并設置GPU的數量,這可以很容易實現。
- # train on 4 gpus on the same machine MUCH faster than DataParallel
- trainer = Trainer(distributed_backend='ddp', gpus=[0, 1, 2, 3])
有關模型加速的思考和技巧
如何通過尋找瓶頸來思考問題?可以把模型分成幾個部分:
- 首先,確保數據加載中沒有瓶頸。為此,可以使用上述的現有數據加載方案,但是如果沒有適合你的方案,你可以把離線處理及超高速緩存作為高性能數據儲存,就像h5py一樣。
- 接下來看看在訓練過程中該怎么做。確保快速轉發,避免多余的計算,并將CPU和GPU之間的數據傳輸最小化。最后,避免降低GPU的速度(在本指南中有介紹)。
- 接下來,最大化批尺寸,通常來說,GPU的內存大小會限制批量大小。自此看來,這其實就是跨GPU分布,但要最小化延遲,有效使用大批次(例如在數據集中,可能會在多個GPUs上獲得8000+的有效批量大小)。
但是需要小心處理大批次。根據具體問題查閱文獻,學習一下別人是如何處理的!