


Redisson 全面解析:從使用方法到工作原理的深度探索
Redisson是基于原生redis操作指令上進一步的封裝,屏蔽了redis數據結構的實現細節,開發可以像操作普通java對象一樣使用redis,而本文將針對Redisson中各種使用的數據結構和工具包使用及其實現進行詳盡的分析,希望對你有幫助。

一、詳解Redisson基本數據類型
1. Redisson前置配置說明
使用redisson的方式比較簡單,我們首先需要引入redisson的依賴包:
<dependency>
            <groupId>org.redisson</groupId>
            <artifactId>redisson-spring-boot-starter</artifactId>
            <version>3.23.5</version>
        </dependency>
然后我們指明redis的ip、端口等配置即可:
spring.redis.host=localhost
spring.redis.port=6379
有了上述配置后,我們就可以快速完成redisson客戶端配置:
@Configuration
public class RedissonConfig {

    @Autowired
    private RedisProperties redisProperties;


    @Bean
    public RedissonClient redissonClient() {
        Config config = new Config();
        String redisUrl = String.format("redis://%s:%s", redisProperties.getHost() + "",
                redisProperties.getPort() + "");
        config.useSingleServer().setAddress(redisUrl);
        return Redisson.create(config);
    }


}
后續在進行使用的時候,我們直接注入對應的客戶端依賴即可:
@Autowired
    private RedissonClient redissonClient;
2. 以bucket維度操作字符串
和我們第一次使用redis一樣,我們先用redisson完成一個字符串的鍵值對存儲,對應的使用例子如下所示,我們只需拿到對應的test-key的bucket即可進行讀寫操作:
//生成 test-key 的bucket
        RBucket<Object> bucket = redissonClient.getBucket("test-key");
        //查看對應的bucket是否存在
        if (ObjUtil.isEmpty(bucket.get())) {
            //基于set指令進行插入
            bucket.set("test-value");
            //嘗試通過get獲取值
            Object value = bucket.get();
            log.info("value:{}", value);
        }
對于RBucket對象的set和get操作本質上都是基于redis字符串操作指令set和get的一層封裝,在我們調用getBucket獲取對應key的bucket的時候,redisson會基于當前客戶端的連接信息和bucket鍵進行一次封裝得到一個test-key的bucket對象:
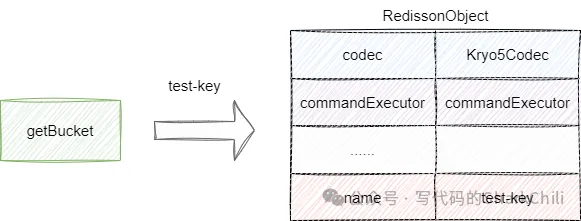
對應的我們給出getBucket的底層實現,可以看到邏輯操作就是封裝維護如下這份信息:
- 編碼器和解碼器codec,默認情況下是Kryo5Codec
- 執行命令的commandExecutor,該對象記錄redis客戶端的基本信息。
- name也就是我們要操作的key的信息,也就是字符串key。
public RedissonObject(Codec codec, CommandAsyncExecutor commandExecutor, String name) {
        this.codec = codec;
        this.commandExecutor = commandExecutor;
        if (name == null) {
            throw new NullPointerException("name can't be null");
        }

        setName(name);
    }
然后就是執行set指令了,我們都知道redisson是基于Netty封裝的redis操作工具,所以在進行redis操作時涉及了大量優秀的異步讀寫涉及,我們以上文set操作為例,實際上其底層執行時做了如下幾件事:
- 基于傳入的key,也就是我們的test-key定位到slot地址。
- 獲取到上一步封裝的編碼器codec。
- 本次執行是set請求,所以如果我們采用主從模式進行部署,這一步是會從主庫獲取連接信息,因為我們就配置了一臺redis,所以默認直接從默認庫獲取連接。
- 基于連接信息發送指令。
- 完成操作后歸還連接。
這些步驟完成后,操作結果會被封裝為Future對象,如果需要直到執行結果,我們調用get即可知曉處理情況:

對應的我們也給出set的源碼入口,如筆者所說其底層就是一個set操作的異步調用setAsync,通過該回調會得到一個RFuture對象,通過get即可獲取結果:
@Override
    public void set(V value) {
     //基于setAsync提交異步set操作,然后通過get獲取執行結果
        get(setAsync(value));
    }
對應的我們步入setAsync可以看到它會拿著我們上一步初始化所得來的key名稱、編碼器、set操作指令對象以及編碼后的value值通過commandExecutor進行異步寫入到redis服務端:
@Override
    public RFuture<Void> setAsync(V value) {
       //......
  //基于各種信息通過commandExecutor進行異步提交
        return commandExecutor.writeAsync(getRawName(), codec, RedisCommands.SET, getRawName(), encode(value));
    }
我們再次步入即可來到第一個核心步驟,通過key獲取到slot,因為我們部署結構是單體,所以source拿到的是默認值0,然后調用async正式執行異步寫操作:
@Override
    public <T, R> RFuture<R> writeAsync(String key, Codec codec, RedisCommand<T> command, Object... params) {
     //定位slot
        NodeSource source = getNodeSource(key);
        //執行異步寫
        return async(false, source, codec, command, params, false, false);
    }
步入async即可看到我們的最核心的步驟了,該方法內部會通過RedisExecutor執行execute方法,大體就是執行了上圖所說的:
- 獲取編碼器
- 基于讀寫請求獲取連接,注意獲取連接的操作是異步的
- 得到連接后調用sendCommand發送set請求,其內部本質上就是基于netty所封裝的socketChannel執行set操作。
- 完成寫操作后釋放連接
public void execute() {
         //......
  //1. 獲取編碼器
        codec = getCodec(codec);
  //2.基于讀寫請求獲取連接,注意獲取連接的操作是異步的
        CompletableFuture<RedisConnection> connectionFuture = getConnection();


    //......
  //3. 得到連接后調用sendCommand發送set請求
        connectionFuture.whenComplete((connection, e) -> {
              //......

            sendCommand(attemptPromise, connection);

           //......
        });

        attemptPromise.whenComplete((r, e) -> {
         //完成操作后釋放連接
            releaseConnection(attemptPromise, connectionFuture);

            checkAttemptPromise(attemptPromise, connectionFuture);
        });
    }
3. 以Java API風格操作redis列表
列表操作就是對于redis列表的封裝,可以看到redisson給出的操作函數完全按照java開發的習慣命名:
RList<Object> list = redissonClient.getList("list");
        //循環添加元素
        for (int i = 0; i < 10; i++) {
            list.add(i);
        }
        //移除索引0位置的元素
        list.remove(0);
getList和上述bucket操作類似這里就不多追贅述,這里我們就看看add的實現細節,本質上它就是異步調用redis的RPUSH指令將元素追加到列表末尾,整體流程原理和上述set操作差不多,這里就不多做贅述了:
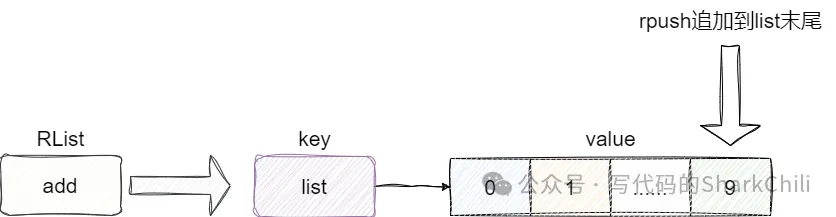
對應的我們也給出底層源碼的核心部分的介紹:
@Override
    public boolean add(V e) {
        return get(addAsync(e));
    }

    @Override
    public RFuture<Boolean> addAsync(V e) {
    //異步執行rpush指令將元素追加到末尾
        return addAsync(e, RPUSH_BOOLEAN);
    }
4. 以Java API格式操作字典
映射集也就是我們java中常說的map,redisson底層使用的就是redis的dict字典,對應示例如下所示,注意這個put方法,每次操作后它會有一個返回值,即如果這個key存在于redis中,那么本次put擦咯做結束后就會返回覆蓋前的值,就像下面這段代碼一樣,第二次put操作后就會返回value1:
RMap<String, String> hashMap = redissonClient.getMap("hashMap");
   //使用put操作,如果這個key存在則返回這個key原有的value值
        String res = hashMap.put("key1", "value1");
        log.info("before res:{}", res);
        res = hashMap.put("key1", "value2");
        log.info("after res:{}", res);
這里我們也給出put的核心實現,對應的核心代碼就是RedissonMap中的putAsync方法,大體邏輯是進行key和value的檢查之后,調用putOperationAsync生成一個異步put操作的任務并得到一個future,最后封裝成mapWriterFuture返回:
@Override
    public RFuture<V> putAsync(K key, V value) {
     //進行鍵值對檢查
        checkKey(key);
        checkValue(value);
        //基于putOperationAsync執行鍵值對插入操作
        RFuture<V> future = putOperationAsync(key, value);
        if (hasNoWriter()) {
            return future;
        }
        //返回結果
        return mapWriterFuture(future, new MapWriterTask.Add(key, value));
    }
所以來到putOperationAsync即可看到這段核心代碼的實現,本質上為了保證返回覆蓋前的值,redis用到的lua腳本,該腳本的執行流程為:
- 調用hget判斷key是否存在若存在用v記錄這個值。
- 調用hset進行鍵值對設置。
- 返回v即覆蓋前的值。

對應的我們也給出這段源代碼示例:
protected RFuture<V> putOperationAsync(K key, V value) {
        String name = getRawName(key);
        return commandExecutor.evalWriteAsync(name, codec, RedisCommands.EVAL_MAP_VALUE,
                "local v = redis.call('hget', KEYS[1], ARGV[1]); "
                + "redis.call('hset', KEYS[1], ARGV[1], ARGV[2]); "
                + "return v",
                Collections.singletonList(name), encodeMapKey(key), encodeMapValue(value));
    }
5. 詳解redisson自實現的阻塞隊列
我們再來個阻塞隊列的例子,整體使用也和java的阻塞隊列差不多:
RBlockingQueue<String> blockingQueue = redissonClient.getBlockingQueue("blockingQueue");
        //添加元素
        blockingQueue.put("element");
        //取出元素
        String value = blockingQueue.take();

        log.info("value:{}", value);
實際上隊列的實現也是基于redis的列表,通過rpush實現入隊,lpop實現出隊:
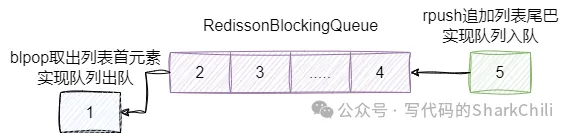
對應我們也給出入隊的代碼核心實現印證這一點:
@Override
    public RFuture<Void> putAsync(V e) {
     //使用rpush模擬入隊
        return addAsync(e, RedisCommands.RPUSH_VOID);
    }
用blpop實現出隊操作:
@Override
    public RFuture<V> takeAsync() {
        return commandExecutor.writeAsync(getRawName(), codec, RedisCommands.BLPOP_VALUE, getRawName(), 0);
    }
6. 詳解redisson自實現延遲隊列
在上文中我們給出阻塞隊列的概念,實際上redisson在此基礎上更進一步的封裝做出了一個延遲隊列的設計,如下面這段示例,該代碼會在5s后提交給blockingQueue一個element元素,通過blockingQueue的take方法即可實現5s后準時出去元素:
//創建延遲隊列
        RBlockingQueue<String> blockingQueue = redissonClient.getBlockingQueue("blockingQueue");
        RDelayedQueue<String> delayedQueue = redissonClient.getDelayedQueue(blockingQueue);

        //添加元素
        delayedQueue.offer("element", 5, TimeUnit.SECONDS);


        //取出元素
        long begin = System.currentTimeMillis();
        String value = blockingQueue.take();
        long end = System.currentTimeMillis();

        log.info("value:{} cost:{}ms", value, end - begin);
對應的我們也給出這段代碼示例的輸出結果,可以看到阻塞隊列必須等到5s左右才能得到元素:
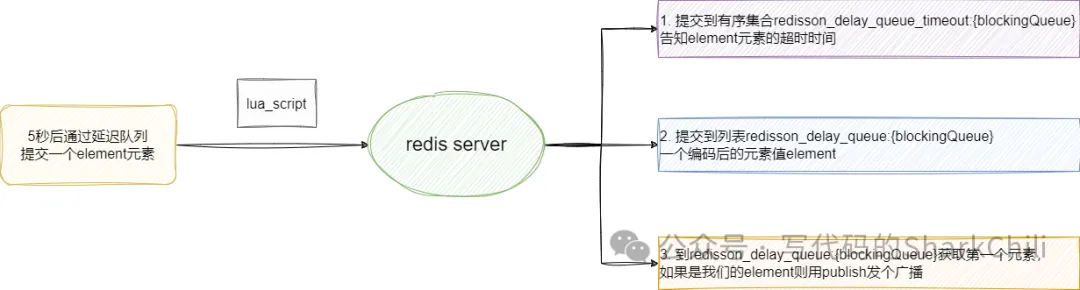
2025-01-14 10:52:27.134 INFO 17684 --- [ main] com.sharkChili.TestRunner : value:element cost:5034ms其實現原理也很簡單,上述代碼我們指明了隊列名稱為blockingQueue,在使用offer進行延遲提交本質上就是通過lua腳本實現元素延遲提交,其工作內容為:
- 基于我們給定的名稱blockingQueue生成一個有序集合redisson_delay_queue_timeout:{blockingQueue}告知element元素的超時時間。
- 基于我們給定的名稱blockingQueue生成列表redisson_delay_queue:{blockingQueue}一個編碼后的元素值element。
- 到有序集合redisson_delay_queue:{blockingQueue}中查看第一個元素是否是當前元素,如果是則通過publish發送一個給redisson_delay_queue_channel:{blockingQueue}這個topic告知元素提交的到期時間。
對應的我們給出offer底層的實現,可以看到該方法通過我們傳入的時間得到一個超時后的時間,然后封裝成lua腳本,也就是我們上面所說的含義提交到redis服務端:
public RFuture<Void> offerAsync(V e, long delay, TimeUnit timeUnit) {
//......
//計算超時后的時間
long delayInMs = timeUnit.toMillis(delay);
long timeout = System.currentTimeMillis() + delayInMs;
//生成隨機數構成一個唯一的lua腳本
byte[] random = getServiceManager().generateIdArray(8);
//基于隨機數生成lua腳本
return commandExecutor.evalWriteNoRetryAsync(getRawName(), codec, RedisCommands.EVAL_VOID,
"local value = struct.pack('Bc0Lc0', string.len(ARGV[2]), ARGV[2], string.len(ARGV[3]), ARGV[3]);"
//提交到超時隊列redisson_delay_queue_timeout:{blockingQueue}記錄元素value插入的時間為ARGV[1],即入參中的timeout
+ "redis.call('zadd', KEYS[2], ARGV[1], value);"
//提交到元素隊列redisson_delay_queue:{blockingQueue}當前元素值為element
+ "redis.call('rpush', KEYS[3], value);"
//從redisson_delay_queue_timeout:{blockingQueue}獲取第一個元素,如果是當前元素則通過redisson_delay_queue_channel:{blockingQueue}這個channel發布元素的到期時間為ARGV[1],即入參中的timeout
+ "local v = redis.call('zrange', KEYS[2], 0, 0); "
+ "if v[1] == value then "
+ "redis.call('publish', KEYS[4], ARGV[1]); "
+ "end;",
//這個list代表keys列表,getRawName是blockingqueue、timeout就是redisson_delay_queue_timeout:{blockingQueue}、queueName就是redisson_delay_queue:{blockingQueue}、channel就是基于redisson_delay_queue_channel:{blockingQueue}
Arrays.asList(getRawName(), timeoutSetName, queueName, channelName),
//代表arg timeout即超時的時間,random是隨機數、e就是我們本次插入的編碼后的element
timeout, random, encode(e));
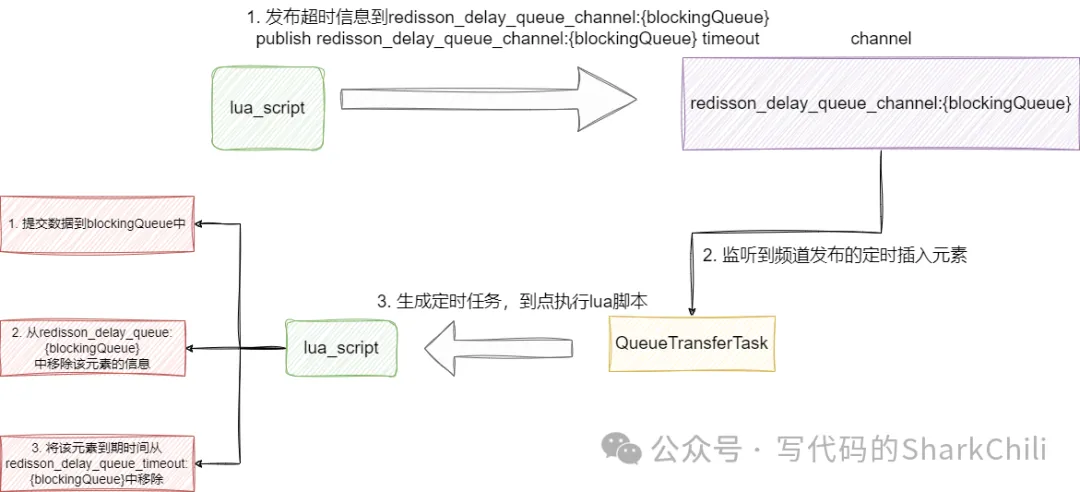
}基于上述的執行腳本,我們的延遲隊列在初始化時會創建一個QueueTransferTask,從上一步發布到redisson_delay_queue_channel:{blockingQueue}的信息,這個QueueTransferTask會監聽到元素的到期時間然后生成一個定時任務,到點后執行如下邏輯:
- 從redisson_delay_queue_timeout:{blockingQueue}這個超時隊列中獲取到期的元素。
- 將元素值提交到blockingQueue中。
- 將本次延遲提交的元素從redisson_delay_queue_timeout:{blockingQueue}、redisson_delay_queue:{blockingQueue}中移除。
由此一次完整的元素提交就成功了:
對應的我們給出延遲隊列的初始化代碼,它會進行各種隊列初始化的任務提交工作,整體步驟為:
- 基于傳入的blockingQueue生成channel、列表、超時隊列。
- 它會創建一個lua腳本,內容就是上面所說的延遲提交入隊列然后移除延遲提交的任務信息。
- 調用schedule啟動task。
protected RedissonDelayedQueue(QueueTransferService queueTransferService, Codec codec, final CommandAsyncExecutor commandExecutor, String name) {
        super(codec, commandExecutor, name);
        //基于傳入的blockingQueue生成channel、列表、超時隊列-
        channelName = prefixName("redisson_delay_queue_channel", getRawName());
        queueName = prefixName("redisson_delay_queue", getRawName());
        timeoutSetName = prefixName("redisson_delay_queue_timeout", getRawName());

        QueueTransferTask task = new QueueTransferTask(commandExecutor.getServiceManager()) {

            @Override
            protected RFuture<Long> pushTaskAsync() {
             //基于初始化的channel、元素列表、延遲隊列信息生成lua提交
                return commandExecutor.evalWriteAsync(getRawName(), LongCodec.INSTANCE, RedisCommands.EVAL_LONG,
                        "local expiredValues = redis.call('zrangebyscore', KEYS[2], 0, ARGV[1], 'limit', 0, ARGV[2]); "
                      + "if #expiredValues > 0 then "
                          + "for i, v in ipairs(expiredValues) do "
                              + "local randomId, value = struct.unpack('Bc0Lc0', v);"
                              + "redis.call('rpush', KEYS[1], value);"
                              + "redis.call('lrem', KEYS[3], 1, v);"
                          + "end; "
                          + "redis.call('zrem', KEYS[2], unpack(expiredValues));"
                      + "end; "
                        // get startTime from scheduler queue head task
                      + "local v = redis.call('zrange', KEYS[2], 0, 0, 'WITHSCORES'); "
                      + "if v[1] ~= nil then "
                         + "return v[2]; "
                      + "end "
                      + "return nil;",
                      Arrays.asList(getRawName(), timeoutSetName, queueName),
                      System.currentTimeMillis(), 100);
            }
           //初始化channel的topic為 channelName
            @Override
            protected RTopic getTopic() {
                return RedissonTopic.createRaw(LongCodec.INSTANCE, commandExecutor, channelName);
            }
        };
        //調用schedule提交這個task
        queueTransferService.schedule(queueName, task);

       //......
    }
對應我們步入這個schedule方法即可看到,封裝的task啟動后會執行會監聽redisson_delay_queue_channel:{blockingqueue}得到元素的到期時間并基于這個時間到點執行提交隊列的lua腳本:
public void start() {
 //獲取到上一步初始化的channel即redisson_delay_queue_channel:{blockingqueue}
        RTopic schedulerTopic = getTopic();
       //......
        //訂閱這個channel收到消息后,基于對應的startTime即延遲提交元素的到期時間通過scheduleTask執行上述的lua腳本將元素提交至blockingqueue中
        messageListenerId = schedulerTopic.addListener(Long.class, new MessageListener<Long>() {
            @Override
            public void onMessage(CharSequence channel, Long startTime) {
                scheduleTask(startTime);
            }
        });
    }
如下以來我們只需通過阻塞隊列的task方法就可以等到元素到期后取出,完成邏輯閉環。
二、更多關于Redisson
1. 詳解Redisson 中的原子類
因為redis執行用戶指令是單線程的,所以針對key執行INCR即可實現元素自增,所以redisson也利用到這一點封裝了一個原子類,對應的使用示例如下:
RAtomicLong atomicLong = redissonClient.getAtomicLong("atomicLong");
        atomicLong.incrementAndGet();
        log.info("atomicLong = {}", atomicLong.get());
2. 詳解redisson中的發布訂閱模型
對應發布訂閱模型,redisson也做了很好的封裝時,使用時的api也非常方便,如下所示,通過publish即可發布消息,通過addListener即可得到對應的channel和message:
CountDownLatch countDownLatch = new CountDownLatch(2);
        //訂閱topic消息
        new Thread(() -> {
            RTopic topic = redissonClient.getTopic("topic");
            topic.addListener(String.class, (c, m) -> {
                log.info("c:{},m:{}", c, m);
            });
            countDownLatch.countDown();
        }).start();

        //發布消息到topic
        new Thread(() -> {
            RTopic topic = redissonClient.getTopic("topic");
            topic.publish("hello redssion");
            countDownLatch.countDown();
        }).start();

        countDownLatch.await();
        log.info("finish");
三、小結
本文演示了redisson幾個常用的數據結構以及一些簡單并發流程工具使用示例和底層源碼分析,希望對你有幫助。


