譯者 | 崔皓
審校 | 重樓
開篇
在本教程中,你將使用 Google 的 Gemini API 構建人工智能驅動的字幕生成器。我們將創建一個名為“AI-Subtitle-Generator”的項目,該項目的前端使用 React,后端使用 Express。準備好了嗎?讓我們馬上出發吧!

先決條件
在構建項目之前,你需要對React 和 Express 有基本了解。
Gemini API 是什么?
Google 的 Gemini API 是一款功能強大的工具,可讓你將高級 AI 功能集成到你的應用程序中。 Gemini 是多模態模型,它支持用戶使用各種類型的輸入,例如文本、圖像、音頻和視頻等。
它擅長分析和處理大量文本,特別是從視頻中提取信息的能力,非常適合字幕生成器的項目。
如何獲取 API 密鑰
API 密鑰充當唯一標識符并驗證你對服務的請求。它對于訪問和使用 Gemini AI 的功能至關重要。這個密鑰將允許我們的應用程序與 Gemini 進行通信,也是構建該項目的關鍵因素。
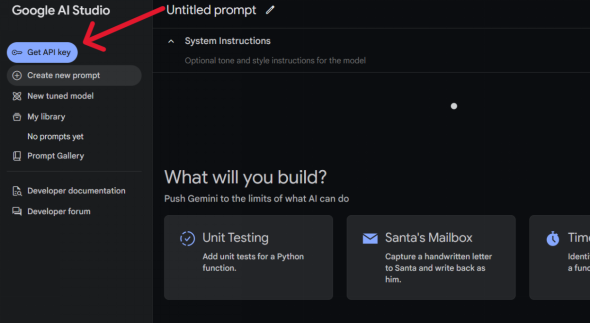
如下圖所示,進入Google AI Studio ,然后點擊“獲取 API 密鑰”(Get API key):
在打開的API KEY 頁面中,單擊“創建 API 密鑰”:
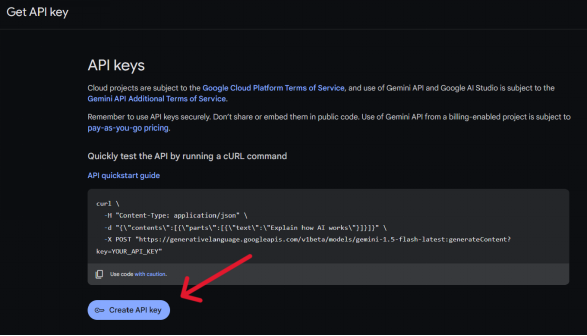
該操作將創建一個新的 API 密鑰,并復制密鑰對其進行妥善保存。
這個就是訪問Gemini API的 密鑰。此密鑰用于驗證應用程序對 Gemini API 的請求。每次應用程序向 Gemini 發送請求時,都必須包含此密鑰。 Gemini 使用此密鑰來驗證請求是否來自授權來源。如果沒有此 API 密鑰,請求將被拒絕,同時應用也無法訪問 Gemini 的服務。
項目設置
首先,基于項目創建一個新文件夾。我們稱之為ai-subtitle-generator 。
在ai-subtitle-generator文件夾內,創建兩個子文件夾: client和server 。 client文件夾將包含 React 前端, server文件夾將包含 Express 后端。
前端設置
我們先將重點關注放到前端,并設置一個基本的 React 應用程序。
通過如下命令,導航到client文件夾:
cd client使用Vite創建一個新的React項目。執行如下命令:
npm create vite@latest .根據提示時,選擇“React”、“React + TS”或者“React + JS”。在本教程中,將使用 React + TS。當然你也可以根據喜好選擇其他的選項。
接下來,使用以下命令安裝依賴項:
npm install然后啟動開發服務器:
npm run dev在前端處理文件上傳
現在在client/src/App.tsx中,添加以下代碼:
//  client/src/App.tsx
const App = () => {
    const handleSubmit = async (e: React.FormEvent<HTMLFormElement>): Promise<void> => {
    e.preventDefault();
    try {
      const formData = new FormData(e.currentTarget);
      console.log(formData)
    } catch (error) {
      console.log(error);
    }
  };

  return (
    <div>
      <form onSubmit={handleSubmit}>
        <input type="file" accept="video/*,.mkv" name="video" />
        <input type="submit" />
      </form>
    </div>
  );
};
export default App;
在上面的代碼中,我們使用了一個輸入標簽來接受視頻并將其命名為video 。該名稱將附加到FormData對象中。
在將視頻發送到服務器的過程中,使用到了“鍵值對“的發送方式,其中”鍵“是video ,值是文件數據。
為什么是鍵值對?因為當服務器收到請求時,它需要解析傳入的塊。解析后,視頻數據將在req.files[key]中使用,其中key是前端分配的名稱(在本例中為video )。
這就是為什么使用FormData對象的原因。當創建一個新的FormData實例并將e.target傳遞給它時,所有表單字段及其名稱將自動生成鍵值對的形式。
服務器設置
目前為止,我們已經獲取了API 密鑰,接著需要設置后端服務器。該服務器將處理來自前端上傳的視頻,并與 Gemini API 進行通信從而生成字幕。
通過如下命令,導航到server文件夾:
cd server并初始化項目:
npm init -y然后安裝必要的包:
npm install express dotenv cors @google/generative-ai express-fileupload nodemon這些是在此項目中使用的后端依賴項:
- express :用于創建后端 API 的 Web 框架。
- dotenv :從.env文件加載環境變量。
- cors :啟用跨源資源共享,允許前端與后端進行通信。
- @google/generative-ai :用于與 Gemini API 交互的 Google AI 庫。
- express-fileupload :處理文件上傳,可以輕松訪問服務器上上傳的文件。
- nodemon :更改代碼時,自動重新啟動服務器。
設置環境變量
現在,創建一個名為.env的文件。可以在此處管理 API 密鑰。
//.env
API_KEY = YOUR_API_API
PORT = 3000
更新package.json
對于該項目,我們使用 ES6 模塊而不是 CommonJS。要啟用此功能,請使用以下代碼更新你的package.json文件:
{
  "name": "server",
  "version": "1.0.0",
  "main": "index.js",
  "type": "module",       //Add "type": "module" to enable ES6 modules
  "scripts": {
    "start": "node server.js",
    "dev": "nodemon server.js"    //configure nodemon
  },
  "keywords": [],
  "author": "",
  "license": "ISC",
  "description": "",
  "dependencies": {
    "@google/generative-ai": "^0.21.0",
    "cors": "^2.8.5",
    "dotenv": "^16.4.7",
    "express": "^4.21.1",
    "express-fileupload": "^1.5.1",
    "nodemon": "^3.1.7"
  }
}
Express 的基本設置
創建文件server.js 。現在,讓我們設置一個基本的 Express 應用程序。
//  server/server.js

import express from "express";
import { configDotenv } from "dotenv";
import fileUpload from "express-fileupload";
import cors from "cors"

const app = express();

configDotenv();           //configure the env
app.use(fileUpload());    //it will parse the mutipart data
app.use(express.json());  // Enable JSON parsing for request bodies
app.use(cors())           //configure cors

app.use("/api/subs",subRoutes);  // Use routes for the "/api/subs" endpoint

app.listen(process.env.PORT, () => {   //access the PORT from the .env
  console.log("server started");
});
在代碼中,我們創建一個 Express 應用程序實例,然后加載環境變量。該環境變量可以用來保存API 密鑰等敏感數據。接下來,利用中間件: fileUpload準備服務器來接收上傳的視頻, express.json允許接收 JSON 數據, cors允許前端和后端之間的通信。
接著,定義路由(/api/subs)來處理與字幕生成相關的所有請求。路由的具體邏輯將在subs.routes.js中體現。最后,啟動服務器,告訴它監聽.env文件中定義的端口,從而保證請求響應。
然后,創建一系列文件夾來管理代碼。當然,也可以在單個文件中管理代碼,但將其構建到單獨的文件夾進行管理會更加方便、更加清晰。
下面是服務器的最終文件夾結構:
server/
├── server.js
├── controller/
│ └── subs.controller.js
├── gemini/
│ ├── gemini.config.js
├── routes/
│ └── subs.routes.js
├── uploads/
├── utils/
│ ├── fileUpload.js
│ └── genContent.js
└── .env
注意:現在不必擔心創建此文件夾結構。這僅供參考。跟著文章一步步來,在后面的內容中會逐步搭建這個結構。
創建路由
創建一個routes文件夾,然后創建subs.routes.js文件如下 :
// server/routes/sub.routes.js
import express from "express"
import { uploadFile } from "../controller/subs.controller.js"    // import the uploadFile function from the controller folder

const router = express.Router()

router.post("/",uploadFile)    // define a POST route that calls the uploadFile function

export default router     // export the router to use in the main server.js file
此代碼定義了服務器的路由,特別是處理視頻上傳和字幕生成的路由。
使用express.Router()創建一個新的路由器實例。這使我們能夠定義新的路由,該路由可以獨立于主服務器路由,從而改進代碼組織結構,使之更加清晰。在 API 接入點的根路徑("/")處定義 POST 路由。當對此路由發出 POST 請求時(當用戶在前端提交視頻上傳表單時會發生),將調用uploadFile函數。該函數將處理實際的上傳和字幕生成。
最后,我們導出路由器,以便可以在主服務器文件(server.js)中使用它來將此路由連接到主應用程序。
配置Gemini
接下來的任務就是配置應用程序如何與 Gemini 交互。
創建一個gemini文件夾,然后創建一個名為gemini.config.js的新文件:
//  server/gemini/gemini.config.js

import {
  GoogleGenerativeAI,
  HarmBlockThreshold,
  HarmCategory,
} from "@google/generative-ai";
import { configDotenv } from "dotenv";
configDotenv();

const genAI = new GoogleGenerativeAI(process.env.API_KEY);  // Initialize Google Generative AI with the API key

const safetySettings = [
  {
    category: HarmCategory.HARM_CATEGORY_HARASSMENT,
    threshold: HarmBlockThreshold.BLOCK_NONE,
  },
  {
    category: HarmCategory.HARM_CATEGORY_HATE_SPEECH,
    threshold: HarmBlockThreshold.BLOCK_NONE,
  },
  {
    category: HarmCategory.HARM_CATEGORY_DANGEROUS_CONTENT,
    threshold: HarmBlockThreshold.BLOCK_NONE,
  },
  {
    category: HarmCategory.HARM_CATEGORY_SEXUALLY_EXPLICIT,
    threshold: HarmBlockThreshold.BLOCK_NONE,
  },
];

const model = genAI.getGenerativeModel({
  model: "gemini-1.5-flash-001",    //choose the model
  safetySettings: safetySettings,   //optional safety settings
});
export default model;    //export the model
在上面的代碼中, safetySettings是可選的。這些設置允許你定義 Gemini 輸出中潛在有害內容(例如仇恨言論、暴力或露骨內容)的閾值。
創建一個控制器來處理端點邏輯
創建一個controller文件夾,并在其中創建一個名為subs.controller.js的文件。在此文件中,你將處理與 Gemini 模型交互的端點邏輯。
在 server/controller/subs.controller.js ,添加這段代碼:
// server/controller/subs.controller.js

import { fileURLToPath } from "url";
import path from "path";
import fs from "fs";

const __filename = fileURLToPath(import.meta.url);  //converts the module URL to a file path
const __dirname = path.dirname(__filename);   //get the current file directory

export const uploadFile = async (req, res) => {
  try {
    if (!req.files || !req.files.video) {   //if there is no file available, return error to the client
      return res.status(400).json({ error: "No video uploaded" });
    }

    const videoFile = req.files.video;   //access the video
    const uploadDir = path.join(__dirname, "..", "uploads");   //path to upload the video temporarily

    if (!fs.existsSync(uploadDir)) {   //check if the directory exists
      fs.mkdirSync(uploadDir);      //if not create a new one
    }

    const uploadPath = path.join(uploadDir, videoFile.name);

    await videoFile.mv(uploadPath);  //it moves the video from the buffer to the "upload" folder

    return res.status(200).json({ message:"file uploaded sucessfully" });
  } catch (error) {
    return res
      .status(500)
      .json({ error: "Internal server error: " + error.message });
  }
};
由于我們使用的是 ES6 模塊,因此__dirname默認情況下不可用。與 CommonJS 相比,文件處理機制有所不同。因此,將使用fileURLToPath來處理文件路徑。
將文件從默認的臨時位置(緩沖區)移動到uploads夾。
但文件上傳過程尚未完成。我們仍然需要將文件發送到Google AI文件管理器,上傳后,它會返回一個URI,模型會使用這個URI進行視頻分析。
如何將文件上傳到 Google AI 文件管理器
創建文件夾utils并創建文件fileUpload.js 。你可以參考上面提供的文件夾結構。
//  server/utils/fileUpload.js

import { GoogleAIFileManager, FileState } from "@google/generative-ai/server";
import { configDotenv } from "dotenv";
configDotenv();

export const fileManager = new GoogleAIFileManager(process.env.API_KEY);  //create a new GoogleAIFileManager instance

export async function fileUpload(path, videoData) {
  try {
    const uploadResponse = await fileManager.uploadFile(path, {   //give the path as an argument
      mimeType: videoData.mimetype,
      displayName: videoData.name,
    });
    const name = uploadResponse.file.name;
    let file = await fileManager.getFile(name);
    while (file.state === FileState.PROCESSING) {     //check the state of the file
      process.stdout.write(".");
      await new Promise((res) => setTimeout(res, 10000));   //check every 10 second
      file = await fileManager.getFile(name);
    }
    if (file.state === FileState.FAILED) {
      throw new Error("Video processing failed");
    }
    return file;   // return the file object, containing the upload file information and the uri
  } catch (error) {
    throw error;
  }
}
在上面的代碼中,我們創建了一個名為fileUpload的函數,它帶有兩個參數。這些參數將從控制器函數傳遞,我們稍后將對其進行設置。
fileUpload函數使用fileManager.uploadFile方法將視頻發送到 Google 的服務器。此方法需要兩個參數:文件路徑和包含文件元數據(其 MIME 類型和顯示名稱)的對象。
由于 Google 服務器上的視頻處理需要時間,因此我們需要檢查文件的狀態。我們使用一個循環來執行此操作,該循環使用fileManager.getFile()每 10 秒檢查一次文件的狀態。只要文件的狀態為PROCESSING,循環就會繼續。一旦狀態更改為SUCCESS或FAILED ,循環就會停止。
然后,該函數檢查處理是否成功。如果是,則返回文件對象,其中包含有關上傳和處理的視頻的信息,包括其 URI。否則,如果狀態為FAILED ,該函數將引發錯誤。
將 URI 傳遞給 Gemini 模型
在utils文件夾中,創建一個名為genContent.js的文件:
// server/utils/genContent.js

import model from "../gemini/gemini.config.js";
import { configDotenv } from "dotenv";
configDotenv();

export async function getContent(file) {
  try {
    const result = await model.generateContent([
      {
        fileData: {
          mimeType: file.mimeType,
          fileUri: file.uri,
        },
      },
      {
        text: "You need to write a subtitle for this full video, write the subtitle in the SRT format, don't write anything else other than a subtitle in the response, create accurate subtitle.",
      },
    ]);
    return result.response.text();
  } catch (error) {
    throw error;
  }
}
導入我們之前配置的模型。創建一個名為getContent的函數。 getContent函數獲取文件對象(從fileUpload函數返回)。
將文件 URI 和mimi傳遞給模型。然后,我們將提供提示,指示模型為整個視頻生成 SRT 格式的字幕。如果需要,你還可以添加提示。然后返回響應。
更新subs.controller.js文件
最后,我們需要更新控制器文件。我們已經創建了fileUpload和getContent函數,現在我們將在控制器中使用它們并提供所需的參數。
在 server/controller/subs.controller.js :
//  server/controller/subs.controller.js

import { fileURLToPath } from "url";
import path from "path";
import fs from "fs";
import { fileUpload } from "../utils/fileUpload.js";
import { getContent } from "../utils/genContent.js";

const __filename = fileURLToPath(import.meta.url);
const __dirname = path.dirname(__filename);

export const uploadFile = async (req, res) => {
  try {
    if (!req.files || !req.files.video) {
      return res.status(400).json({ error: "No video uploaded" });
    }

    const videoFile = req.files.video;
    const uploadDir = path.join(__dirname, "..", "uploads");

    if (!fs.existsSync(uploadDir)) {
      fs.mkdirSync(uploadDir);
    }

    const uploadPath = path.join(uploadDir, videoFile.name);

    await videoFile.mv(uploadPath);

    const response = await fileUpload(uploadPath, req.files.video);  //we pass 'uploadPath' and the video file data to 'fileUpload'
    const genContent = await getContent(response);   //the 'response' (containing the file URI) is passed to 'getContent'

    return res.status(200).json({ subs: genContent });   //// return the generated subtitles to the client
  } catch (error) {
    console.error("Error uploading video:", error);
    return res
      .status(500)
      .json({ error: "Internal server error: " + error.message });
  }
};
至此,后臺API就完成了。現在,我們將繼續更新前端。
更新前端
我們的前端目前只允許用戶選擇視頻。在本節中,我們將更新它以將視頻數據發送到后端進行處理。然后,前端將從后端接收生成的字幕并啟動.srt文件的下載。
導航到client文件夾:
cd client安裝axios 。我們將使用它來處理 HTTP 請求。
npm install axios在client/src/App.tsx中:
//   client/src/App.tsx

import axios from "axios";

const App = () => {
  const handleSubmit = async (e: React.FormEvent<HTMLFormElement>): Promise<void> => {
    e.preventDefault();
    try {
      const formData = new FormData(e.currentTarget);
      // sending a POST request with form data
      const response = await axios.post(
        "http://localhost:3000/api/subs/",
        formData
      );
// creating a Blob from the server response and triggering the file download
      const blob = new Blob([response.data.subs], { type: "text/plain" });
      const link = document.createElement("a");
      link.href = URL.createObjectURL(blob);
      link.download = "subtitle.srt";
      link.click();
      link.remove();
    } catch (error) {
      console.log(error);
    }
  };

  return (
    <div>
      <form onSubmit={handleSubmit}>
        <input type="file" accept="video/*,.mkv" name="video" />
        <input type="submit" />
      </form>
    </div>
  );
};
export default App;
axios向后端 API 端點(/api/subs)發出 POST 請求。服務器將處理視頻,這可能需要一些時間。
服務器發送生成的字幕后,前端接收它們作為響應。為了處理此響應并允許用戶下載字幕,我們將使用 Blob。 Blob(二進制大對象)是一種 Web API 對象,表示原始二進制數據,本質上就像文件一樣。在我們的例子中,從服務器返回的字幕將被轉換為 Blob,然后可以在用戶的瀏覽器中觸發下載。
概括
在本教程中,你學習了如何使用 Google 的 Gemini API、React 和 Express 構建人工智能驅動的字幕生成器。你可以上傳視頻,發送到Gemini API進行字幕生成,并提供生成的字幕供下載。
結論
就是這樣!你已使用 Gemini API 成功構建了人工智能驅動的字幕生成器。為了更快地進行測試,請從較短的視頻剪輯(3-5 分鐘)開始。較長的視頻可能需要更多時間來處理。
想要創建可定制的視頻提示應用程序嗎?只需添加一個輸入字段,讓用戶輸入提示,將該提示發送到服務器,并使用它代替硬編碼的提示。僅此而已。
譯者介紹
崔皓,51CTO社區編輯,資深架構師,擁有18年的軟件開發和架構經驗,10年分布式架構經驗。