SpringBoot3之Web編程
一、簡介
基于web包的依賴,SpringBoot可以快速啟動一個web容器,簡化項目的開發(fā);
在web開發(fā)中又涉及如下幾個功能點:
攔截器:可以讓接口被訪問之前,將請求攔截到,通過對請求的識別和校驗,判斷請求是否允許通過;
頁面交互:對于服務端的開發(fā)來說,需要具備簡單的頁面開發(fā)能力,解決部分場景的需求;
Swagger接口:通過簡單的配置,快速生成接口的描述,并且提供對接口的測試能力;
Junit測試:通過編寫代碼的方式對接口進行測試,從而完成對接口的檢查和驗證,并且可以不入侵原代碼結構;
二、工程搭建
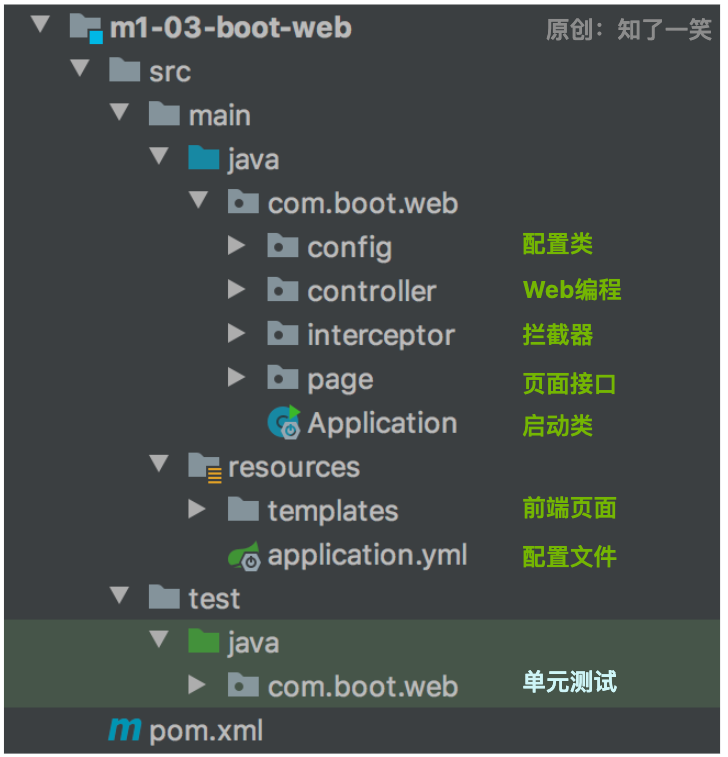
1、工程結構
 圖片
圖片
2、依賴管理
<!-- 基礎框架組件 -->
<dependency>
    <groupId>org.springframework.boot</groupId>
    <artifactId>spring-boot-starter-web</artifactId>
    <version>${spring-boot.version}</version>
</dependency>
<!-- 接口文檔組件 -->
<dependency>
    <groupId>org.springdoc</groupId>
    <artifactId>springdoc-openapi-starter-webmvc-ui</artifactId>
    <version>${springdoc.version}</version>
</dependency>
<!-- 前端頁面組件 -->
<dependency>
    <groupId>org.springframework.boot</groupId>
    <artifactId>spring-boot-starter-thymeleaf</artifactId>
    <version>${spring-boot.version}</version>
</dependency>
<!-- 單元測試組件 -->
<dependency>
    <groupId>org.springframework.boot</groupId>
    <artifactId>spring-boot-starter-test</artifactId>
    <version>${spring-boot.version}</version>
    <exclusions>
        <exclusion>
            <groupId>org.slf4j</groupId>
            <artifactId>slf4j-api</artifactId>
        </exclusion>
    </exclusions>
</dependency>
<dependency>
    <groupId>junit</groupId>
    <artifactId>junit</artifactId>
    <version>${junit.version}</version>
</dependency>
三、Web開發(fā)
1、接口開發(fā)
編寫四個簡單常規(guī)的接口,從對資源操作的角度,也就是常說的:增Post、刪Delete、改Put、查Get,并且使用了swagger注解,可以快速生成接口文檔;
@RestController
@Tag(name = "Rest接口")
public class RestWeb {

    @Operation(summary = "Get接口")
    @GetMapping("rest/get/{id}")
    public String restGet(@PathVariable Integer id) {
        return "OK:"+id;
    }

    @Operation(summary = "Post接口")
    @PostMapping("/rest/post")
    public String restPost(@RequestBody ParamBO param){
        return "OK:"+param.getName();
    }

    @Operation(summary = "Put接口")
    @PutMapping("/rest/put")
    public String restPut(@RequestBody ParamBO param){
        return "OK:"+param.getId();
    }

    @Operation(summary = "Delete接口")
    @DeleteMapping("/rest/delete/{id}")
    public String restDelete(@PathVariable Integer id){
        return "OK:"+id;
    }
}
2、頁面交互
對于服務端開發(fā)來說,在部分場景下是需要進行簡單的頁面開發(fā)的,比如通過頁面渲染再去生成文件,或者直接通過頁面填充郵件內(nèi)容等;
數(shù)據(jù)接口
@Controller
public class PageWeb {

    @RequestMapping("/page/view")
    public ModelAndView pageView (HttpServletRequest request){
        ModelAndView modelAndView = new ModelAndView() ;
        // 普通參數(shù)
        modelAndView.addObject("name", "cicada");
        modelAndView.addObject("time", "2023-07-12");
        // 對象模型
        modelAndView.addObject("page", new PageBO(7,"頁面數(shù)據(jù)模型"));
        // List集合
        List<PageBO> pageList = new ArrayList<>() ;
        pageList.add(new PageBO(1,"第一頁"));
        pageList.add(new PageBO(2,"第二頁"));
        modelAndView.addObject("pageList", pageList);
        // Array數(shù)組
        PageBO[] pageArr = new PageBO[]{new PageBO(6,"第六頁"),new PageBO(7,"第七頁")} ;
        modelAndView.addObject("pageArr", pageArr);
        modelAndView.setViewName("/page-view");
        return modelAndView ;
    }
}
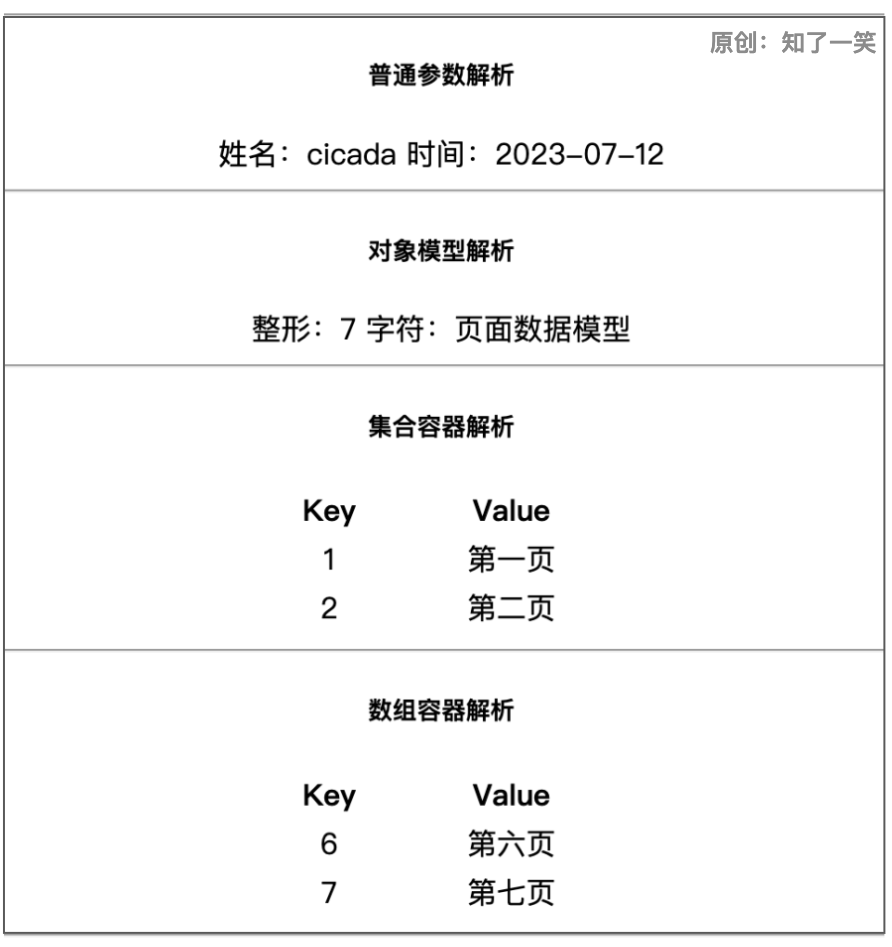
頁面解析:分別解析了普通參數(shù),實體對象,集合容器,數(shù)組容器等幾種數(shù)據(jù)模型;
<div style="text-align: center">
    <hr/>
    <h5>普通參數(shù)解析</h5>
    姓名:<span th:text="${name}"></span>
    時間:<span th:text="${time}"></span>
    <hr/>
    <h5>對象模型解析</h5>
    整形:<span th:text="${page.getKey()}"></span>
    字符:<span th:text="${page.getValue()}"></span>
    <hr/>
    <h5>集合容器解析</h5>
    <table style="margin:0 auto;width: 200px">
        <tr>
            <th>Key</th>
            <th>Value</th>
        </tr>
        <tr th:each="page:${pageList}">
            <td th:text="${page.getKey()}"></td>
            <td th:text="${page.getValue()}"></td>
        </tr>
    </table>
    <hr/>
    <h5>數(shù)組容器解析</h5>
    <table style="margin:0 auto;width: 200px">
        <tr>
            <th>Key</th>
            <th>Value</th>
        </tr>
        <tr th:each="page:${pageArr}">
            <td th:text="${page.getKey()}"></td>
            <td th:text="${page.getValue()}"></td>
        </tr>
    </table>
    <hr/>
</div>
效果圖展示
 圖片
圖片
四、攔截器
1、攔截器定義
通過實現(xiàn)HandlerInterceptor接口,完成對兩個攔截器的自定義,請求在訪問服務時,必須通過兩個攔截器的校驗;
/**
 * 攔截器一
 */
public class HeadInterceptor implements HandlerInterceptor {
    private static final Logger log  = LoggerFactory.getLogger(HeadInterceptor.class);
    @Override
    public boolean preHandle(HttpServletRequest request, HttpServletResponse response,
                             Object handler) throws Exception {
        log.info("HeadInterceptor:preHandle");
        Iterator<String> headNames = request.getHeaderNames().asIterator();
        log.info("request-header");
        while (headNames.hasNext()){
            String headName = headNames.next();
            String headValue = request.getHeader(headName);
            System.out.println(headName+":"+headValue);
        }
        // 放開攔截
        return true;
    }
    @Override
    public void postHandle(HttpServletRequest request,HttpServletResponse response,
                           Object handler, ModelAndView modelAndView) throws Exception {
        log.info("HeadInterceptor:postHandle");
    }
    @Override
    public void afterCompletion(HttpServletRequest request,HttpServletResponse response,
                                Object handler, Exception e) throws Exception {
        log.info("HeadInterceptor:afterCompletion");
    }
}

/**
 * 攔截器二
 */
public class BodyInterceptor implements HandlerInterceptor {
    private static final Logger log  = LoggerFactory.getLogger(BodyInterceptor.class);
    @Override
    public boolean preHandle(HttpServletRequest request,HttpServletResponse response,
                             Object handler) throws Exception {
        log.info("BodyInterceptor:preHandle");
        Iterator<String> paramNames = request.getParameterNames().asIterator();
        log.info("request-param");
        while (paramNames.hasNext()){
            String paramName = paramNames.next();
            String paramValue = request.getParameter(paramName);
            System.out.println(paramName+":"+paramValue);
        }
        // 放開攔截
        return true;
    }
    @Override
    public void postHandle(HttpServletRequest request,HttpServletResponse response,
                           Object handler, ModelAndView modelAndView) throws Exception {
        log.info("BodyInterceptor:postHandle");
    }
    @Override
    public void afterCompletion(HttpServletRequest request,HttpServletResponse response,
                                Object handler, Exception e) throws Exception {
        log.info("BodyInterceptor:afterCompletion");
    }
}
2、攔截器配置
自定義攔截器之后,還需要添加到web工程的配置文件中,可以通過實現(xiàn)WebMvcConfigurer接口,完成自定義的配置添加;
@Configuration
public class WebMvcConfig implements WebMvcConfigurer {

    /**
     * 添加自定義攔截器
     */
    @Override
    public void addInterceptors(InterceptorRegistry registry) {
        registry.addInterceptor(new HeadInterceptor()).addPathPatterns("/**");
        registry.addInterceptor(new BodyInterceptor()).addPathPatterns("/**");
    }
}
五、測試工具
1、Swagger接口
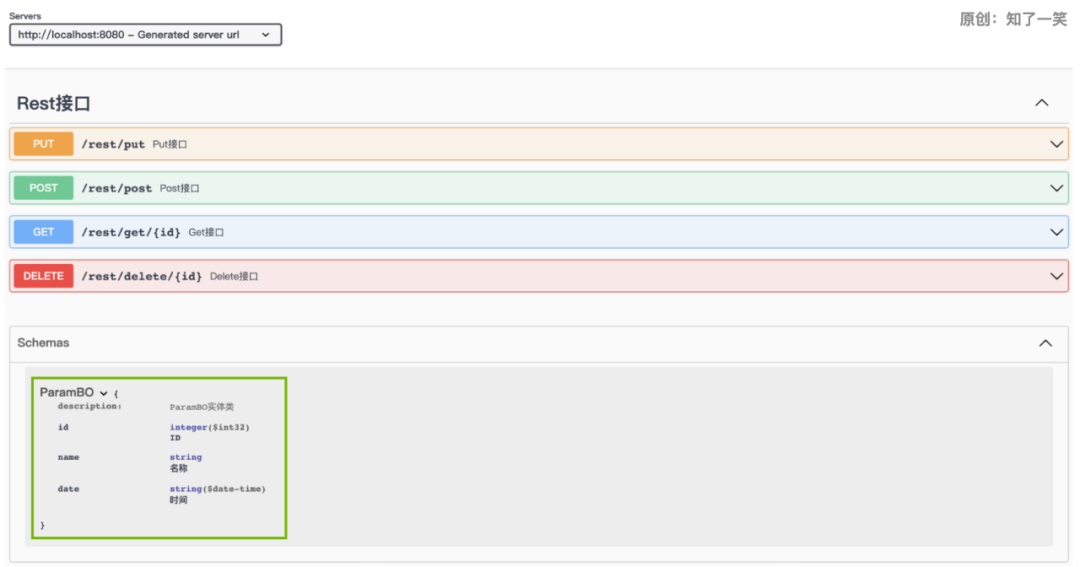
添加上述的springdoc依賴之后,還可以在配置文件中簡單定義一些信息,訪問IP:端口/swagger-ui/index.html即可;
@Configuration
public class WebMvcConfig implements WebMvcConfigurer {

    /**
     * 接口文檔配置
     */
    @Bean
    public OpenAPI openAPI() {
        return new OpenAPI()
                .info(new Info().title("【boot-web】").description("Rest接口文檔-2023-07-11")
                .version("1.0.0"));
    }
}
圖片
圖片
2、Junit測試
在個人的習慣上,Swagger接口文檔更偏向在前后端對接的時候使用,而Junit單元測試更符合開發(fā)的時候使用,這里是對RestWeb中的接口進行測試;
@RunWith(SpringRunner.class)
@SpringBootTest
@AutoConfigureMockMvc
public class RestWebTest {

    @Autowired
    private MockMvc mockMvc;

    @Test
    public void testGet () throws Exception {
        // GET接口測試
        MvcResult mvcResult = mockMvc
                .perform(MockMvcRequestBuilders.get("/rest/get/1"))
                .andReturn();
        printMvcResult(mvcResult);
    }

    @Test
    public void testPost () throws Exception {
        // 參數(shù)模型
        JsonMapper jsonMapper = new JsonMapper();
        ParamBO param = new ParamBO(null,"單元測試",new Date()) ;
        String paramJson = jsonMapper.writeValueAsString(param) ;
        // Post接口測試
        MvcResult mvcResult = mockMvc.perform(MockMvcRequestBuilders.post("/rest/post")
                .contentType(MediaType.APPLICATION_JSON)
                .accept(MediaType.APPLICATION_JSON).content(paramJson)).andReturn();
        printMvcResult(mvcResult);
    }

    @Test
    public void testPut () throws Exception {
        // 參數(shù)模型
        JsonMapper jsonMapper = new JsonMapper();
        ParamBO param = new ParamBO(7,"Junit組件",new Date()) ;
        String paramJson = jsonMapper.writeValueAsString(param) ;
        // Put接口測試
        MvcResult mvcResult = mockMvc.perform(MockMvcRequestBuilders.put("/rest/put")
                .contentType(MediaType.APPLICATION_JSON)
                .accept(MediaType.APPLICATION_JSON).content(paramJson)).andReturn();
        printMvcResult(mvcResult);
    }

    @Test
    public void testDelete () throws Exception {
        // Delete接口測試
        MvcResult mvcResult = mockMvc
                .perform(MockMvcRequestBuilders.delete("/rest/delete/2"))
                .andReturn();
        printMvcResult(mvcResult);
    }

    /**
     * 打印【MvcResult】信息
     */
    private void printMvcResult (MvcResult mvcResult) throws Exception {
        System.out.println("請求-URI【"+mvcResult.getRequest().getRequestURI()+"】");
        System.out.println("響應-status【"+mvcResult.getResponse().getStatus()+"】");
        System.out.println("響應-content【"+mvcResult.getResponse().getContentAsString(StandardCharsets.UTF_8)+"】");
    }
}
六、參考源碼
文檔倉庫:
https://gitee.com/cicadasmile/butte-java-note

源碼倉庫:
https://gitee.com/cicadasmile/butte-spring-parent


