教你使用TensorFlow2對識別驗證碼
驗證碼是根據(jù)隨機字符生成一幅圖片,然后在圖片中加入干擾象素,用戶必須手動填入,防止有人利用機器人自動批量注冊、灌水、發(fā)垃圾廣告等等 。
數(shù)據(jù)集來源:https://www.kaggle.com/fournierp/captcha-version-2-images
圖片是5個字母的單詞,可以包含數(shù)字。這些圖像應(yīng)用了噪聲(模糊和一條線)。它們是200 x 50 PNG。我們的任務(wù)是嘗試制作光學字符識別算法的模型。
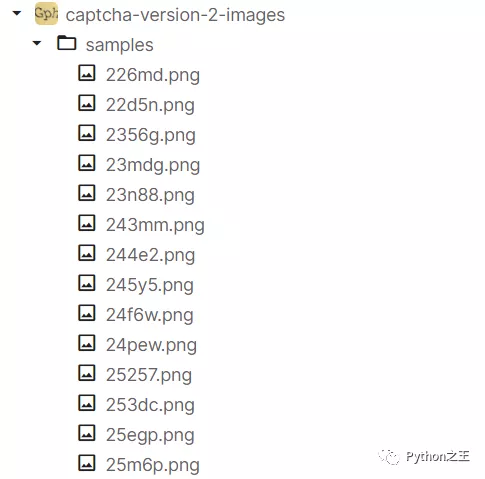
在數(shù)據(jù)集中存在的驗證碼png圖片,對應(yīng)的標簽就是圖片的名字。
- import os
- import numpy as np
- import pandas as pd
- import cv2
- import matplotlib.pyplot as plt
- import seaborn as sns
- # imgaug 圖片數(shù)據(jù)增強
- import imgaug.augmenters as iaa
- import tensorflow as tf
- # Conv2D MaxPooling2D Dropout Flatten Dense BN GAP
- from tensorflow.keras.layers import Conv2D, MaxPooling2D, Dropout, Flatten, Dense, Layer, BatchNormalization, GlobalAveragePooling2D
- from tensorflow.keras.optimizers import Adam
- from tensorflow.keras import Model, Input
- from tensorflow.keras.callbacks import EarlyStopping, ReduceLROnPlateau
- # 圖片處理器
- from tensorflow.keras.preprocessing.image import ImageDataGenerator
- import plotly.express as px
- import plotly.graph_objects as go
- import plotly.offline as pyo
- pyo.init_notebook_mode()
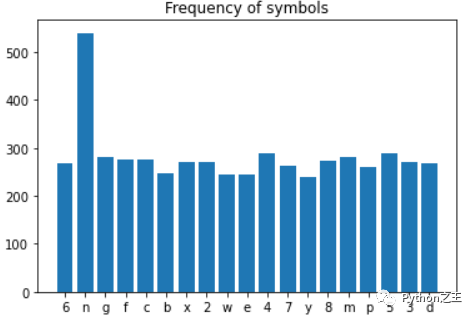
對數(shù)據(jù)進行一個簡單的分析,統(tǒng)計圖像中大約出現(xiàn)了什么樣的符號。
- # 數(shù)據(jù)路徑
- DIR = '../input/captcha-version-2-images/samples/samples'
- # 存儲驗證碼的標簽
- captcha_list = []
- characters = {}
- for captcha in os.listdir(DIR):
- captcha_list.append(captcha)
- # 每張驗證碼的captcha_code
- captcha_code = captcha.split(".")[0]
- for i in captcha_code:
- # 遍歷captcha_code
- characters[i] = characters.get(i, 0) +1
- symbols = list(characters.keys())
- len_symbols = len(symbols)
- print(f'圖像中只使用了{len_symbols}符號')
- plt.bar(*zip(*characters.items()))
- plt.title('Frequency of symbols')
- plt.show()
如何提取圖像的數(shù)據(jù)建立X,y??
- # 如何提取圖像 建立 model X 的shape 1070 * 50 * 200 * 1
- # y的shape 5 * 1070 * 19
- for i, captcha in enumerate(captcha_list):
- captcha_code = captcha.split('.')[0]
- # cv2.IMREAD_GRAYSCALE 灰度圖
- captcha_cv2 = cv2.imread(os.path.join(DIR, captcha),cv2.IMREAD_GRAYSCALE)
- # 縮放
- captcha_cv2 = captcha_cv2 / 255.0
- # print(captcha_cv2.shape) (50, 200)
- # 將captcha_cv2的(50, 200) 切換成(50, 200, 1)
- captcha_cv2 = np.reshape(captcha_cv2, img_shape)
- # (5,19)
- targs = np.zeros((len_captcha, len_symbols))
- for a, b in enumerate(captcha_code):
- targs[a, symbols.index(b)] = 1
- X[i] = captcha_cv2
- y[:, i] = targs
- print("shape of X:", X.shape)
- print("shape of y:", y.shape)
輸出如下
- print("shape of X:", X.shape)
- print("shape of y:", y.shape)
通過Numpy中random 隨機選擇數(shù)據(jù),劃分訓練集和測試集
- # 生成隨機數(shù)
- from numpy.random import default_rng
- rng = default_rng(seed=1)
- test_numbers = rng.choice(1070, size=int(1070*0.3), replace=False)
- X_test = X[test_numbers]
- X_full = np.delete(X, test_numbers,0)
- y_test = y[:,test_numbers]
- y_full = np.delete(y, test_numbers,1)
- val_numbers = rng.choice(int(1070*0.7), size=int(1070*0.3), replace=False)
- X_val = X_full[val_numbers]
- X_train = np.delete(X_full, val_numbers,0)
- y_val = y_full[:,val_numbers]
- y_train = np.delete(y_full, val_numbers,1)
在此驗證碼數(shù)據(jù)中,容易出現(xiàn)過擬合的現(xiàn)象,你可能會想到添加更多的新數(shù)據(jù)、 添加正則項等, 但這里使用數(shù)據(jù)增強的方法,特別是對于機器視覺的任務(wù),數(shù)據(jù)增強技術(shù)尤為重要。
常用的數(shù)據(jù)增強操作:imgaug庫。imgaug是提供了各種圖像增強操作的python庫 https://github.com/aleju/imgaug。
imgaug幾乎包含了所有主流的數(shù)據(jù)增強的圖像處理操作, 增強方法詳見github
- # Sequential(C, R) 尺寸增加了5倍,
- # 選取一系列子增強器C作用于每張圖片的位置,第二個參數(shù)表示是否對每個batch的圖片應(yīng)用不同順序的Augmenter list # rotate=(-8, 8) 旋轉(zhuǎn)
- # iaa.CropAndPad 截取(crop)或者填充(pad),填充時,被填充區(qū)域為黑色。
- # px: 想要crop(negative values)的或者pad(positive values)的像素點。
- # (top, right, bottom, left)
- # 當pad_mode=constant的時候選擇填充的值
- aug =iaa.Sequential([iaa.CropAndPad(
- px=((0, 10), (0, 35), (0, 10), (0, 35)),
- pad_mode=['edge'],
- pad_cval=1
- ),iaa.Rotate(rotate=(-8,8))])
- X_aug_train = None
- y_aug_train = y_train
- for i in range(40):
- X_aug = aug(images = X_train)
- if X_aug_train is not None:
- X_aug_train = np.concatenate([X_aug_train, X_aug], axis = 0)
- y_aug_train = np.concatenate([y_aug_train, y_train], axis = 1)
- else:
- X_aug_train = X_aug
讓我們看看一些數(shù)據(jù)增強的訓練圖像。
- fig, ax = plt.subplots(nrows=2, ncols =5, figsize = (16,16))
- for i in range(10):
- index = np.random.randint(X_aug_train.shape[0])
- ax[i//5][i%5].imshow(X_aug_train[index],cmap='gray')


這次使用函數(shù)式API創(chuàng)建模型,函數(shù)式API是創(chuàng)建模型的另一種方式,它具有更多的靈活性,包括創(chuàng)建更為復(fù)雜的模型。
需要定義inputs和outputs
- #函數(shù)式API模型創(chuàng)建
- captcha = Input(shape=(50,200,channels))
- x = Conv2D(32, (5,5),padding='valid',activation='relu')(captcha)
- x = MaxPooling2D((2,2),padding='same')(x)
- x = Conv2D(64, (3,3),padding='same',activation='relu')(x)
- x = MaxPooling2D((2,2),padding='same')(x)
- x = Conv2D(128, (3,3),padding='same',activation='relu')(x)
- maxpool = MaxPooling2D((2,2),padding='same')(x)
- outputs = []
- for i in range(5):
- x = Conv2D(256, (3,3),padding='same',activation='relu')(maxpool)
- x = MaxPooling2D((2,2),padding='same')(x)
- x = Flatten()(x)
- x = Dropout(0.5)(x)
- x = BatchNormalization()(x)
- x = Dense(64, activation='relu')(x)
- x = Dropout(0.5)(x)
- x = BatchNormalization()(x)
- x = Dense(len_symbols , activation='softmax' , name=f'char_{i+1}')(x)
- outputs.append(x)
- model = Model(inputs = captcha , outputs=outputs)
- # ReduceLROnPlateau更新學習率
- reduce_lr = ReduceLROnPlateau(patience =3, factor = 0.5,verbose = 1)
- model.compile(loss='categorical_crossentropy', optimizer=Adam(learning_rate=0.0005), metrics=["accuracy"])
- # EarlyStopping用于提前停止訓練的callbacks。具體地,可以達到當訓練集上的loss不在減小
- earlystopping = EarlyStopping(monitor ="val_loss",
- mode ="min", patience = 10,
- min_delta = 1e-4,
- restore_best_weights = True)
- history = model.fit(X_train, [y_train[i] for i in range(5)], batch_size=32, epochs=30, verbose=1, validation_data = (X_val, [y_val[i] for i in range(5)]), callbacks =[earlystopping,reduce_lr])
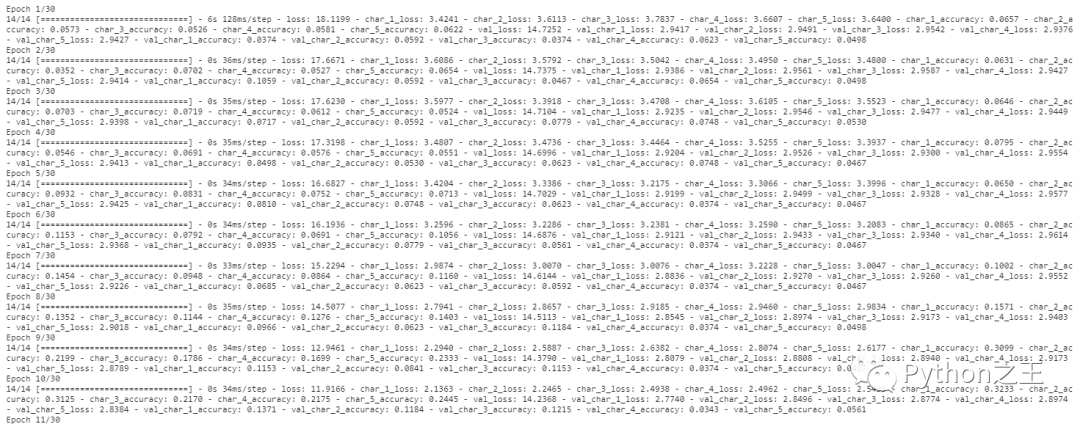
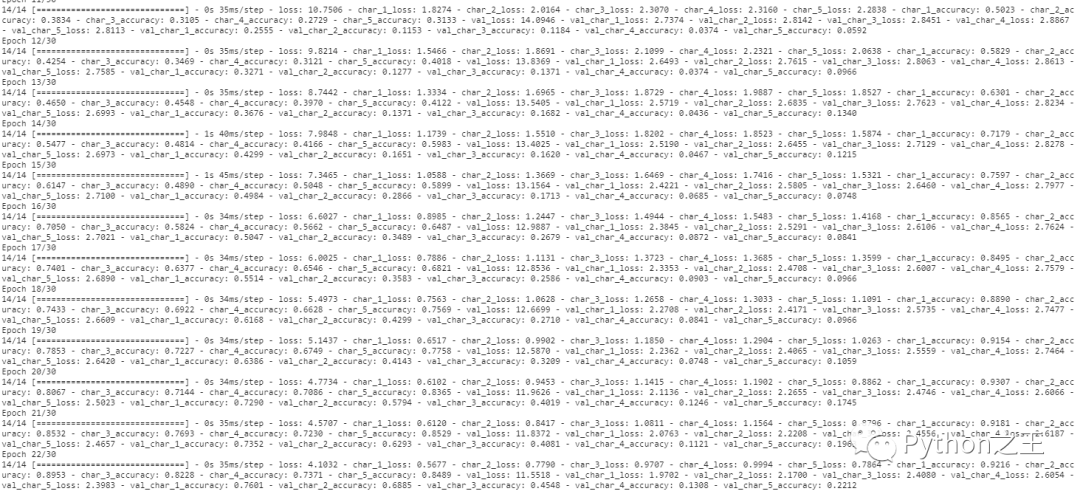
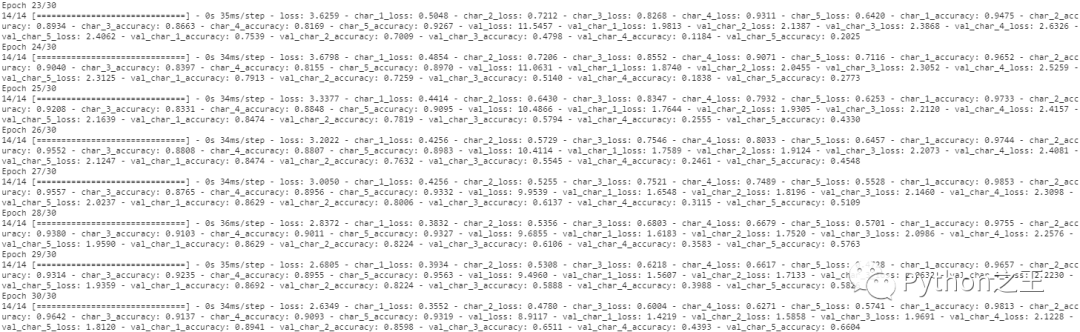
下面對model進行一個測試和評估。
- score = model.evaluate(X_test,[y_test[0], y_test[1], y_test[2], y_test[3], y_test[4]],verbose=1)
- metrics = ['loss','char_1_loss', 'char_2_loss', 'char_3_loss', 'char_4_loss', 'char_5_loss', 'char_1_acc', 'char_2_acc', 'char_3_acc', 'char_4_acc', 'char_5_acc']
- for i,j in zip(metrics, score):
- print(f'{i}: {j}')
具體輸出如下:
- 11/11 [==============================] - 0s 11ms/step - loss: 0.7246 - char_1_loss: 0.0682 - char_2_loss: 0.1066 - char_3_loss: 0.2730 - char_4_loss: 0.2636 - char_5_loss: 0.0132 - char_1_accuracy: 0.9844 - char_2_accuracy: 0.9657 - char_3_accuracy: 0.9408 - char_4_accuracy: 0.9626 - char_5_accuracy: 0.9938
- loss: 0.7246273756027222
- char_1_loss: 0.06818050146102905
- char_2_loss: 0.10664034634828568
- char_3_loss: 0.27299806475639343
- char_4_loss: 0.26359987258911133
- char_5_loss: 0.013208594173192978
- char_1_acc: 0.9844236969947815
- char_2_acc: 0.9657320976257324
- char_3_acc: 0.940809965133667
- char_4_acc: 0.9626168012619019
- char_5_acc: 0.9937694668769836
字母1到字母5的精確值都大于
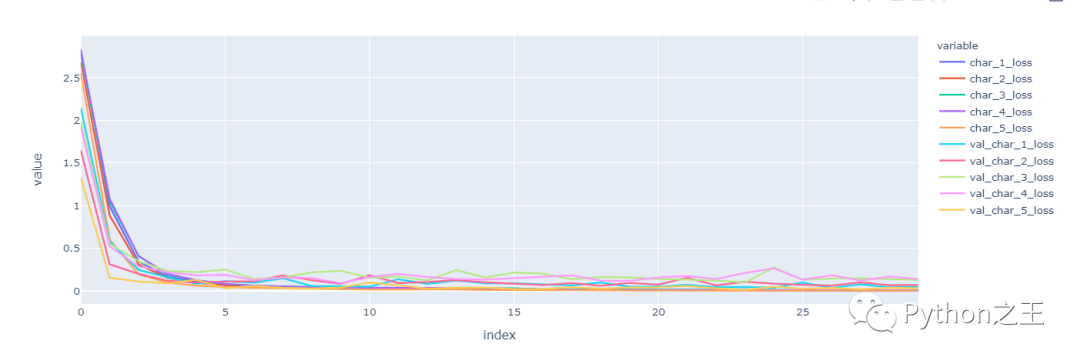
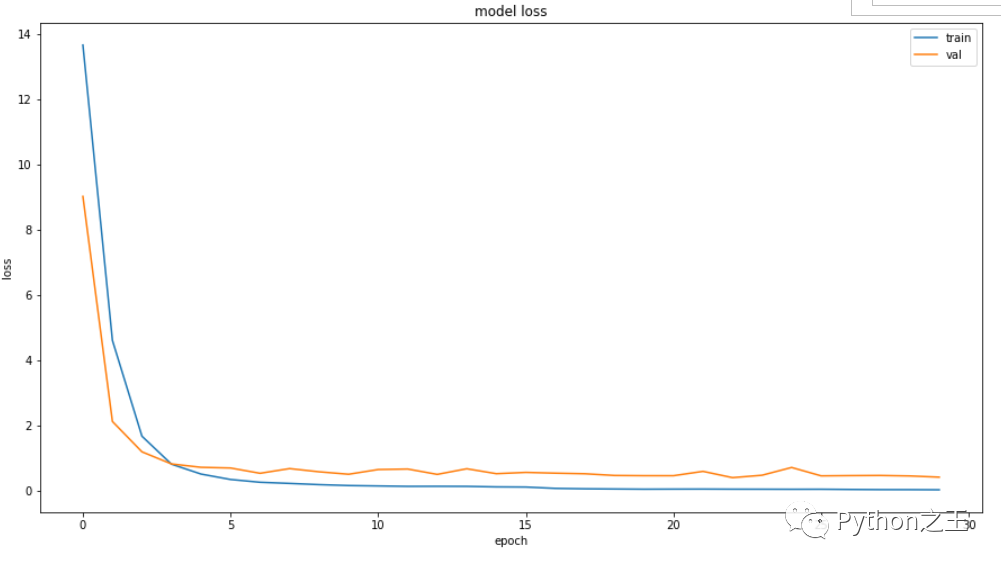
繪制loss和score
- metrics_df = pd.DataFrame(history.history)
- columns = [col for col in metrics_df.columns if 'loss' in col and len(col)>8]
- fig = px.line(metrics_df, y = columns)
- fig.show()
- plt.figure(figsize=(15,8))
- plt.plot(history.history['loss'])
- plt.plot(history.history['val_loss'])
- plt.title('model loss')
- plt.ylabel('loss')
- plt.xlabel('epoch')
- plt.legend(['train', 'val'], loc='upper right',prop={'size': 10})
- plt.show()
- # 預(yù)測數(shù)據(jù)
- def predict(captcha):
- captcha = np.reshape(captcha , (1, 50,200,channels))
- result = model.predict(captcha)
- result = np.reshape(result ,(5,len_symbols))
- # 取出最大預(yù)測中的輸出
- label = ''.join([symbols[np.argmax(i)] for i in result])
- return label
- predict(X_test[2])
- # 25277
下面預(yù)測所有的數(shù)據(jù)
- actual_pred = []
- for i in range(X_test.shape[0]):
- actual = ''.join([symbols[i] for i in (np.argmax(y_test[:, i],axis=1))])
- pred = predict(X_test[i])
- actual_pred.append((actual, pred))
- print(actal_pred[:10])
輸出如下:
- [('n4b4m', 'n4b4m'), ('42nxy', '42nxy'), ('25257', '25277'), ('cewnm', 'cewnm'), ('w46ep', 'w46ep'), ('cdcb3', 'edcb3'), ('8gf7n', '8gf7n'), ('nny5e', 'nny5e'), ('gm2c2', 'gm2c2'), ('g7fmc', 'g7fmc')]
- sameCount = 0
- diffCount = 0
- letterDiff = {i:0 for i in range(5)}
- incorrectness = {i:0 for i in range(1,6)}
- for real, pred in actual_pred:
- # 預(yù)測和輸出相同
- if real == pred:
- sameCount += 1
- else:
- # 失敗
- diffCount += 1
- # 遍歷
- incorrectnessPoint = 0
- for i in range(5):
- if real[i] != pred[i]:
- letterDiff[i] += 1
- incorrectnessPoint += 1
- incorrectness[incorrectnessPoint] += 1
- x = ['True predicted', 'False predicted']
- y = [sameCount, diffCount]
- fig = go.Figure(data=[go.Bar(x = x, y = y)])
- fig.show()
在預(yù)測數(shù)據(jù)中,一共有287個數(shù)據(jù)預(yù)測正確。

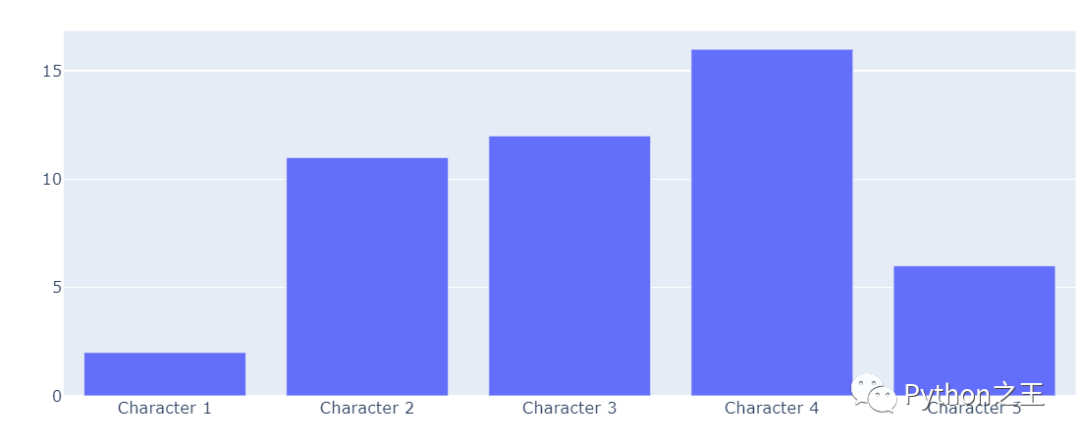
在這里,我們可以看到出現(xiàn)錯誤到底是哪一個index。
- x1 = ["Character " + str(x) for x in range(1, 6)]
- fig = go.Figure(data=[go.Bar(x = x1, y = list(letterDiff.values()))])
- fig.show()
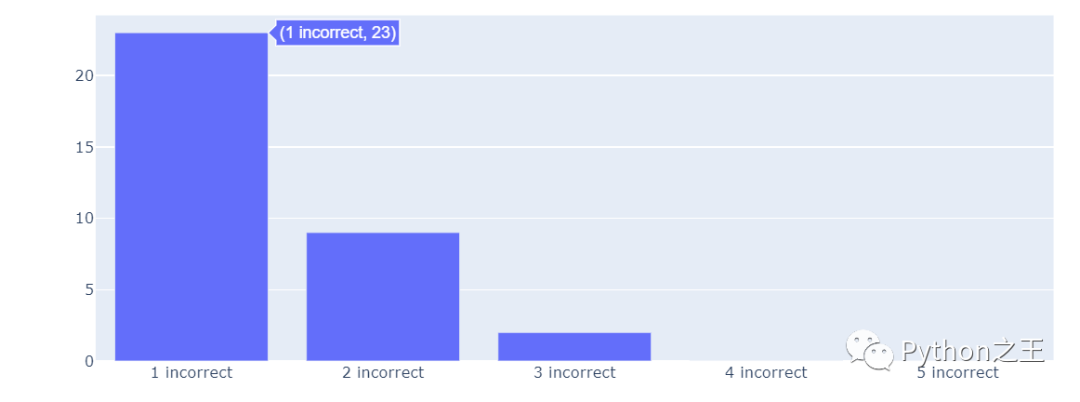
為了計算每個單詞的錯誤數(shù),繪制相關(guān)的條形圖。
- x2 = [str(x) + " incorrect" for x in incorrectness.keys()]
- y2 = list(incorrectness.values())
- fig = go.Figure(data=[go.Bar(x = x2, y = y2)])
- fig.show()
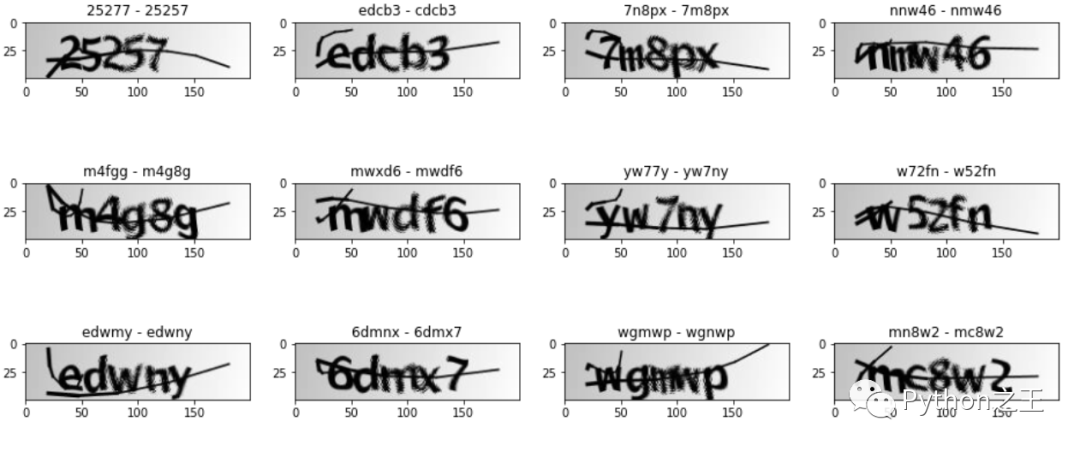
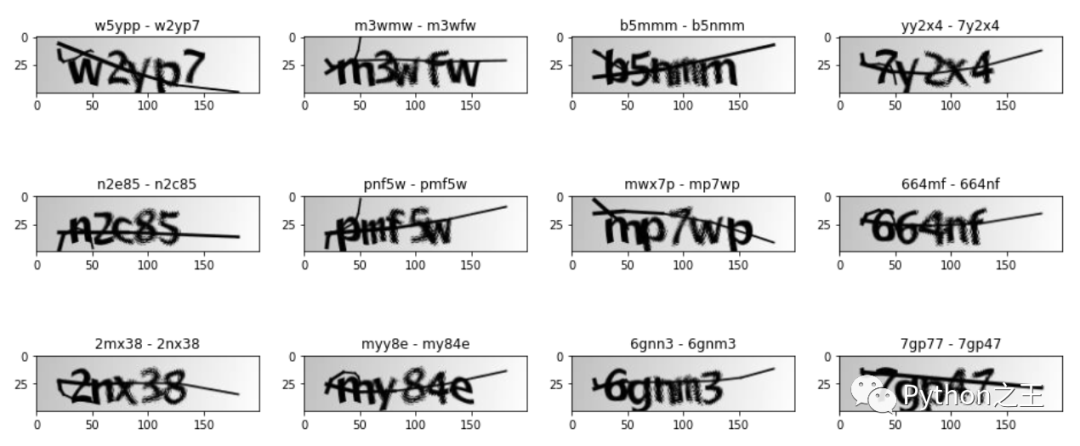
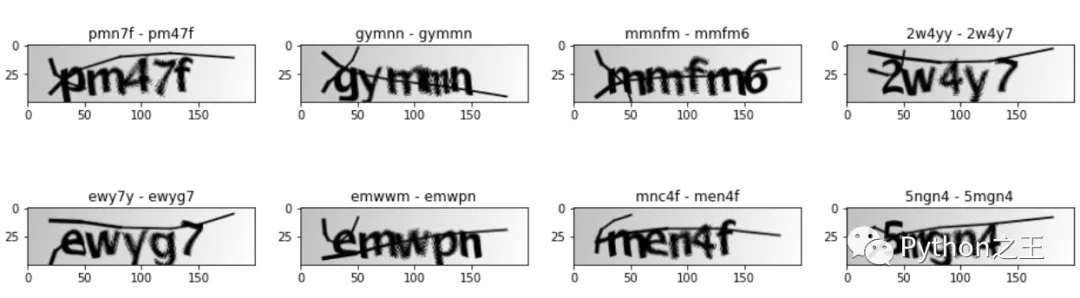
下面繪制錯誤的驗證碼圖像,并標準正確和錯誤的區(qū)別。
- fig, ax = plt.subplots(nrows = 8, ncols=4,figsize = (16,20))
- count = 0
- for i, (actual , pred) in enumerate(actual_pred):
- if actual != pred:
- img = X_test[i]
- try:
- ax[count//4][count%4].imshow(img, cmap = 'gray')
- ax[count//4][count%4].title.set_text(pred + ' - ' + actual)
- count += 1
- except:
- pass