Vue 3.0 進階之指令探秘
本文轉載自微信公眾號「全棧修仙之路」,作者阿寶哥。轉載本文請聯系全棧修仙之路公眾號。
在 Vue 的項目中,我們經常會遇到 v-if、v-show、v-for 或 v-model 這些內置指令,它們為我們提供了不同的功能。除了使用這些內置指令之外,Vue 也允許注冊自定義指令。
接下來,阿寶哥將使用 Vue 3 官方文檔 自定義指令 章節中使用的示例,來一步步揭開自定義指令背后的秘密。
提示:在閱讀本文前,建議您先閱讀 Vue 3 官方文檔 自定義指令 章節的內容。
一、自定義指令
1、注冊全局自定義指令
- const app = Vue.createApp({})
- // 注冊一個全局自定義指令 v-focus
- app.directive('focus', {
- // 當被綁定的元素掛載到 DOM 中時被調用
- mounted(el) {
- // 聚焦元素
- el.focus()
- }
- })
2、使用全局自定義指令
- <div id="app">
- <input v-focus />
- </div>
3、完整的使用示例
- <div id="app">
- <input v-focus />
- </div>
- <script>
- const { createApp } = Vue
- const app = Vue.createApp({}) // ①
- app.directive('focus', { // ②
- // 當被綁定的元素掛載到 DOM 中時被調用
- mounted(el) {
- el.focus() // 聚焦元素
- }
- })
- app.mount('#app') // ③
- </script>
當頁面加載完成后,頁面中的輸入框元素將自動獲得焦點。該示例的代碼比較簡單,主要包含 3 個步驟:創建 App 對象、注冊全局自定義指令和應用掛載。其中創建 App 對象的細節,阿寶哥會在后續的文章中單獨介紹,下面我們將重點分析其他 2 個步驟。首先我們先來分析注冊全局自定義指令的過程。
二、注冊全局自定義指令的過程
在以上示例中,我們使用 app 對象的 directive 方法來注冊全局自定義指令:
- app.directive('focus', {
- // 當被綁定的元素掛載到 DOM 中時被調用
- mounted(el) {
- el.focus() // 聚焦元素
- }
- })
當然,除了注冊全局自定義指令外,我們也可以注冊局部指令,因為組件中也接受一個 directives 的選項:
- directives: {
- focus: {
- mounted(el) {
- el.focus()
- }
- }
- }
對于以上示例來說,我們使用的 app.directive 方法被定義在 runtime-core/src/apiCreateApp.ts 文件中:
- // packages/runtime-core/src/apiCreateApp.ts
- export function createAppAPI<HostElement>(
- render: RootRenderFunction,
- hydrate?: RootHydrateFunction
- ): CreateAppFunction<HostElement> {
- return function createApp(rootComponent, rootProps = null) {
- const context = createAppContext()
- let isMounted = false
- const app: App = (context.app = {
- // 省略部分代碼
- _context: context,
- // 用于注冊或檢索全局指令。
- directive(name: string, directive?: Directive) {
- if (__DEV__) {
- validateDirectiveName(name)
- }
- if (!directive) {
- return context.directives[name] as any
- }
- if (__DEV__ && context.directives[name]) {
- warn(`Directive "${name}" has already been registered in target app.`)
- }
- context.directives[name] = directive
- return app
- },
- return app
- }
- }
通過觀察以上代碼,我們可以知道 directive 方法支持以下兩個參數:
- name:表示指令的名稱;
- directive(可選):表示指令的定義。
name 參數比較簡單,所以我們重點分析 directive 參數,該參數的類型是 Directive類型:
- // packages/runtime-core/src/directives.ts
- export type Directive<T = any, V = any> =
- | ObjectDirective<T, V>
- | FunctionDirective<T, V>
由上可知 Directive 類型屬于聯合類型,所以我們需要繼續分析 ObjectDirective 和 FunctionDirective 類型。這里我們先來看一下 ObjectDirective 類型的定義:
- // packages/runtime-core/src/directives.ts
- export interface ObjectDirective<T = any, V = any> {
- created?: DirectiveHook<T, null, V>
- beforeMount?: DirectiveHook<T, null, V>
- mounted?: DirectiveHook<T, null, V>
- beforeUpdate?: DirectiveHook<T, VNode<any, T>, V>
- updated?: DirectiveHook<T, VNode<any, T>, V>
- beforeUnmount?: DirectiveHook<T, null, V>
- unmounted?: DirectiveHook<T, null, V>
- getSSRProps?: SSRDirectiveHook
- }
該類型定義了對象類型的指令,對象上的每個屬性表示指令生命周期上的鉤子。而 FunctionDirective 類型則表示函數類型的指令:
- // packages/runtime-core/src/directives.ts
- export type FunctionDirective<T = any, V = any> = DirectiveHook<T, any, V>
- export type DirectiveHook<T = any, Prev = VNode<any, T> | null, V = any> = (
- el: T,
- binding: DirectiveBinding<V>,
- vnode: VNode<any, T>,
- prevVNode: Prev
- ) => void
介紹完 Directive 類型,我們再回顧一下前面的示例,相信你就會清晰很多:
- app.directive('focus', {
- // 當被綁定的元素掛載到 DOM 中時觸發
- mounted(el) {
- el.focus() // 聚焦元素
- }
- })
對于以上示例,當我們調用 app.directive 方法注冊自定義 focus 指令時,就會執行以下邏輯:
- directive(name: string, directive?: Directive) {
- if (__DEV__) { // 避免自定義指令名稱,與已有的內置指令名稱沖突
- validateDirectiveName(name)
- }
- if (!directive) { // 獲取name對應的指令對象
- return context.directives[name] as any
- }
- if (__DEV__ && context.directives[name]) {
- warn(`Directive "${name}" has already been registered in target app.`)
- }
- context.directives[name] = directive // 注冊全局指令
- return app
- }
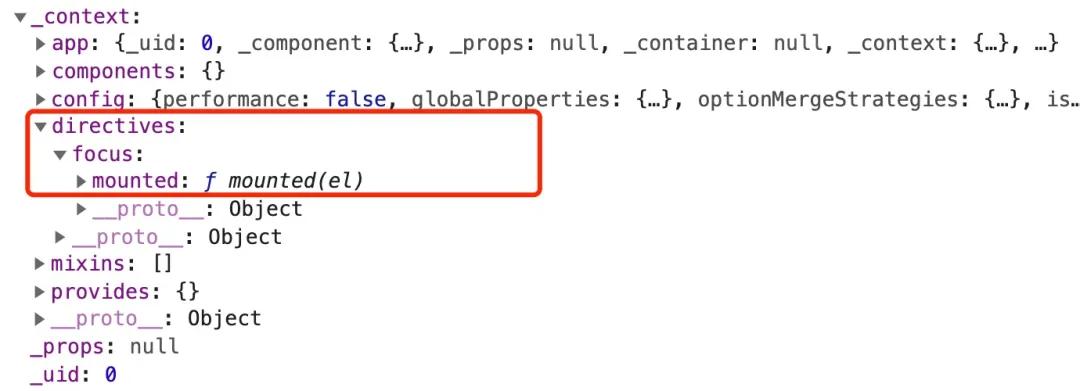
當 focus 指令注冊成功之后,該指令會被保存在 context 對象的 directives 屬性中,具體如下圖所示:
顧名思義 context 是表示應用的上下文對象,那么該對象是如何創建的呢?其實,該對象是通過 createAppContext 函數來創建的:
- const context = createAppContext()
而 createAppContext 函數被定義在 runtime-core/src/apiCreateApp.ts 文件中:
- // packages/runtime-core/src/apiCreateApp.ts
- export function createAppContext(): AppContext {
- return {
- app: null as any,
- config: {
- isNativeTag: NO,
- performance: false,
- globalProperties: {},
- optionMergeStrategies: {},
- isCustomElement: NO,
- errorHandler: undefined,
- warnHandler: undefined
- },
- mixins: [],
- components: {},
- directives: {},
- provides: Object.create(null)
- }
- }
看到這里,是不是覺得注冊全局自定義指令的內部處理邏輯其實挺簡單的。那么對于已注冊的 focus 指令,何時會被調用呢?要回答這個問題,我們就需要分析另一個步驟 ——應用掛載。
三、應用掛載的過程
為了更加直觀地了解應用掛載的過程,阿寶哥利用 Chrome 開發者工具,記錄了應用掛載的主要過程:
通過上圖,我們就可以知道應用掛載期間所經歷的主要過程。此外,從圖中我們也發現了一個與指令相關的函數 resolveDirective。很明顯,該函數用于解析指令,且該函數在render 方法中會被調用。在源碼中,我們找到了該函數的定義:
- // packages/runtime-core/src/helpers/resolveAssets.ts
- export function resolveDirective(name: string): Directive | undefined {
- return resolveAsset(DIRECTIVES, name)
- }
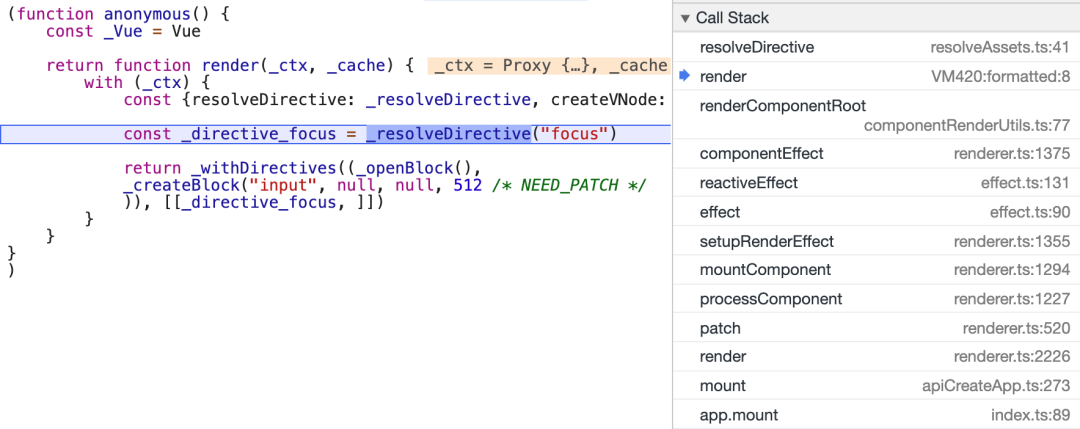
在 resolveDirective 函數內部,會繼續調用 resolveAsset 函數來執行具體的解析操作。在分析 resolveAsset 函數的具體實現之前,我們在 resolveDirective 函數內部加個斷點,來一睹 render 方法的 “芳容”:
在上圖中,我們看到了與 focus 指令相關的 _resolveDirective("focus") 函數調用。前面我們已經知道在 resolveDirective 函數內部會繼續調用 resolveAsset 函數,該函數的具體實現如下:
- // packages/runtime-core/src/helpers/resolveAssets.ts
- function resolveAsset(
- type: typeof COMPONENTS | typeof DIRECTIVES,
- name: string,
- warnMissing = true
- ) {
- const instance = currentRenderingInstance || currentInstance
- if (instance) {
- const Component = instance.type
- // 省略解析組件的處理邏輯
- const res =
- // 局部注冊
- resolve(instance[type] || (Component as ComponentOptions)[type], name) ||
- // 全局注冊
- resolve(instance.appContext[type], name)
- return res
- } else if (__DEV__) {
- warn(
- `resolve${capitalize(type.slice(0, -1))} ` +
- `can only be used in render() or setup().`
- )
- }
- }
因為注冊 focus 指令時,使用的是全局注冊的方式,所以解析的過程會執行 resolve(instance.appContext[type], name) 該語句,其中 resolve 方法的定義如下:
- function resolve(registry: Record<string, any> | undefined, name: string) {
- return (
- registry &&
- (registry[name] ||
- registry[camelize(name)] ||
- registry[capitalize(camelize(name))])
- )
- }
分析完以上的處理流程,我們可以知道在解析全局注冊的指令時,會通過 resolve 函數從應用的上下文對象中獲取已注冊的指令對象。在獲取到 _directive_focus 指令對象后,render 方法內部會繼續調用 _withDirectives 函數,用于把指令添加到 VNode 對象上,該函數被定義在 runtime-core/src/directives.ts 文件中:
- // packages/runtime-core/src/directives.ts
- export function withDirectives<T extends VNode>(
- vnode: T,
- directives: DirectiveArguments
- ): T {
- const internalInstance = currentRenderingInstance // 獲取當前渲染的實例
- const instance = internalInstance.proxy
- const bindings: DirectiveBinding[] = vnode.dirs || (vnode.dirs = [])
- for (let i = 0; i < directives.length; i++) {
- let [dir, value, arg, modifiers = EMPTY_OBJ] = directives[i]
- // 在 mounted 和 updated 時,觸發相同行為,而不關系其他的鉤子函數
- if (isFunction(dir)) { // 處理函數類型指令
- dir = {
- mounted: dir,
- updated: dir
- } as ObjectDirective
- }
- bindings.push({
- dir,
- instance,
- value,
- oldValue: void 0,
- arg,
- modifiers
- })
- }
- return vnode
- }
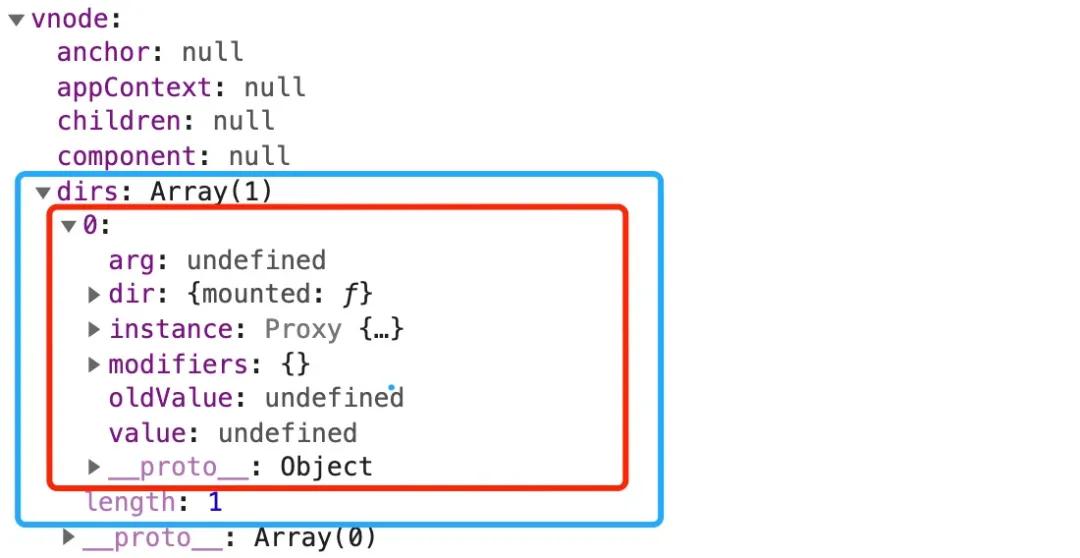
因為一個節點上可能會應用多個指令,所以 withDirectives 函數在 VNode 對象上定義了一個 dirs 屬性且該屬性值為數組。對于前面的示例來說,在調用 withDirectives 函數之后,VNode 對象上就會新增一個 dirs 屬性,具體如下圖所示:
通過上面的分析,我們已經知道在組件的 render 方法中,我們會通過 withDirectives函數把指令注冊對應的 VNode 對象上。那么 focus 指令上定義的鉤子什么時候會被調用呢?在繼續分析之前,我們先來介紹一下指令對象所支持的鉤子函數。
一個指令定義對象可以提供如下幾個鉤子函數 (均為可選):
- created:在綁定元素的屬性或事件監聽器被應用之前調用。
- beforeMount:當指令第一次綁定到元素并且在掛載父組件之前調用。
- mounted:在綁定元素的父組件被掛載后調用。
- beforeUpdate:在更新包含組件的 VNode 之前調用。
- updated:在包含組件的 VNode 及其子組件的 VNode 更新后調用。
- beforeUnmount:在卸載綁定元素的父組件之前調用。
- unmounted:當指令與元素解除綁定且父組件已卸載時,只調用一次。
介紹完這些鉤子函數之后,我們再來回顧一下前面介紹的 ObjectDirective 類型:
- // packages/runtime-core/src/directives.ts
- export interface ObjectDirective<T = any, V = any> {
- created?: DirectiveHook<T, null, V>
- beforeMount?: DirectiveHook<T, null, V>
- mounted?: DirectiveHook<T, null, V>
- beforeUpdate?: DirectiveHook<T, VNode<any, T>, V>
- updated?: DirectiveHook<T, VNode<any, T>, V>
- beforeUnmount?: DirectiveHook<T, null, V>
- unmounted?: DirectiveHook<T, null, V>
- getSSRProps?: SSRDirectiveHook
- }
好的,接下來我們來分析一下 focus 指令上定義的鉤子什么時候被調用。同樣,阿寶哥在focus 指令的 mounted 方法中加個斷點:
在圖中右側的調用棧中,我們看到了 invokeDirectiveHook 函數,很明顯該函數的作用就是調用指令上已注冊的鉤子。出于篇幅考慮,具體的細節阿寶哥就不繼續介紹了,感興趣的小伙伴可以自行斷點調試一下。
四、阿寶哥有話說
4.1 Vue 3 有哪些內置指令?
在介紹注冊全局自定義指令的過程中,我們看到了一個 validateDirectiveName 函數,該函數用于驗證自定義指令的名稱,從而避免自定義指令名稱,與已有的內置指令名稱沖突。
- // packages/runtime-core/src/directives.ts
- export function validateDirectiveName(name: string) {
- if (isBuiltInDirective(name)) {
- warn('Do not use built-in directive ids as custom directive id: ' + name)
- }
- }
在 validateDirectiveName 函數內部,會通過 isBuiltInDirective(name) 語句來判斷是否為內置指令:
- const isBuiltInDirective = /*#__PURE__*/ makeMap(
- 'bind,cloak,else-if,else,for,html,if,model,on,once,pre,show,slot,text'
- )
以上代碼中的 makeMap 函數,用于生成一個 map 對象(Object.create(null))并返回一個函數,用于檢測某個 key 是否存在 map 對象中。另外,通過以上代碼,我們就可以很清楚地了解 Vue 3 中為我們提供了哪些內置指令。
4.2 指令有幾種類型?
在 Vue 3 中指令分為 ObjectDirective 和 FunctionDirective 兩種類型:
- // packages/runtime-core/src/directives.ts
- export type Directive<T = any, V = any> =
- | ObjectDirective<T, V>
- | FunctionDirective<T, V>
ObjectDirective
- export interface ObjectDirective<T = any, V = any> {
- created?: DirectiveHook<T, null, V>
- beforeMount?: DirectiveHook<T, null, V>
- mounted?: DirectiveHook<T, null, V>
- beforeUpdate?: DirectiveHook<T, VNode<any, T>, V>
- updated?: DirectiveHook<T, VNode<any, T>, V>
- beforeUnmount?: DirectiveHook<T, null, V>
- unmounted?: DirectiveHook<T, null, V>
- getSSRProps?: SSRDirectiveHook
- }
FunctionDirective
- export type FunctionDirective<T = any, V = any> = DirectiveHook<T, any, V>
- export type DirectiveHook<T = any, Prev = VNode<any, T> | null, V = any> = (
- el: T,
- binding: DirectiveBinding<V>,
- vnode: VNode<any, T>,
- prevVNode: Prev
- ) => void
如果你想在 mounted 和 updated 時觸發相同行為,而不關心其他的鉤子函數。那么你可以通過將回調函數傳遞給指令來實現:
- app.directive('pin', (el, binding) => {
- el.style.position = 'fixed'
- const s = binding.arg || 'top'
- el.style[s] = binding.value + 'px'
- })
4.3 注冊全局指令與局部指令有什么區別?
注冊全局指令
- app.directive('focus', {
- // 當被綁定的元素掛載到 DOM 中時被調用
- mounted(el) {
- el.focus() // 聚焦元素
- }
- });
注冊局部指令
- const Component = defineComponent({
- directives: {
- focus: {
- mounted(el) {
- el.focus()
- }
- }
- },
- render() {
- const { directives } = this.$options;
- return [withDirectives(h('input'), [[directives.focus, ]])]
- }
- });
解析全局注冊和局部注冊的指令
- // packages/runtime-core/src/helpers/resolveAssets.ts
- function resolveAsset(
- type: typeof COMPONENTS | typeof DIRECTIVES,
- name: string,
- warnMissing = true
- ) {
- const instance = currentRenderingInstance || currentInstance
- if (instance) {
- const Component = instance.type
- // 省略解析組件的處理邏輯
- const res =
- // 局部注冊
- resolve(instance[type] || (Component as ComponentOptions)[type], name) ||
- // 全局注冊
- resolve(instance.appContext[type], name)
- return res
- }
- }
4.4 內置指令和自定義指令生成的渲染函數有什么區別?
要了解內置指令和自定義指令生成的渲染函數的區別,阿寶哥以 v-if 、v-show 內置指令和 v-focus 自定義指令為例,然后使用 Vue 3 Template Explorer 這個在線工具來編譯生成渲染函數:
v-if 內置指令
- <input v-if="isShow" />
- const _Vue = Vue
- return function render(_ctx, _cache, $props, $setup, $data, $options) {
- with (_ctx) {
- const { createVNode: _createVNode, openBlock: _openBlock,
- createBlock: _createBlock, createCommentVNode: _createCommentVNode } = _Vue
- return isShow
- ? (_openBlock(), _createBlock("input", { key: 0 }))
- : _createCommentVNode("v-if", true)
- }
- }
對于 v-if 指令來說,在編譯后會通過 ?: 三目運算符來實現動態創建節點的功能。
v-show 內置指令
- <input v-show="isShow" />
- const _Vue = Vue
- return function render(_ctx, _cache, $props, $setup, $data, $options) {
- with (_ctx) {
- const { vShow: _vShow, createVNode: _createVNode, withDirectives: _withDirectives,
- openBlock: _openBlock, createBlock: _createBlock } = _Vue
- return _withDirectives((_openBlock(), _createBlock("input", null, null, 512 /* NEED_PATCH */)), [
- [_vShow, isShow]
- ])
- }
- }
以上示例中的 vShow 指令被定義在 packages/runtime-dom/src/directives/vShow.ts文件中,該指令屬于 ObjectDirective 類型的指令,該指令內部定義了beforeMount、mounted、updated 和 beforeUnmount 四個鉤子。
v-focus 自定義指令
- <input v-focus />
- const _Vue = Vue
- return function render(_ctx, _cache, $props, $setup, $data, $options) {
- with (_ctx) {
- const { resolveDirective: _resolveDirective, createVNode: _createVNode,
- withDirectives: _withDirectives, openBlock: _openBlock, createBlock: _createBlock } = _Vue
- const _directive_focus = _resolveDirective("focus")
- return _withDirectives((_openBlock(), _createBlock("input", null, null, 512 /* NEED_PATCH */)), [
- [_directive_focus]
- ])
- }
- }
通過對比 v-focus 與 v-show 指令生成的渲染函數,我們可知 v-focus 自定義指令與v-show 內置指令都會通過 withDirectives 函數,把指令注冊到 VNode 對象上。而自定義指令相比內置指令來說,會多一個指令解析的過程。
此外,如果在 input 元素上,同時應用了 v-show 和 v-focus 指令,則在調用 _withDirectives 函數時,將使用二維數組:
- <input v-show="isShow" v-focus />
- const _Vue = Vue
- return function render(_ctx, _cache, $props, $setup, $data, $options) {
- with (_ctx) {
- const { vShow: _vShow, resolveDirective: _resolveDirective, createVNode: _createVNode,
- withDirectives: _withDirectives, openBlock: _openBlock, createBlock: _createBlock } = _Vue
- const _directive_focus = _resolveDirective("focus")
- return _withDirectives((_openBlock(), _createBlock("input", null, null, 512 /* NEED_PATCH */)), [
- [_vShow, isShow],
- [_directive_focus]
- ])
- }
- }
4.5 如何在渲染函數中應用指令?
除了在模板中應用指令之外,利用前面介紹的 withDirectives 函數,我們可以很方便地在渲染函數中應用指定的指令:
- <div id="app"></div>
- <script>
- const { createApp, h, vShow, defineComponent, withDirectives } = Vue
- const Component = defineComponent({
- data() {
- return { value: true }
- },
- render() {
- return [withDirectives(h('div', '我是阿寶哥'), [[vShow, this.value]])]
- }
- });
- const app = Vue.createApp(Component)
- app.mount('#app')
- </script>
本文阿寶哥主要介紹了在 Vue 3 中如何自定義指令、如何注冊全局和局部指令。為了讓大家能夠更深入地掌握自定義指令的相關知識,阿寶哥從源碼的角度分析了指令的注冊和應用過程。
在后續的文章中,阿寶哥將會介紹一些特殊的指令,當然也會重點分析一下雙向綁定的原理,感興趣的小伙伴不要錯過喲。
五、參考資源
- Vue 3 官網 - 自定義指令
- Vue 3 官網 - 應用 API


