OpenStack 高性能監(jiān)控工具:Monasca
介紹
Monasca 是一個多租戶監(jiān)控即服務(wù)工具,可以幫助IT團(tuán)隊分析日志數(shù)據(jù)并設(shè)置告警和通知。
OpenStack環(huán)境中的監(jiān)控需求是巨大,多樣且高度復(fù)雜的。Monasca的項目任務(wù)是提供一種多租戶,高度可擴(kuò)展,高性能和容錯的監(jiān)控即服務(wù)解決方案。
Monasca為高級監(jiān)控提供了可擴(kuò)展的平臺,運(yùn)營商和租戶均可使用該平臺來獲取有關(guān)其基礎(chǔ)架構(gòu)和應(yīng)用的運(yùn)行狀態(tài)。
Monasca使用REST API進(jìn)行高速的日志處理和查詢。它集成了流告警引擎,通知引擎和聚合引擎。
您可以使用Monasca實現(xiàn)的用例非常多樣。Monasca遵循微服務(wù)架構(gòu),其中幾個服務(wù)分布在多個存儲庫中。每個模塊旨在為整個監(jiān)控解決方案提供離散服務(wù),并且可以根據(jù)運(yùn)營商/客戶的需求進(jìn)行部署。
- 使用Rest API接口來存儲、查詢性能和歷史數(shù)據(jù),不同于其他監(jiān)控工具使用特殊的協(xié)議和傳輸方法,如nagios的NSCA,Monasca只利用了http
- 多租戶認(rèn)證,指標(biāo)的提交和認(rèn)證使用Keystone組件。存儲關(guān)聯(lián)租戶ID
- 指標(biāo)使用(key,value)的鍵值來定義,稱作量度(dimensions)
- 對系統(tǒng)指標(biāo)進(jìn)行實時閾值和告警
- 復(fù)合告警設(shè)置使用簡單的語法,由子告警表達(dá)式和邏輯操作器組成
- 監(jiān)控代理支持內(nèi)置的系統(tǒng)和服務(wù)的檢查結(jié)果,同時也只nagios的checks和statsd
- 根據(jù)開源技術(shù)搭建的開源監(jiān)控方案
架構(gòu)
下圖概述了Monasca的指標(biāo)管道以及所涉及組件的交互。
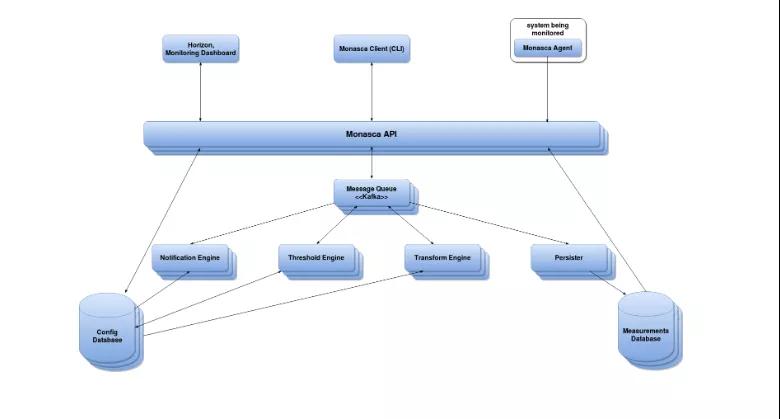
核心組件
- monasca-agent:監(jiān)控代理,python編寫,包含了多個子組件,支持各種cpu使用率、可用內(nèi)存、nagios插件、statsd、以及許多服務(wù)如mysql、rabbitMQ等監(jiān)控
- monasca-api::一個用于監(jiān)控的RESTful API接口,針對在以下概念和區(qū)域:
- 指標(biāo):對于實時的大量指標(biāo)的存儲和查詢
- 統(tǒng)計:查詢指標(biāo)的統(tǒng)計數(shù)據(jù)
- 告警定義:告警定義的增刪查改
- 告警:查詢和刪除告警歷史
- 通知方式:創(chuàng)建和刪除通知方式,當(dāng)告警狀態(tài)改變時可以直接郵件通知用戶—monasca API可以通過python或JAVA來實現(xiàn)
- manasca-persister:消息隊列傳送指標(biāo)或告警的消費(fèi)者(RPC傳輸中的概念consumer),并將指標(biāo)和告警存入對應(yīng)的數(shù)據(jù)庫
- monasca-transform:一個轉(zhuǎn)換聚合引擎,轉(zhuǎn)換指標(biāo)的名字和值,生成新的指標(biāo)傳遞給消息隊列
- Anomaly and Prediction Engine:目前還是原型階段
- monasca-thresh:對指標(biāo)進(jìn)行計算,當(dāng)超過閾值是發(fā)布告警給消息隊列,基于Apache storm項目(開源實時分布式計算系統(tǒng))
- monasca-notification:接受從消息隊列傳來的告警,并發(fā)送通知,如發(fā)送告警郵件,Notification Engine基于Python
- monasca-analytics:分析引擎,接受從消息隊列傳來的告警,進(jìn)行異常檢測和告警關(guān)聯(lián)
- 消息隊列:以前是支持RabbitMQ的,由于性能、規(guī)模、持續(xù)性和高可用的限制,轉(zhuǎn)向了Kafka
- Metrics and Alarms Database:支持Vertica和infuxDB,對Cassandra的支持正在進(jìn)行中
- Config Database:配置信息數(shù)據(jù)庫,目前使用Mysql,對PostgreSQL的支持正在進(jìn)程中
- python-monascaclient:python實現(xiàn)的命令行客戶端,對monasca API進(jìn)行操控
- Monitoring UI:Horizon dashboard的可視化
- Ceilometer publisher:提供給Ceilometer的multi-publisher插件
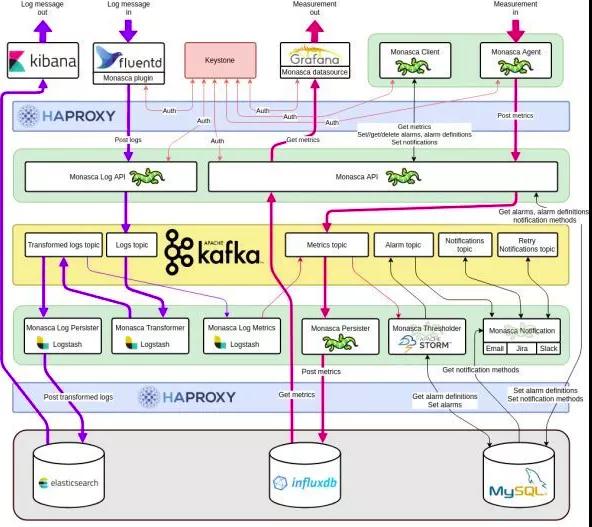
除了直接向API發(fā)送請求之外,還可以使用以下工具與Monasca進(jìn)行交互:
- Monasca client:CLI和Python客戶端
- Horizon plugin:該插件將監(jiān)控面板添加到Horizon
- Grafana app:Grafana插件可查看和配置告警定義,告警和通知
Libraries:
- monasca-common:Monasca組件中使用的通用代碼
- monasca-statsd:StatsD兼容的庫,用于從已檢測的應(yīng)用程序發(fā)送指標(biāo)
Grafana集成:
- monasca-grafana-datasource:用于Grafana的多租戶Monasca數(shù)據(jù)源
- grafana:Grafana 4.1.2的分支版本,添加了Keystone身份驗證
第三方技術(shù)與工具
Monasca使用多種第三方技術(shù):
- 內(nèi)部處理和中間件
- Apache Kafka(http://kafka.apache.org):是一個分布式、分區(qū)的、多副本的、多訂閱者,基于zookeeper協(xié)調(diào)的分布式日志系統(tǒng)(也可以當(dāng)做MQ系統(tǒng)),常見可以用于web/nginx日志、訪問日志,消息服務(wù)等等
- Apache Storm(http://storm.incubator.apache.org/):Apache Storm是一個免費(fèi)的開源分布式實時計算系統(tǒng)。通過Storm,可以輕松可靠地處理無限數(shù)據(jù)流,從而可以進(jìn)行實時處理,而Hadoop可以進(jìn)行批處理
- ZooKeeper(http://zookeeper.apache.org/):由Kafka和Storm使用
- Apache Spark:由Monasca Transform用作聚合引擎
- 配置數(shù)據(jù)庫:
- MySQL:支持將MySQL作為配置數(shù)據(jù)庫
- PostgreSQL:通過Hibernate和SQLAlchemy支持Config數(shù)據(jù)庫的POSTgres
- Vagrant(http://www.vagrantup.com/):Vagrant提供了易于配置,可重復(fù)的便攜式工作環(huán)境,該環(huán)境建立在行業(yè)標(biāo)準(zhǔn)技術(shù)之上,并由一個一致的工作流程控制,可幫助您最大程度地提高生產(chǎn)力和靈活性
- Dropwizard(https://dropwizard.github.io/dropwizard/):Dropwizard將Java生態(tài)系統(tǒng)中穩(wěn)定,成熟的庫匯集到一個簡單,輕巧的程序包中,使您可以專注于完成自身的工作任務(wù)中。Dropwizard對復(fù)雜的配置,應(yīng)用程序指標(biāo),日志記錄,操作工具等提供了開箱即用的支持,使您和您的團(tuán)隊可以在最短的時間內(nèi)發(fā)布高質(zhì)量的Web服務(wù)
- 時間序列數(shù)據(jù)庫:
- InfluxDB(http://influxdb.com/):一個沒有外部依賴性的開源分布式時間序列數(shù)據(jù)庫。Metrics數(shù)據(jù)庫支持InfluxDB
- Vertica(http://www.vertica.com):具有高度可擴(kuò)展性的商業(yè)企業(yè)級SQL分析數(shù)據(jù)庫。它提供了內(nèi)置的自動高可用性功能,并且擅長數(shù)據(jù)庫內(nèi)分析以及壓縮和存儲大量數(shù)據(jù)。提供了Vertica的免費(fèi)社區(qū)版本,該版本可以存儲最大1 TB的數(shù)據(jù),沒有時間限制,網(wǎng)址為https://my.vertica.com/community/。雖然不再經(jīng)常用Vertrica,但Metrics數(shù)據(jù)庫支持它
- Cassandra(https://cassandra.apache.org):Mestrics數(shù)據(jù)庫支持Cassandra
安裝
手工安裝
monasca的所有組件都可以安裝在一個節(jié)點上,例如openstack控制器節(jié)點上,也可以將其部署在多節(jié)點上。本文中,將在我的openstack集群中創(chuàng)建的新VM中安裝monasca-api,該VM具有關(guān)聯(lián)的浮動ip。Monasca-agent已安裝在控制器節(jié)點上。代理節(jié)點通過浮動ip將指標(biāo)發(fā)布到api節(jié)點。它們在同一子網(wǎng)中。
安裝我們需要的軟件包和工具
- apt-get install -y git
- apt-get install openjdk-7-jre-headless python-pip python-dev
安裝mysql數(shù)據(jù)庫如果您在openstack控制器節(jié)點中安裝了monasca-api,則可以跳過安裝,將已安裝的msyql用于openstack服務(wù)。
- apt-get install -y mysql-server
創(chuàng)建monasca數(shù)據(jù)庫架構(gòu),在此處下載mon.sql( https://raw.githubusercontent.com/stackforge/cookbook-monasca-schema/master/files/default/mysql/mon.sql)
- mysql -uroot -ppassword < mon_mysql.sql
安裝Zookeeper安裝Zookeeper并重新啟動它。我使用本地主機(jī)接口,并且只有一個Zookeeper,因此默認(rèn)配置文件不需要配置。
- apt-get install -y zookeeper zookeeperd zookeeper-bin
- service zookeeper restart
安裝和配置kafka
- wget http://apache.mirrors.tds.net/kafka/0.8.1.1/kafka_2.9.2-0.8.1.1.tgz
- mv kafka_2.9.2-0.8.1.1.tgz /opt
- cd /opt
- tar zxf kafka_2.9.2-0.8.1.1.tgz
- ln -s /opt/kafka_2.9.2-0.8.1.1/ /opt/kafka
- ln -s /opt/kafka/config /etc/kafka
創(chuàng)建kafka系統(tǒng)用戶,kafka服務(wù)將以該用戶身份啟動。
- useradd kafka -U -r
在/etc/init/kafka.conf中創(chuàng)建kafka啟動腳本,將以下內(nèi)容復(fù)制 到/etc/init/kafka.conf中并保存。
- description "Kafka"
- start on runlevel [2345]
- stop on runlevel [!2345]
- respawn
- limit nofile 32768 32768
- # If zookeeper is running on this box also give it time to start up properly
- pre-start script
- if [ -e /etc/init.d/zookeeper ]; then
- /etc/init.d/zookeeper restart
- fi
- end script
- # Rather than using setuid/setgid sudo is used because the pre-start task must run as root
- exec sudo -Hu kafka -g kafka KAFKA_HEAP_OPTS="-Xmx1G -Xms1G" JMX_PORT=9997 /opt/kafka/bin/kafka-server-start.sh /etc/kafka/server.properties
配置kafka,vim /etc/kafka/server.properties,確保配置了以下內(nèi)容:
- host.name=localhost
- advertised.host.name=localhost
- log.dirs=/var/kafka
創(chuàng)建 kafka log目錄
- mkdir /var/kafka
- mkdir /var/log/kafka
- chown -R kafka. /var/kafka/
- chown -R kafka. /var/log/kafka/
啟動kafka服務(wù)
- service kafka start
下一步就是創(chuàng)建 kafka topics
- /opt/kafka/bin/kafka-topics.sh --create --zookeeper localhost:2181 --replication-factor 1 --partitions 64 --topic metrics
- /opt/kafka/bin/kafka-topics.sh --create --zookeeper localhost:2181 --replication-factor 1 --partitions 12 --topic events
- /opt/kafka/bin/kafka-topics.sh --create --zookeeper localhost:2181 --replication-factor 1 --partitions 12 --topic raw-events
- /opt/kafka/bin/kafka-topics.sh --create --zookeeper localhost:2181 --replication-factor 1 --partitions 12 --topic transformed-events
- /opt/kafka/bin/kafka-topics.sh --create --zookeeper localhost:2181 --replication-factor 1 --partitions 12 --topic stream-definitions
- /opt/kafka/bin/kafka-topics.sh --create --zookeeper localhost:2181 --replication-factor 1 --partitions 12 --topic transform-definitions
- /opt/kafka/bin/kafka-topics.sh --create --zookeeper localhost:2181 --replication-factor 1 --partitions 12 --topic alarm-state-transitions
- /opt/kafka/bin/kafka-topics.sh --create --zookeeper localhost:2181 --replication-factor 1 --partitions 12 --topic alarm-notifications
- /opt/kafka/bin/kafka-topics.sh --create --zookeeper localhost:2181 --replication-factor 1 --partitions 12 --topic stream-notifications
- /opt/kafka/bin/kafka-topics.sh --create --zookeeper localhost:2181 --replication-factor 1 --partitions 3 --topic retry-notifications
安裝和配置 influxdb
- curl -sL https://repos.influxdata.com/influxdb.key | apt-key add -
- echo "deb https://repos.influxdata.com/ubuntu trusty stable" > /etc/apt/sources.list.d/influxdb.list
- apt-get update
- apt-get install -y apt-transport-https
- apt-get install -y influxdb
- service influxdb start
創(chuàng)建 influxdb database, user, password, retention policy, 同時修改密碼。
- influx
- CREATE DATABASE mon
- CREATE USER monasca WITH PASSWORD 'tyun'
- CREATE RETENTION POLICY persister_all ON mon DURATION 90d REPLICATION 1 DEFAULT
- exit
安裝與配置 storm
- wget http://apache.mirrors.tds.net/storm/apache-storm-0.9.6/apache-storm-0.9.6.tar.gz
- mkdir /opt/storm
- cp apache-storm-0.9.6.tar.gz /opt/storm/
- cd /opt/storm/
- tar xzf apache-storm-0.9.6.tar.gz
- ln -s /opt/storm/apache-storm-0.9.6 /opt/storm/current
- useradd storm -U -r
- mkdir /var/storm
- mkdir /var/log/storm
- chown -R storm. /var/storm/
- chown -R storm. /var/log/storm/
修改storm.yaml, vim current/storm/conf/storm.yaml
- ### base
- java.library.path: "/usr/local/lib:/opt/local/lib:/usr/lib"
- storm.local.dir: "/var/storm"
- ### zookeeper.*
- storm.zookeeper.servers:
- - "localhost"
- storm.zookeeper.port: 2181
- storm.zookeeper.retry.interval: 5000
- storm.zookeeper.retry.times: 29
- storm.zookeeper.root: "/storm"
- storm.zookeeper.session.timeout: 30000
- ### supervisor.* configs are for node supervisors
- supervisor.slots.ports:
- - 6701
- - 6702
- - 6703
- - 6704
- supervisor.childopts: "-Xmx1024m"
- ### worker.* configs are for task workers
- worker.childopts: "-Xmx1280m -XX:+UseConcMarkSweepGC -Dcom.sun.management.jmxremote"
- ### nimbus.* configs are for the masteri
- nimbus.host: "localhost"
- nimbus.thrift.port: 6627
- mbus.childopts: "-Xmx1024m"
- ### ui.* configs are for the master
- ui.host: 127.0.0.1
- ui.port: 8078
- ui.childopts: "-Xmx768m"
- ### drpc.* configs
- ### transactional.* configs
- transactional.zookeeper.servers:
- - "localhost"
- transactional.zookeeper.port: 2181
- transactional.zookeeper.root: "/storm-transactional"
- ### topology.* configs are for specific executing storms
- topology.acker.executors: 1
- topology.debug: false
- logviewer.port: 8077
- logviewer.childopts: "-Xmx128m"
創(chuàng)建storm supervisor 啟動腳本,vim /etc/init/storm-supervisor.conf
- # Startup script for Storm Supervisor
- description "Storm Supervisor daemon"
- start on runlevel [2345]
- console log
- respawn
- kill timeout 240
- respawn limit 25 5
- setgid storm
- setuid storm
- chdir /opt/storm/current
- exec /opt/storm/current/bin/storm supervisor
創(chuàng)建Storm nimbus 啟動腳本。vim /etc/init/storm-nimbus.conf
- # Startup script for Storm Nimbus
- description "Storm Nimbus daemon"
- start on runlevel [2345]
- console log
- respawn
- kill timeout 240
- respawn limit 25 5
- setgid storm
- setuid storm
- chdir /opt/storm/current
- exec /opt/storm/current/bin/storm nimbus
啟動supervisor 與 nimbus
- service storm-supervisor start
- service storm-nimbus start
安裝monasca api python軟件包
一些monasca組件同時提供python和java代碼,主要是我選擇python代碼進(jìn)行部署。
- pip install monasca-common
- pip install gunicorn
- pip install greenlet # Required for both
- pip install eventlet # For eventlet workers
- pip install gevent # For gevent workers
- pip install monasca-api
- pip install influxdb
vim /etc/monasca/api-config.ini,將主機(jī)修改為您的IP地址
- [DEFAULT]
- name = monasca_api
- [pipeline:main]
- # Add validator in the pipeline so the metrics messages can be validated.
- pipeline = auth keystonecontext api
- [app:api]
- paste.app_factory = monasca_api.api.server:launch
- [filter:auth]
- paste.filter_factory = keystonemiddleware.auth_token:filter_factory
- [filter:keystonecontext]
- paste.filter_factory = monasca_api.middleware.keystone_context_filter:filter_factory
- [server:main]
- use = egg:gunicorn#main
- host = 192.168.2.23
- port = 8082
- workers = 1
- proc_name = monasca_api
vim /etc/monasca/api-config.conf,修改以下內(nèi)容
- [DEFAULT]
- # logging, make sure that the user under whom the server runs has permission
- # to write to the directory.
- log_file = monasca-api.log
- log_dir = /var/log/monasca/api/
- debug=False
- region = RegionOne
- [security]
- # The roles that are allowed full access to the API.
- default_authorized_roles = admin, user, domainuser, domainadmin, monasca-user
- # The roles that are allowed to only POST metrics to the API. This role would be used by the Monasca Agent.
- agent_authorized_roles = admin
- # The roles that are allowed to only GET metrics from the API.
- read_only_authorized_roles = admin
- # The roles that are allowed to access the API on behalf of another tenant.
- # For example, a service can POST metrics to another tenant if they are a member of the "delegate" role.
- delegate_authorized_roles = admin
- [kafka]
- # The endpoint to the kafka server
- uri = localhost:9092
- [influxdb]
- # Only needed if Influxdb database is used for backend.
- # The IP address of the InfluxDB service.
- ip_address = localhost
- # The port number that the InfluxDB service is listening on.
- port = 8086
- # The username to authenticate with.
- user = monasca
- # The password to authenticate with.
- password = tyun
- # The name of the InfluxDB database to use.
- database_name = mon
- [database]
- url = "mysql+pymysql://monasca:tyun@127.0.0.1/mon"
- [keystone_authtoken]
- identity_uri = http://192.168.1.11:35357
- auth_uri = http://192.168.1.11:5000
- admin_password = tyun
- admin_user = monasca
- admin_tenant_name = service
- cafile =
- certfile =
- keyfile =
- insecure = false
注釋掉[mysql]部分,其他部分保持默認(rèn)。
創(chuàng)建monasca系統(tǒng)用戶并進(jìn)入目錄
- useradd monasca -U -r
- mkdir /var/log/monasca
- mkdir /var/log/monasca/api
- chown -R monasca. /var/log/monasca/
在openstack控制器節(jié)點上,創(chuàng)建monasca用戶密碼,為租戶服務(wù)中的用戶monasca分配管理員角色。
- openstack user create --domain default --password tyun monasca
- openstack role add --project service --user monasca admin
- openstack service create --name monasca --description "Monasca monitoring service" monitoring
- create endpoint
- openstack endpoint create --region RegionOne monasca public http://192.168.1.143:8082/v2.0
- openstack endpoint create --region RegionOne monasca internal http://192.168.1.143:8082/v2.0
- openstack endpoint create --region RegionOne monasca admin http://192.168.1.143:8082/v2.0
192.168.1.143是我的api虛擬機(jī)地址的浮動IP,請將其更改為您的IP。
創(chuàng)建monasca api啟動腳本,vim /etc/init/monasca-api.conf
- # Startup script for the Monasca API
- description "Monasca API Python app"
- start on runlevel [2345]
- console log
- respawn
- setgid monasca
- setuid monasca
- exec /usr/local/bin/gunicorn -n monasca-api -k eventlet --worker-connections=2000 --backlog=1000 --paste /etc/monasca/api-config.ini
安裝monasca-persister
創(chuàng)建monasca-persister啟動腳本
vim /etc/init/monasca-persister.conf
- # Startup script for the Monasca Persister
- description "Monasca Persister Python app"
- start on runlevel [2345]
- console log
- respawn
- setgid monasca
- setuid monasca
- exec /usr/bin/java -Dfile.encoding=UTF-8 -cp /opt/monasca/monasca-persister.jar monasca.persister.PersisterApplication server /etc/monasca/persister-config.yml
啟動monasca-persister
- service monasca-persister start
安裝monasca-notificatoin
- pip install --upgrade monasca-notification
- apt-get install sendmail
將notification.yaml復(fù)制到/etc/monasca/創(chuàng)建啟動腳本,vim /etc/init/monasca-notification.conf
- # Startup script for the monasca_notification
- description "Monasca Notification daemon"
- start on runlevel [2345]
- console log
- respawn
- setgid monasca
- setuid monasca
- exec /usr/bin/python /usr/local/bin/monasca-notification
啟動通知服務(wù)
- service monasca-notification start
安裝monasca-thresh復(fù)制monasca-thresh到/etc/init.d/復(fù)制monasca-thresh.jar到/opt/monasca-thresh/復(fù)制thresh-config.yml到/etc/monasca /并修改主機(jī)以及數(shù)據(jù)庫信息啟動monasca-thresh
- service monasca-thresh start
安裝monasca-agent
在openstack控制器節(jié)點上安裝monasca-agent,以便它可以監(jiān)控openstack服務(wù)進(jìn)程。
- sudo pip install --upgrade monasca-agent
設(shè)置monasca-agent,將用戶域ID和項目域ID更改為默認(rèn)值。
- monasca-setup -u monasca -p tyun --user_domain_id e25e0413a70c41449d2ccc2578deb1e4 --project_domain_id e25e0413a70c41449d2ccc2578deb1e4 --user monasca \
- --project_name service -s monitoring --keystone_url http://192.168.1.11:35357/v3 --monasca_url http://192.168.1.143:8082/v2.0 --config_dir /etc/monasca/agent --log_dir /var/log/monasca/agent --overwrite
加載認(rèn)證腳本admin-rc.sh,然后運(yùn)行monasca metric-list。
DevStack安裝
運(yùn)行Monasca DevStack至少需要一臺具有10GB RAM的主機(jī)。
可在此處找到安裝和運(yùn)行Devstack的說明:
- https://docs.openstack.org/devstack/latest/
要在DevStack中運(yùn)行Monasca,請執(zhí)行以下三個步驟。
克隆DevStack代碼庫。
- git clone https://git.openstack.org/openstack-dev/devstack
將以下內(nèi)容添加到devstack目錄根目錄中的DevStack local.conf文件中。如果local.conf不存在,則可能需要創(chuàng)建它。
- # BEGIN DEVSTACK LOCAL.CONF CONTENTS
- [[local|localrc]]
- DATABASE_PASSWORD=secretdatabase
- RABBIT_PASSWORD=secretrabbit
- ADMIN_PASSWORD=secretadmin
- SERVICE_PASSWORD=secretservice
- SERVICE_TOKEN=111222333444
- LOGFILE=$DEST/logs/stack.sh.log
- LOGDIR=$DEST/logs
- LOG_COLOR=False
- # The following two variables allow switching between Java and Python for the implementations
- # of the Monasca API and the Monasca Persister. If these variables are not set, then the
- # default is to install the Python implementations of both the Monasca API and the Monasca Persister.
- # Uncomment one of the following two lines to choose Java or Python for the Monasca API.
- MONASCA_API_IMPLEMENTATION_LANG=${MONASCA_API_IMPLEMENTATION_LANG:-java}
- # MONASCA_API_IMPLEMENTATION_LANG=${MONASCA_API_IMPLEMENTATION_LANG:-python}
- # Uncomment of the following two lines to choose Java or Python for the Monasca Pesister.
- MONASCA_PERSISTER_IMPLEMENTATION_LANG=${MONASCA_PERSISTER_IMPLEMENTATION_LANG:-java}
- # MONASCA_PERSISTER_IMPLEMENTATION_LANG=${MONASCA_PERSISTER_IMPLEMENTATION_LANG:-python}
- # Uncomment one of the following two lines to choose either InfluxDB or Vertica.
- # default "influxdb" is selected as metric DB
- MONASCA_METRICS_DB=${MONASCA_METRICS_DB:-influxdb}
- # MONASCA_METRICS_DB=${MONASCA_METRICS_DB:-vertica}
- # This line will enable all of Monasca.
- enable_plugin monasca-api https://git.openstack.org/openstack/monasca-api
- # END DEVSTACK LOCAL.CONF CONTENTS
從devstack目錄的根目錄運(yùn)行“ ./stack.sh”。
如果要使用最少的OpenStack組件運(yùn)行Monasca,可以將以下兩行添加到local.conf文件中。
- disable_all_services
- enable_service rabbit mysql key
如果您還希望安裝Tempest測試,請?zhí)砑?tempest
- enable_service rabbit mysql key tempest
要啟用Horizon和Monasca UI,請?zhí)砑?horizon
- enable_service rabbit mysql key horizon tempest
使用Vagrant
Vagrant可用于使用Vagrantfile部署運(yùn)行有Devstack和Monasca的VM。安裝Vagrant后,只需在../monasca-api/devstack目錄中運(yùn)行vagrant up命令。
要在devstack安裝中使用本地代碼庫,請將更改提交到本地存儲庫的master分支,然后在配置文件中修改與要使用的本地存儲庫相對應(yīng)的變量file://my/local/repo/location。要使用monasca-api repo的本地實例,請將更改enable_plugin monasca-api https://git.openstack.org/openstack/monasca-api為enable_plugin monasca-api file://my/repo/is/here。這兩個設(shè)置僅在重建devstack VM時生效。
1.使用Vagrant將Vertica啟用為Metrics DB
Monasca支持同時使用InfluxDB和Vertica來存儲指標(biāo)和告警狀態(tài)歷史記錄。默認(rèn)情況下,在DevStack環(huán)境中啟用InfluxDB。
Vertica是Hewlett Packard Enterprise的商業(yè)數(shù)據(jù)庫。可以下載免費(fèi)的Community Edition(CE)安裝程序,要啟用Vertica,請執(zhí)行以下操作:
- 注冊并下載Vertica Debian安裝程序https://my.vertica.com/download/vertica/community-edition/,并將其放在您的主目錄中。不幸的是,DevStack安裝程序沒有可以自動使用的URL,因此必須單獨(dú)下載該URL,并將其放置在安裝程序運(yùn)行時可以找到它的位置。安裝程序假定此位置是您的主目錄。使用Vagrant時,您的主目錄通常將以“ /vagrant_home”掛載在VM內(nèi)。
- 修改local.conf中MONASCA_METRICS_DB變量,配置Vertica的支持,如下所示:
MONASCA_METRICS_DB=${MONASCA_METRICS_DB:-vertica}
2.使用PostgreSQL或MySQL
Monasca支持使用PostgreSQL和MySQL,因此該devstack插件也支持。啟用postgresql或mysql。
要使用MySQL設(shè)置環(huán)境,請使用:
- enable_service mysql
另外,對于PostgreSQL,請使用:
- enable_service postgresql
3.使用ORM支持
ORM支持可以通過MONASCA_DATABASE_USE_ORM變量來控制。但是,如果啟用了PostgreSQL(也稱為數(shù)據(jù)庫后端),則將強(qiáng)制提供ORM支持
enable_service postgresql
4.加強(qiáng)Apache鏡像
如果由于某種原因APACHE_MIRROR而無法使用,則可以通過以下方式強(qiáng)制執(zhí)行:
- APACHE_MIRROR=http://www-us.apache.org/dist/
5.使用WSGI
Monasca-api可以使用uwsgi和gunicorn與Apache一起部署。默認(rèn)情況下,monasca-api在uwsgi下運(yùn)行。如果您想使用Gunicorn,請確保其中devstack/local.conf包含:
- MONASCA_API_USE_MOD_WSGI=False
使用
Monasca Dashboard
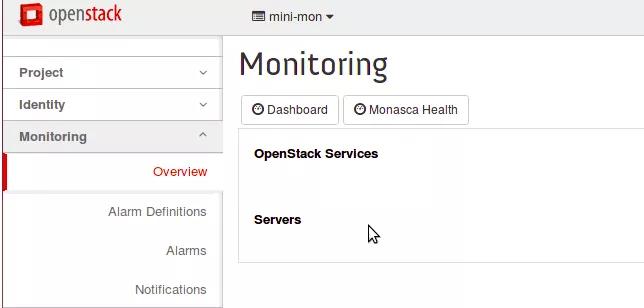
安裝完成Monasca Dashboard Plugin后,可以通過web控制臺進(jìn)行查看以及管理相應(yīng)的監(jiān)控與告警。
在操作控制臺的“Monitoring”欄,單擊“Launch Monitoring Dashboard“,這將打開在管理節(jié)點上運(yùn)行的專用OpenStack Horizon門戶。
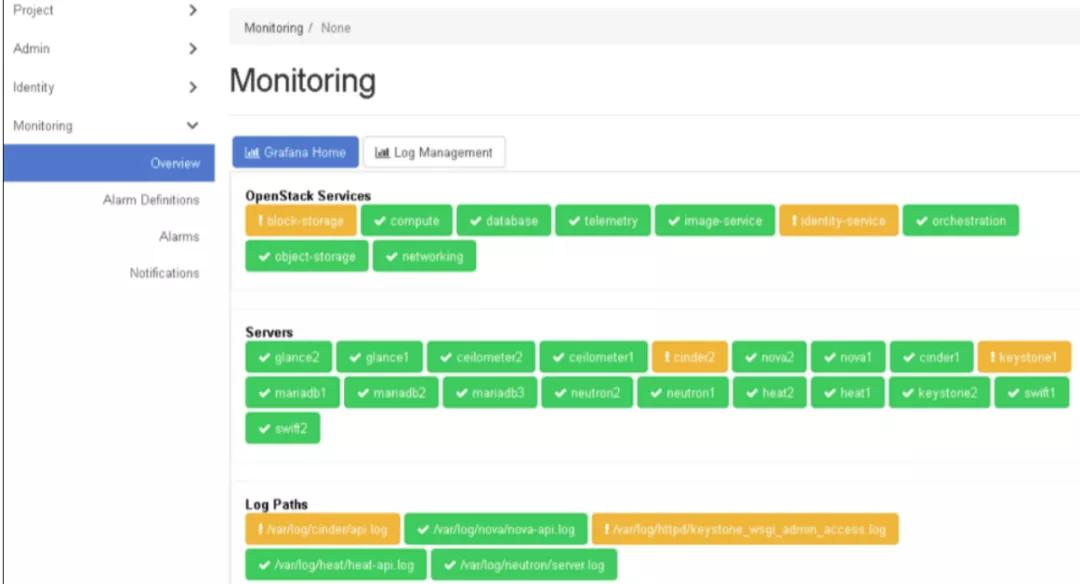
在該面板中,您可以:
- 單擊OpenStack服務(wù)名稱,以查看服務(wù)告警。
- 單擊服務(wù)器名稱以查看相關(guān)設(shè)備的告警。
監(jiān)控信息存儲在兩個數(shù)據(jù)庫中(Vertica/influxdb與mysql)。備份監(jiān)控數(shù)據(jù)時,將同時備份兩個數(shù)據(jù)庫。看到
- 監(jiān)控指標(biāo)在Vertica中存儲7天。
- 配置設(shè)置存儲在MySQL中。
- 如果監(jiān)控節(jié)點上的服務(wù)在高負(fù)載(例如15個控制網(wǎng)絡(luò)和200個計算節(jié)點)下停止,則消息隊列將在大約6個小時內(nèi)開始清除。
查看監(jiān)控信息
在操作控制臺中,通過從主菜單中選擇Monitoring Dashboard來打開監(jiān)控UI 。
單擊Launch Monitoring Dashboard。
將打開管理設(shè)備上OpenStack Horizon中的“Monitoring”儀表板。
使用您在首次安裝過程中為操作控制臺設(shè)置的用戶名和密碼登錄。
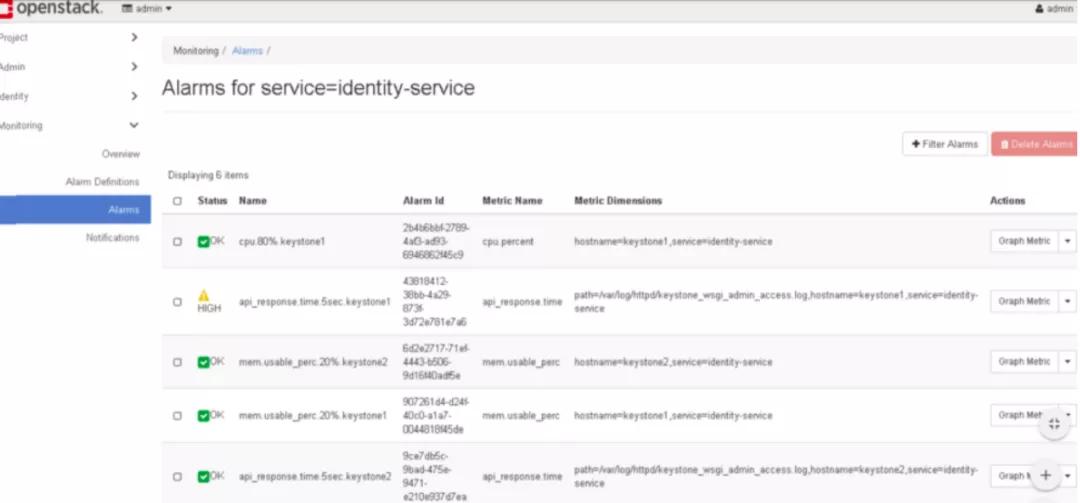
查看告警。您可以在屏幕上過濾結(jié)果。
- 點擊告警左側(cè)導(dǎo)航看到報警的所有服務(wù)和設(shè)備。
- 在每行右側(cè)的“操作”菜單上,可以單擊“Graph metrics”以查看告警明細(xì),并且可以顯示告警的歷史記錄和告警定義。您還可以在該告警的圖形頂部看到指標(biāo)名稱。
- 點擊OpenStack服務(wù)名稱以查看服務(wù)告警。
- 單擊服務(wù)器名稱以查看有關(guān)設(shè)備的告警。
單擊左側(cè)導(dǎo)航中的”Alarm Definitions “以查看和編輯已啟用的告警的類型。
注意:請勿更改或刪除任何默認(rèn)告警定義。但是,您可以添加新的告警定義。
您可以更改告警的名稱,表達(dá)式和其他詳細(xì)信息。
如果收到過多或不足的告警,則可能需要提高或降低告警閾值。
有關(guān)編寫告警表達(dá)式的信息。
可選:單擊Dashboard。
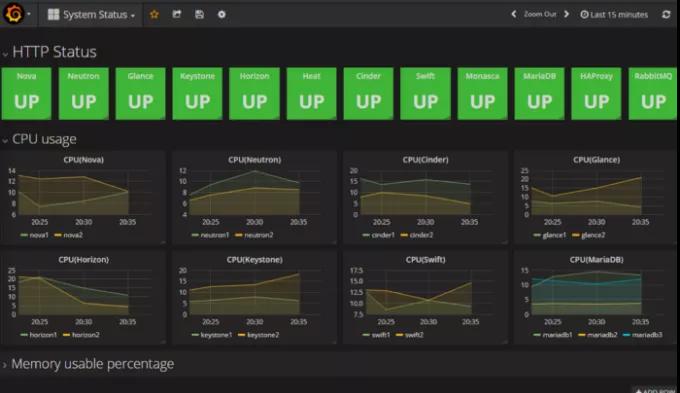
OpenStack儀表板(Grafana)打開。從該儀表板中,您可以看到OpenStack服務(wù)的運(yùn)行狀況以及每個節(jié)點的CPU和數(shù)據(jù)庫使用情況的圖形表示。
- 單擊圖形標(biāo)題(例如,CPU),然后單擊“編輯”。
- 更改功能以查看圖中的其他類型的信息。
可選:單擊Monasca Health。
將打開“ Monasca服務(wù)儀表板”。在此儀表板上,您可以看到Monasca服務(wù)運(yùn)行狀況的圖形表示。
總結(jié)
Monasca作為Openstack的monitoring-as-a-service組件,目前社區(qū)和網(wǎng)上的資料還是比較少。本文通過作者的實踐,記錄了Monasca相關(guān)的安裝和配置以及使用的方法,
Monasca是一個可以實現(xiàn)IAAS到PAAS的高擴(kuò)展,高性能的監(jiān)控系統(tǒng),其體系架構(gòu)決定了它能夠輕松駕馭大集群,高負(fù)載的監(jiān)控。當(dāng)前我們已經(jīng)逐步擯棄了ceilometer+gnocchi+aodh的組合,全面轉(zhuǎn)向Monasca。當(dāng)前監(jiān)控的不僅僅是云主機(jī),云網(wǎng)絡(luò),同時也監(jiān)控著我們Openstack集群內(nèi)部的Kubernetns集群,數(shù)據(jù)庫集群,對象存儲等PAAS軟件。
參考文章:
https://docs.openstack.org/monasca-api/latest/
https://wiki.openstack.org/wiki/Monasca