一個90后女孩的第一個 Spring Boot 應用
本文轉(zhuǎn)載自微信公眾號「小明菜市場 」,作者小明菜市場。轉(zhuǎn)載本文請聯(lián)系小明菜市場公眾號。
前言
Spring Boot 出現(xiàn)的原因
Spring Boot的出現(xiàn),主要是用來解決 Spring 過去的一些問題,提出了約定優(yōu)于配置的思想,默認對很多方法進行了設(shè)置,使得開發(fā)者可以快速的構(gòu)建項目,集成第三方的內(nèi)容。使得開發(fā)效率大大提升。
基本概念
Spring Boot 不單單是一套框架,是一套體系,目的是簡化 Spring 的開發(fā)。
特點
基于 Spring 的開發(fā)提供更快的入門 直接上手,冗余代碼沒有 內(nèi)嵌式容器 簡化 Spring
核心功能極度依賴構(gòu)建工具 能夠進行自動化的配置
Hello World
Maven創(chuàng)建
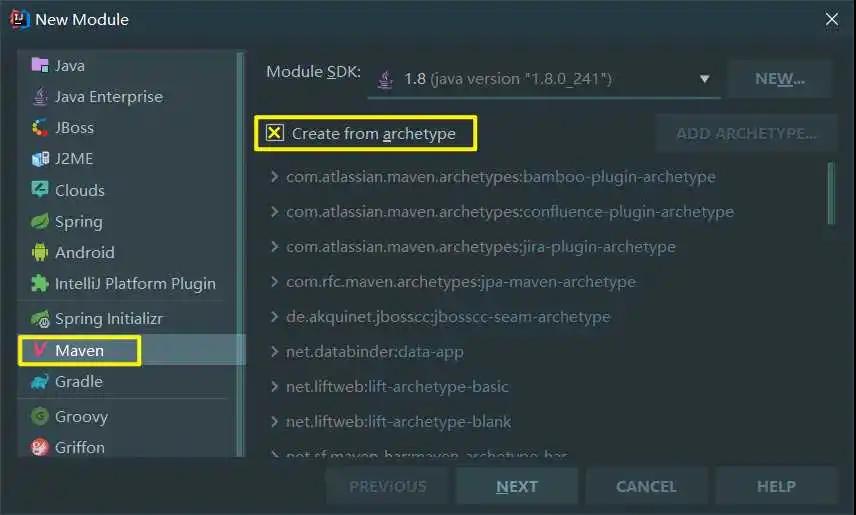
創(chuàng)建一個新的空工程,分別創(chuàng)建 module,如下圖所示
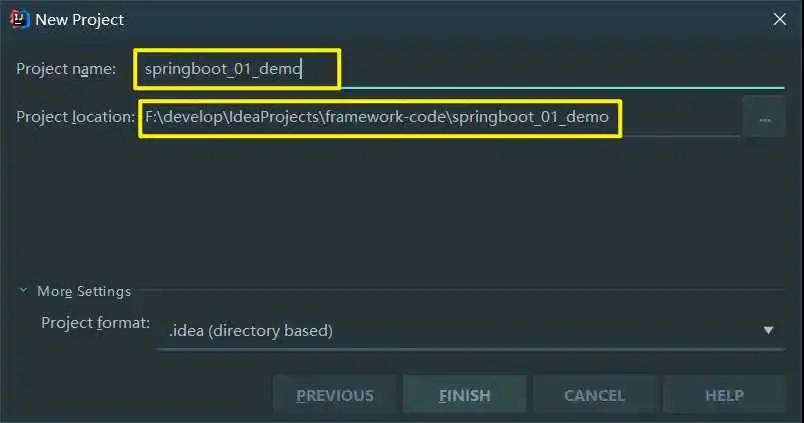
創(chuàng)建 Maven Module
創(chuàng)建一個 Module,選擇 Maven 工程,勾選以前用的 web 骨架
填寫好 GroupID,ArtifactID
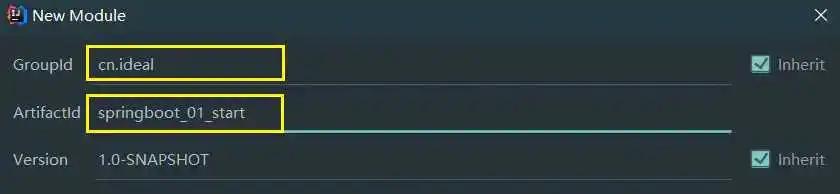
選擇好以后,按住回車
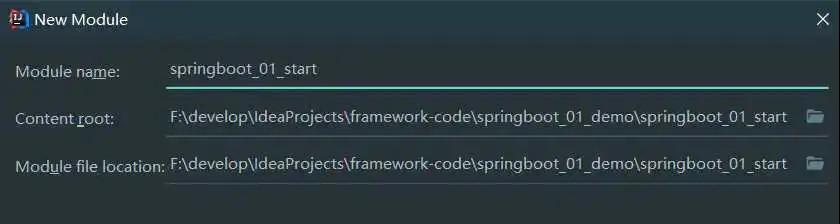
這樣就完成了一個基本的 maven 項目的創(chuàng)建
添加起步依賴
根據(jù) Spring Boot 的要求,進行簡單的測試,以及添加相應的起步依賴 項目需要繼承 Spring Boot 的起步依賴 Spring boot starter parent 為了集成 Spring MVC 進行 Controller 開發(fā),需要導入 Spring boot starter web
- <?xml version="1.0" encoding="UTF-8"?>
- <project xmlns="http://maven.apache.org/POM/4.0.0"
- xmlns:xsi="http://www.w3.org/2001/XMLSchema-instance"
- xsi:schemaLocation="http://maven.apache.org/POM/4.0.0 http://maven.apache.org/xsd/maven-4.0.0.xsd">
- <modelVersion>4.0.0</modelVersion>
- <parent>
- <groupId>org.springframework.boot</groupId>
- <artifactId>spring-boot-starter-parent</artifactId>
- <version>2.2.7.RELEASE</version>
- </parent>
- <groupId>cn.ideal</groupId>
- <artifactId>springboot_01_start</artifactId>
- <version>1.0-SNAPSHOT</version>
- <dependencies>
- <dependency>
- <groupId>org.springframework.boot</groupId>
- <artifactId>spring-boot-starter-web</artifactId>
- </dependency>
- </dependencies>
- </project>
編寫 Spring Boot 啟動類
這里編寫 Spring Boot 啟動類
- package cn.ideal;
- import org.springframework.boot.SpringApplication;
- import org.springframework.boot.autoconfigure.SpringBootApplication;
- @SpringBootApplication
- public class MySpringBootApplication {
- public static void main(String[] args) {
- SpringApplication.run(MySpringBootApplication.class);
- }
- }
創(chuàng)建控制層
- package cn.ideal.controller;
- import org.springframework.stereotype.Controller;
- import org.springframework.web.bind.annotation.RequestMapping;
- import org.springframework.web.bind.annotation.ResponseBody;
- @Controller
- public class QuickStartController {
- @RequestMapping("/test")
- @ResponseBody
- public String test(){
- return "springboot 訪問測試,起飛,飛飛飛飛 ~ ~ ~";
- }
- }
測試 Spring Boot
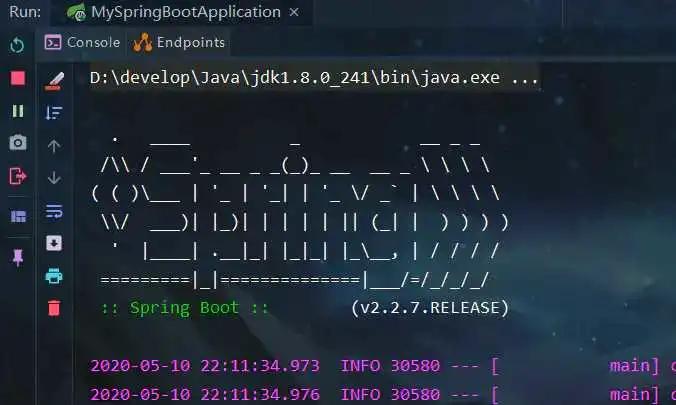
項目啟動,控制臺會輸出如下內(nèi)容
- . ____ _ __ _ _
- /\ / ___'_ __ _ _(_)_ __ __ _
- ( ( )___ | '_ | '_| | '_ / _` |
- \/ ___)| |_)| | | | | || (_| | ) ) ) )
- ' |____| .__|_| |_|_| |___, | / / / /
- =========|_|==============|___/=/_/_/_/
- :: Spring Boot :: (v2.2.7.RELEASE)
- 2020-05-10 22:11:34.973 INFO 30580 --- [ main] cn.ideal.MySpringBootApplication : Starting MySpringBootApplication on LAPTOP-5T03DV1G with PID 30580 (F:developIdeaProjectsframework-codespringboot_01_demospringboot_01_starttargetclasses started by abc in F:developIdeaProjectsframework-codespringboot_01_demo)
- 2020-05-10 22:11:34.976 INFO 30580 --- [ main] cn.ideal.MySpringBootApplication : No active profile set, falling back to default profiles: default
- 2020-05-10 22:11:35.686 INFO 30580 --- [ main] o.s.b.w.embedded.tomcat.TomcatWebServer : Tomcat initialized with port(s): 8080 (http)
- 2020-05-10 22:11:35.693 INFO 30580 --- [ main] o.apache.catalina.core.StandardService : Starting service [Tomcat]
- 2020-05-10 22:11:35.693 INFO 30580 --- [ main] org.apache.catalina.core.StandardEngine : Starting Servlet engine: [Apache Tomcat/9.0.34]
- 2020-05-10 22:11:35.765 INFO 30580 --- [ main] o.a.c.c.C.[Tomcat].[localhost].[/] : Initializing Spring embedded WebApplicationContext
- 2020-05-10 22:11:35.766 INFO 30580 --- [ main] o.s.web.context.ContextLoader : Root WebApplicationContext: initialization completed in 747 ms
- 2020-05-10 22:11:35.884 INFO 30580 --- [ main] o.s.s.concurrent.ThreadPoolTaskExecutor : Initializing ExecutorService 'applicationTaskExecutor'
- 2020-05-10 22:11:35.990 INFO 30580 --- [ main] o.s.b.w.embedded.tomcat.TomcatWebServer : Tomcat started on port(s): 8080 (http) with context path ''
- 2020-05-10 22:11:35.993 INFO 30580 --- [ main] cn.ideal.MySpringBootApplication
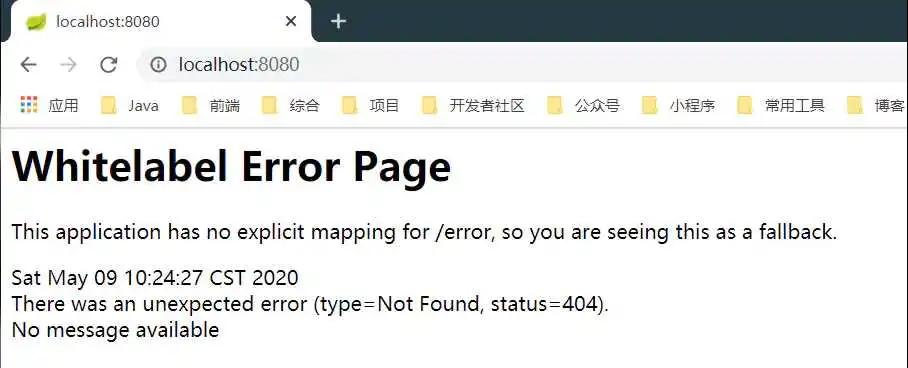
圖片顯示如下
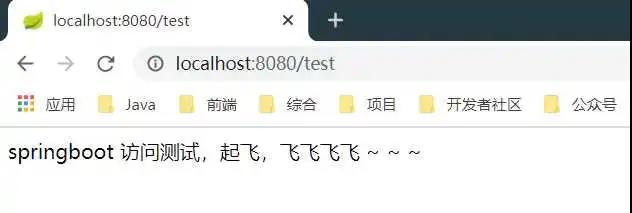
輸入創(chuàng)建的 controller 項目直接打印出來
項目打包成為 jar 包
添加依賴
- <plugin>
- <!-- 打包插件 -->
- <groupId>org.springframework.boot</groupId>
- <artifactId>spring-boot-maven-plugin</artifactId>
- </plugin>
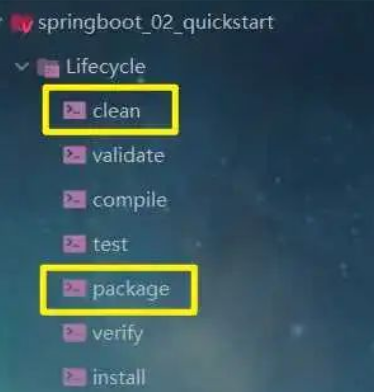
單擊右邊,進行package 進行打包,選擇package選項
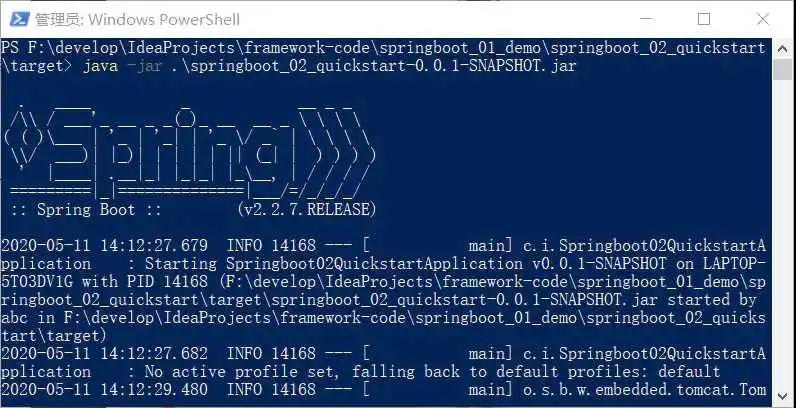
可以看到target下產(chǎn)生了新的jar包,這里直接在cmd中運行
關(guān)于作者
我是小小,一枚小小的程序猿。bye~bye!