從0到1 手把手教你建一個區塊鏈
譯文【51CTO.com快譯】近期的區塊鏈重回熱點,如果你想深入了解區塊鏈,那就來看一下本文,手把手教你構建一個自己的區塊鏈。
弄懂區塊鏈的最快方法-親自構建一個
看到這篇文章,說明您也是對加密貨幣的興起感興趣,想知道區塊鏈是如何工作的和其背后運行的技術原理。
但是想要搞懂區塊鏈并不容易。我在眾多的視頻中苦苦鉆研,跟隨著漏洞百出的教程,經歷著因區塊鏈相關案例太少而產生的挫敗感。
我喜歡從行動中學習。它迫使我從代碼層面處理問題,從而解決問題。如果您和我一樣做,那么在本指南的最后,您將擁有一個運行正常的區塊鏈,并對它們的工作原理有深入的了解。
上手準備
請記住,區塊鏈是一個不可變的、連續的記錄鏈,稱為塊。它們可以包含事務、文件或您喜歡的任何數據。但是重要的是,它們通過使用哈希而被鏈接在一起。
如果您不確定什么是哈希值,請參考這里。
教程面向的人群?
可以輕松地閱讀和編寫一些基本的Python,并且對HTTP請求的工作方式有所了解,因為本文將通過HTTP與區塊鏈進行交流。
需要準備什么?
確保已安裝 Python 3.6 +(以及pip)。您還需要安裝Flask和很棒的Requests庫:
pip install Flask==0.12.2 requests==2.18.4
您還需要HTTP客戶端,例如Postman或cURL。
源代碼可在此處獲得。
步驟1:構建一個區塊鏈
打開你最喜歡的文本編輯器或IDE,我個人喜歡 PyCharm。創建一個名為blockchain.py的新文件。我們將只使用一個文件,但是如果您有困惑了,可以隨時參考源代碼。
展示區塊鏈
我們將創建一個Blockchain class,它的構造函數會創建一個初始的空列表(用于存儲我們的區塊鏈),另一個用于存儲事務。這是腳本:
class Blockchain(object):
def __init__(self):
self.chain = []
self.current_transactions = []
def new_block(self):
# Creates a new Block and adds it to the chain
pass
def new_transaction(self):
# Adds a new transaction to the list of transactions
pass
@staticmethod
def hash(block):
# Hashes a Block
pass
@property
def last_block(self):
# Returns the last Block in the chain
pass
??Blockchain class?? 的demo
我們的Blockchain class負責管理鏈。它將存儲事物,并具有一些將新塊添加到鏈中的輔助方法。讓我們來嘗試一些新的方法吧。
Block像什么?
每個Block都有以下的內容:
- 一個索引,
- 一個時間戳(Unix時間),
- 一個交易列表,
- 一個證明(稍后會有更多說明)
- 前一個區塊的哈希值。
單個區塊示例:
block = {
'index': 1,
'timestamp': 1506057125.900785,
'transactions': [
{
'sender': "8527147fe1f5426f9dd545de4b27ee00",
'recipient': "a77f5cdfa2934df3954a5c7c7da5df1f",
'amount': 5,
}
],
'proof': 324984774000,
'previous_hash': "2cf24dba5fb0a30e26e83b2ac5b9e29e1b161e5c1fa7425e73043362938b9824"
}
在這一點上,鏈的概念應該很明顯--每個新區塊本身都包含前一個區塊的哈希值。這是至關重要的,因為這給予了區塊鏈的不可篡改性:如果攻擊者破壞了鏈中較早的區塊,則后續所有的區塊都將包含不正確的哈希值。
不知道你能理解嘛,請多花些時間去理解它—這是區塊鏈的核心思想。
添加事物到區塊中
我們需要一種將事物添加到區塊的方法。我們的new_transaction()方法有效,而且很簡單:
class Blockchain(object):
...
def new_transaction(self, sender, recipient, amount):
"""
Creates a new transaction to go into the next mined Block
:param sender: Address of the Sender
:param recipient: Address of the Recipient
:param amount: Amount
:return: The index of the Block that will hold this transaction
"""
self.current_transactions.append({
'sender': sender,
'recipient': recipient,
'amount': amount,
})

return self.last_block['index'] + 1
在new_transaction()添加一個新的交易到列表中,它將返回到交易將被添加進去、即將被開采的區塊的索引。這對之后提交交易的用戶是很有用處的。
創建新區塊
當我們Blockchain被實例化,我們需要用一個genesis塊來播種它——一個沒有前處理的塊。還需要向我們的創世區塊添加一個“證明”,這是挖掘(或工作證明)的結果。稍后我們將詳細討論挖礦。
除了在構造函數中創建genesis塊,我們還將充實new_block()、new_transaction()和hash()的方法:
import hashlib
import json
from time import time
class Blockchain(object):
def __init__(self):
self.current_transactions = []
self.chain = []
# Create the genesis block
self.new_block(previous_hash=1, proof=100)
def new_block(self, proof, previous_hash=None):
"""
Create a new Block in the Blockchain
:param proof: The proof given by the Proof of Work algorithm
:param previous_hash: (Optional) Hash of previous Block
:return: New Block
"""
block = {
'index': len(self.chain) + 1,
'timestamp': time(),
'transactions': self.current_transactions,
'proof': proof,
'previous_hash': previous_hash or self.hash(self.chain[-1]),
}
# Reset the current list of transactions
self.current_transactions = []
self.chain.append(block)
return block
def new_transaction(self, sender, recipient, amount):
"""
Creates a new transaction to go into the next mined Block
:param sender: Address of the Sender
:param recipient: Address of the Recipient
:param amount: Amount
:return: The index of the Block that will hold this transaction
"""
self.current_transactions.append({
'sender': sender,
'recipient': recipient,
'amount': amount,
})
return self.last_block['index'] + 1
@property
def last_block(self):
return self.chain[-1]
@staticmethod
def hash(block):
"""
Creates a SHA-256 hash of a Block
:param block: Block
:return:
"""
# We must make sure that the Dictionary is Ordered, or we'll have inconsistent hashes
block_string = json.dumps(block, sort_keys=True).encode()
return hashlib.sha256(block_string).hexdigest()
上面的內容應該很簡單—我添加了一些注釋和文檔字符串來幫助保持清楚明了。對區塊鏈的表示幾乎完成了。但此時,您一定想知道如何創建、鍛造或挖掘新的區塊。
了解工作量證明
工作算法(PoW)是在區塊鏈上創建或挖掘新區塊的方式。PoW的目標是發現可以解決問題的數字。從數字上來說,很難找到該數字,但是很容易被網絡上的任何人進行驗證。這是工作證明的核心思想。
我們將看一個非常簡單的示例來幫助理解。
讓我們決定某個整數X乘以另一個Y的哈希必須以0結尾。因此,對于這個簡化的示例,讓我們修復。在Python中實現:xy0hash(x * y) = ac23dc...0x = 5
from hashlib import sha256
x = 5
y = 0 # We don't know what y should be yet...
while sha256(f'{x*y}'.encode()).hexdigest()[-1] != "0":
y += 1
print(f'The solution is y = {y}')
解是y = 21。因為,產生的哈希值以0結尾:
hash(5 * 21)= 1253e9373e ... 5e3600155e860
在比特幣中,工作證明算法稱為Hashcash。而且與我們上面的示例并沒有太大不同。這是礦工為了創建一個新的塊而競相求解的算法。通常,難度由字符串中搜索的字符數決定。然后,通過在交易中獲得硬幣,礦工將借此獲得獎勵。
網絡能夠輕松驗證他們的解決方案。
實施基本的工作證明
讓我們為區塊鏈實現類似的算法。我們的規則將類似于上面的示例:
找出一個數字 p ,當該數字與上一個塊的解決方案進行哈希運算時,將產生一個帶有4個前導4個0的哈希。
import hashlib
import json
from time import time
from uuid import uuid4
class Blockchain(object):
...
def proof_of_work(self, last_proof):
"""
Simple Proof of Work Algorithm:
- Find a number p' such that hash(pp') contains leading 4 zeroes, where p is the previous p'
- p is the previous proof, and p' is the new proof
:param last_proof:
:return:
"""
proof = 0
while self.valid_proof(last_proof, proof) is False:
proof += 1
return proof
@staticmethod
def valid_proof(last_proof, proof):
"""
Validates the Proof: Does hash(last_proof, proof) contain 4 leading zeroes?
:param last_proof: Previous Proof
:param proof: Current Proof
:return: True if correct, False if not.
"""
guess = f'{last_proof}{proof}'.encode()
guess_hash = hashlib.sha256(guess).hexdigest()
return guess_hash[:4] == "0000"
要調整算法的難度,我們可以修改前導零的數量。但是4就足夠了。您會發現,添加單個前導零會極大地縮短尋找解決方案所需的時間。
我們的類快要完成了,我們已經準備好開始使用HTTP請求與其進行交互。
步驟2:我們的區塊鏈作為API
我們將使用Python Flask框架。這是一個微框架,可輕松將端點映射到Python函數。這使我們可以使用HTTP請求通過web與區塊鏈進行通信。
我們將創建三種方法:
- /transactions/new 創建一個新的交易塊。
- /mine 告訴我們的服務器挖掘一個新塊。
- /chain 返回完整的區塊鏈。
設置Flask
我們的“服務器”將在我們的區塊鏈網絡中形成單個節點。讓我們創建一個demo:
import hashlib
import json
from textwrap import dedent
from time import time
from uuid import uuid4
from flask import Flask
class Blockchain(object):
...
# Instantiate our Node
app = Flask(__name__)
# Generate a globally unique address for this node
node_identifier = str(uuid4()).replace('-', '')
# Instantiate the Blockchain
blockchain = Blockchain()
@app.route('/mine', methods=['GET'])
def mine():
return "We'll mine a new Block"
@app.route('/transactions/new', methods=['POST'])
def new_transaction():
return "We'll add a new transaction"
@app.route('/chain', methods=['GET'])
def full_chain():
response = {
'chain': blockchain.chain,
'length': len(blockchain.chain),
}
return jsonify(response), 200
if __name__ == '__main__':
app.run(host='0.0.0.0', port=5000)
簡要說明:
- 第15行:實例化我們的節點;??Flask更多信息??。
- 第18行:為節點創建一個隨機名稱。
- 第21行:實例化Blockchain類。
- 第24–26行:創建/mine端點,這是一個GET請求。
- 第28–30行:創建/transactions/new端點,這是一個POST請求,因為我們將向它發送數據。
- 第32–38行:創建/chain端點,該端點返回完整的區塊鏈。
- 40-41行:在端口5000上運行服務器。
交易端點
這就是交易請求的樣子。這是用戶發送到服務器的內容:
{
"sender": "my address",
"recipient": "someone else's address",
"amount": 5
}
由于我們已經有了用于將事務添加到塊中的類方法,因此其余操作很簡單。讓我們編寫添加事務的函數:
import hashlib
import json
from textwrap import dedent
from time import time
from uuid import uuid4
from flask import Flask, jsonify, request
...
@app.route('/transactions/new', methods=['POST'])
def new_transaction():
values = request.get_json()
# Check that the required fields are in the POST'ed data
required = ['sender', 'recipient', 'amount']
if not all(k in values for k in required):
return 'Missing values', 400
# Create a new Transaction
index = blockchain.new_transaction(values['sender'], values['recipient'], values['amount'])
response = {'message': f'Transaction will be added to Block {index}'}
return jsonify(response), 201
創建交易的方法
步驟3:與區塊鏈交互
您可以使用普通的舊cURL或Postman通過網絡與我們的API進行交互。
啟動服務器:
$ python blockchain.py
* Running on http://127.0.0.1:5000/ (按CTRL + C退出)
讓我們嘗試通過向http://localhost:5000/mine:發出GET請求來挖掘一個塊:
?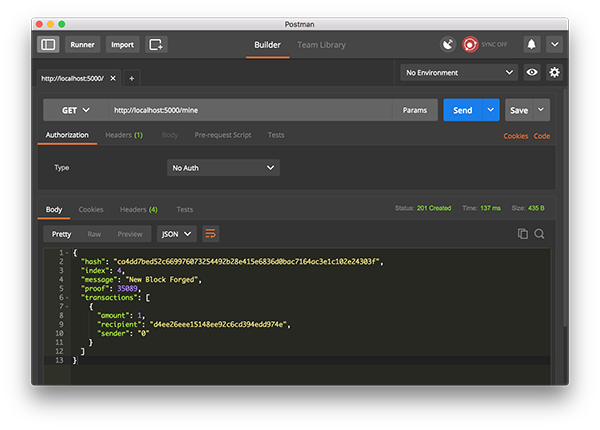 ?
?
使用郵遞員發出GET請求讓我們創建一個新的事務,通過發送POST請求到http://localhost:5000/transactions/new,其主體包含我們的事務結構:
?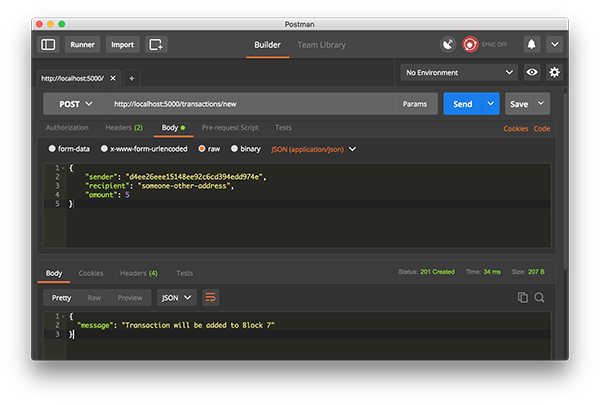 ?
?
使用郵遞員發出POST請求
如果您不使用Postman,可以使用cURL發出等效請求:http://localhost:5000/chain:
{
"chain": [
{
"index": 1,
"previous_hash": 1,
"proof": 100,
"timestamp": 1506280650.770839,
"transactions": []
},
{
"index": 2,
"previous_hash": "c099bc...bfb7",
"proof": 35293,
"timestamp": 1506280664.717925,
"transactions": [
{
"amount": 1,
"recipient": "8bbcb347e0634905b0cac7955bae152b",
"sender": "0"
}
]
},
{
"index": 3,
"previous_hash": "eff91a...10f2",
"proof": 35089,
"timestamp": 1506280666.1086972,
"transactions": [
{
"amount": 1,
"recipient": "8bbcb347e0634905b0cac7955bae152b",
"sender": "0"
}
]
}
],
"length": 3
}
步驟4:共識
我們目前已經擁有一個基本的區塊鏈,可以接受交易并允許我們挖掘新的區塊。但是區塊鏈的重點在于它們應該去中心化。而且,如果它們是去中心,我們如何確保它們都反映相同的鏈?這叫做共識問題,如果我們要在網絡中擁有多個節點,就必須實現共識算法。
注冊新節點
在實現共識算法之前,我們需要一種讓節點知道網絡上相鄰節點的方法。我們網絡上的每個節點都應保留網絡上其他節點的注冊表。
因此,我們將需要更多的端點:
- /nodes/register 接受URL形式的新節點列表。
- /nodes/resolve 實現我們的共識算法,該算法可以解決所有沖突-確保節點具有正確的鏈。
我們需要修改區塊鏈的構造函數,并提供一種注冊節點的方法:
...
from urllib.parse import urlparse
...
class Blockchain(object):
def __init__(self):
...
self.nodes = set()
...
def register_node(self, address):
"""
Add a new node to the list of nodes
:param address: Address of node. Eg. 'http://192.168.0.5:5000'
:return: None
"""
parsed_url = urlparse(address)
self.nodes.add(parsed_url.netloc)
一種將相鄰節點添加到網絡的方法
請注意,我們使用了a set()來保存節點列表。這是一種廉價方法,它確保添加新節點是冪等,這意味著無論我們添加特定節點多少次,它都將只出現一次。
實施共識算法
如上所述,當一個節點與另一節點具有不同的鏈時會發生沖突。為了解決這個問題,我們規定最長的有效鏈是具有最高權威的。換句話說,網絡上最長的鏈是事實鏈。使用此算法,我們可以在網絡中的節點之間達成共識。
...
import requests
class Blockchain(object)
...
def valid_chain(self, chain):
"""
Determine if a given blockchain is valid
:param chain: A blockchain
:return: True if valid, False if not
"""
last_block = chain[0]
current_index = 1
while current_index < len(chain):
block = chain[current_index]
print(f'{last_block}')
print(f'{block}')
print("\n-----------\n")
# Check that the hash of the block is correct
if block['previous_hash'] != self.hash(last_block):
return False
# Check that the Proof of Work is correct
if not self.valid_proof(last_block['proof'], block['proof']):
return False
last_block = block
current_index += 1
return True
def resolve_conflicts(self):
"""
This is our Consensus Algorithm, it resolves conflicts
by replacing our chain with the longest one in the network.
:return: True if our chain was replaced, False if not
"""
neighbours = self.nodes
new_chain = None
# We're only looking for chains longer than ours
max_length = len(self.chain)
# Grab and verify the chains from all the nodes in our network
for node in neighbours:
response = requests.get(f'http://{node}/chain')
if response.status_code == 200:
length = response.json()['length']
chain = response.json()['chain']
# Check if the length is longer and the chain is valid
if length > max_length and self.valid_chain(chain):
max_length = length
new_chain = chain
# Replace our chain if we discovered a new, valid chain longer than ours
if new_chain:
self.chain = new_chain
return True
return False
第一種方法valid_chain()負責通過檢查每個塊并驗證哈希和檢驗鏈是否有效。
resolve_conflicts()是一種方法,它會檢查我們所有的相鄰節點,下載它們的鏈并使用上述方法驗證它們。如果找到有效鏈,其長度大于我們的長度,我們將替換它。
讓我們將兩個端點注冊到我們的API,一個端點用于添加相鄰節點,另一個端點用于解決沖突:
@app.route('/nodes/register', methods=['POST'])
def register_nodes():
values = request.get_json()
nodes = values.get('nodes')
if nodes is None:
return "Error: Please supply a valid list of nodes", 400
for node in nodes:
blockchain.register_node(node)
response = {
'message': 'New nodes have been added',
'total_nodes': list(blockchain.nodes),
}
return jsonify(response), 201
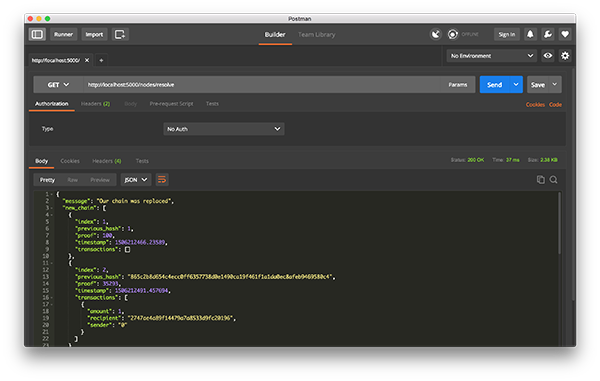
@app.route('/nodes/resolve', methods=['GET'])
def consensus():
replaced = blockchain.resolve_conflicts()
if replaced:
response = {
'message': 'Our chain was replaced',
'new_chain': blockchain.chain
}
else:
response = {
'message': 'Our chain is authoritative',
'chain': blockchain.chain
}
return jsonify(response), 200此時,您可以根據需要使用其他計算機,并在網絡上啟動不同的節點。或使用同一臺計算機上的不同端口啟動進程。我在機器上的另一個端口上旋轉了另一個節點,并將其注冊到當前節點。因此,我有兩個節點:http://localhost:5000和http://localhost:5001。
?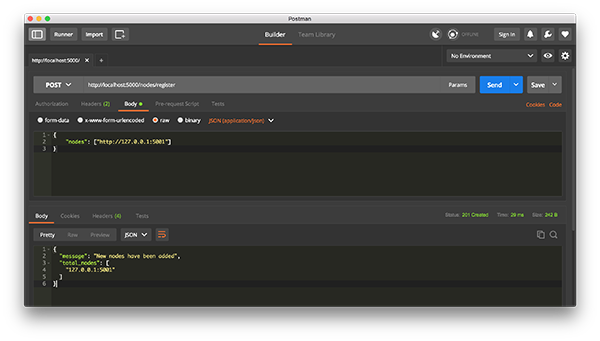 ?
?
注冊新節點
然后,我在節點2上挖到了一些新區塊,以確保鏈更長。之后,對GET /nodes/resolve在節點1上進行了調用,在該節點上,該鏈被共識算法替換:
? ?
?
工作中的共識算法
目前為止已經接近成功;可以去找一些朋友一起幫助測試您的區塊鏈。
原文標題:Learn Blockchains by Building One,作者:Daniel van Flymen
【51CTO譯稿,合作站點轉載請注明原文譯者和出處為51CTO.com】