是時候閉環Java應用了
你曾經因為部署/上線而痛苦嗎?你曾經因為要去運維那改配置而煩惱嗎?在我接觸過的一些部署/上線方式中,曾碰到過以下一些問題:
1、程序代碼和依賴都是人工上傳到服務器,不是通過工具進行部署和發布;
2、目錄結構沒有規范,jar啟動時通過-classpath任意指定;
3、fat jar,把程序代碼、配置文件和依賴jar都打包到一個jar中,改配置文件太費勁;
4、不管是非web應用還是web應用都部署到web容器環境,如Tomcat;
5、web應用還需要先在服務器上安裝好環境(如裝Tomcat)才能部署,想升級版本或者換個容器太難了;
6、線上參數修改還需要找運維,痛苦。
還有如沒有自動部署平臺,回滾到上一個版本那可真是天方夜談;增量包而非全量包,無法自由在在的回滾;前端代碼直接覆蓋而非版本化,難快速回滾,出問題要清理CDN,痛苦;ngx_lua項目時不按照項目的方式部署,在服務器上隨意修改代碼,導致某些服務器忘記修改或者版本不一致,排查問題太痛苦。
還有很多部署中不好的方式,但是本文只關注閉環Java應用帶來的好處。首先介紹下應該如何部署應用,然后介紹下什么是閉環Java應用,它的好處和如何搭建。
應該如何部署應用
項目
項目中應該包括了所有要執行的代碼、啟停腳本,比如非web應用

web應用
打包應用后,會按照相應的目錄結構構建。如果項目使用maven,可以使用maven-assembly-plugin進行按照相應的目錄結構構件。
即項目、打包的應用要按照統一的風格來實施。
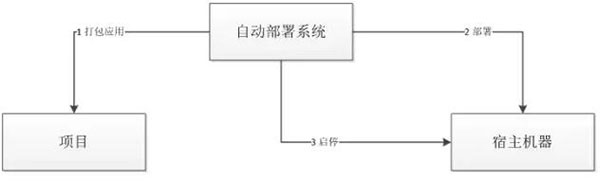
自動部署系統
自動部署系統負責打包應用(比如執行mvn相應的命令即可)、抽包(從指定目錄抽取要部署的代碼,如target/nonweb-example-package目錄)、部署代碼(發布代碼,將代碼同步到宿主機器)、啟停應用(配置指定的啟停腳本并調用)。
自動部署除了這些功能外,應該還有如發布歷史管理(回滾)、分組管理(如不同機房不同的配置文件)、配置管理(如要修改啟動/停止腳本、修改配置文件[不同機房不同的配置]、參數管理[如jvm參數等])等。
宿主機器
即代碼部署到的機器,它應該只安裝最小化環境,如只需要裝JDK即可,像Tomcat是不需要安裝的,由應用決定使用哪個容器。
通過增加自動部署系統可以更好的進行項目的統一發布、管理和回滾。
閉環Java應用
閉環Java應用指Java代碼、容器、配置文件、啟停腳本等都在同一處維護,修改配置文件、修改環境參數、更改容器類型等都不需要到宿主機器上進行更改。宿主機器只提供基本運行環境,如僅部署JDK環境即可,不需要部署如Tomcat容器,需要什么容器,都是在Java應用中指定。
這樣的好處是配置文件修改、JVM參數修改、容器的選擇都可以在Java應用中配置,形成閉環。
閉環Java應用的目的主要是讓Java應用能自啟動,這樣程序的控制權就在我們手里,而不是運維手里。而我們更懂我們的程序。
隨著微服務概念的流行,spring boot也受到大家的熱捧。spring boot能幫助我們快速構建基于spring的應用;其能方便創建自啟動應用、可以嵌入各種容器(如Tomcat、Jetty)、提供了一些starter pom用于簡化配置文件、自動化配置(只需要引入相關的pom,就自動獲得了某些功能)等。
在介紹spring boot之前,我們看下在以前是怎么構建閉環Java應用。
從零構建非web應用
項目結構
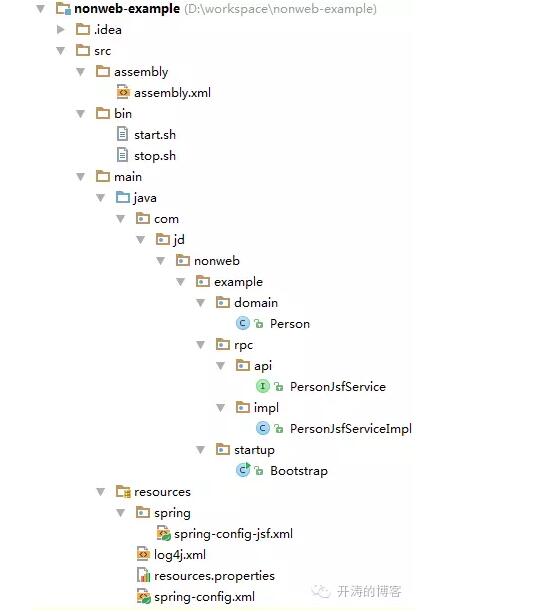
本示例演示了構建一個非web應用RPC服務生產者(如Dubbo服務),還可以構建如Worker類型的應用,他們本身不需要web容器,作為普通的java應用啟動即可。
maven依賴(pom.xml)
需要自己添加如spring-core、spring-context等相關依賴,此處就不展示了。
打包配置(pom.xml)
nonweb-example\pom.xml
- <plugin>
- <groupId>org.apache.maven.plugins</groupId>
- <artifactId>maven-assembly-plugin</artifactId>
- <version>2.6</version>
- <configuration>
- <descriptor>src/assembly/assembly.xml</descriptor>
- <finalName>${project.build.finalName}</finalName>
- </configuration>
- <executions>
- <execution>
- <phase>package</phase>
- <goals>
- <goal>directory</goal>
- </goals>
- </execution>
- </executions>
- </plugin>
使用maven-assembly-plugin進行打包;打包配置如下:
- <id>package</id>
- <formats>
- <format>dir</format>
- </formats>
- <includeBaseDirectory>false</includeBaseDirectory>
- <fileSets>
- <!-- 可執行文件 -->
- <fileSet>
- <directory>src/bin</directory>
- <outputDirectory>bin</outputDirectory>
- <includes>
- <include>*.bat</include>
- </includes>
- <lineEnding>dos</lineEnding>
- </fileSet>
- <fileSet>
- <directory>src/bin</directory>
- <outputDirectory>bin</outputDirectory>
- <includes>
- <include>*.sh</include>
- </includes>
- <lineEnding>unix</lineEnding>
- <fileMode>0755</fileMode>
- </fileSet>
- <!-- classes -->
- <fileSet>
- <directory>${project.build.directory}/classes</directory>
- <outputDirectory>classes</outputDirectory>
- </fileSet>
- </fileSets>
- <!-- 依賴jar包 -->
- <dependencySets>
- <dependencySet>
- <outputDirectory>lib</outputDirectory>
- <excludes>
- <exclude>com.jd:nonweb-example</exclude>
- </excludes>
- </dependencySet>
- </dependencySets>
主要有三組配置:
- formats:打包格式,此處使用的是dir,還可以是zip、rar等;
- fileSet:拷貝文件,本示例主要有bin文件、classes文件需要拷貝;
- dependencySets:依賴jar,拷貝到lib目錄;
執行mvn package后形成了將得到如下結構:
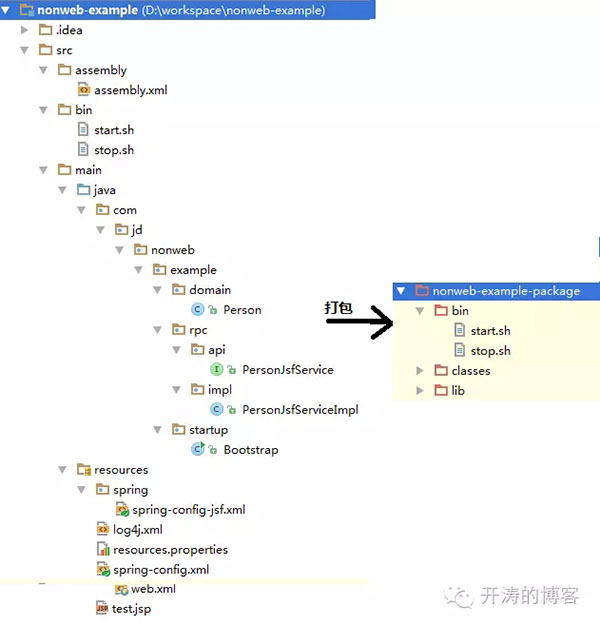
將該目錄通過自動部署抽包并部署到宿主機器即可。然后自動部署系統執行bin下的啟停腳本執行即可。
啟動類
- public class Bootstrap {
- public static void main(String[] args) throws Exception {
- ClassPathXmlApplicationContext ctx = new ClassPathXmlApplicationContext("classpath:spring-config.xml");
- ctx.registerShutdownHook();
- Thread.currentThread().join();
- }
- }
本示例沒有使用Java Config方式構建,直接加載spring配置文件啟動Java應用。
啟動腳本
- #!/bin/sh
- echo -------------------------------------------
- echo start server
- echo -------------------------------------------
- # 設置項目代碼路徑
- export CODE_HOME="/export/App/nonweb-example-startup-package"
- #日志路徑
- export LOG_PATH="/export/Logs/nonweb.example.jd.local"
- mkdir -p $LOG_PATH
- # 設置依賴路徑
- export CLASSPATH="$CODE_HOME/classes:$CODE_HOME/lib/*"
- # java可執行文件位置
- export _EXECJAVA="$JAVA_HOME/bin/java"
- # JVM啟動參數
- export JAVA_OPTS="-server -Xms128m -Xmx256m -Xss256k -XX:MaxDirectMemorySize=128m"
- # 啟動類
- export MAIN_CLASS=com.jd.nonweb.example.startup.Bootstrap
- $_EXECJAVA $JAVA_OPTS -classpath $CLASSPATH $MAIN_CLASS &
- tail -f $LOG_PATH/stdout.log
配置項目代碼路徑、日志路徑、依賴路徑、java執行文件路徑、JVM啟動參數、啟動類。
停止腳本
- #日志路徑
- export LOG_PATH="/export/Logs/nonweb.example.jd.local"
- mkdir -p $LOG_PATH
- # 啟動類
- export MAIN_CLASS=com.jd.nonweb.example.startup.Bootstrap
- echo -------------------------------------------
- echo stop server
- #所有相關進程
- PIDs=`jps -l | grep $MAIN_CLASS | awk '{print $1}'`
- #停止進程
- if [ -n "$PIDs" ]; then
- for PID in $PIDs; do
- kill $PID
- echo "kill $PID"
- done
- fi
- #等待50秒
- for i in 1 10; do
- PIDs=`jps -l | grep $MAIN_CLASS | awk '{print $1}'`
- if [ ! -n "$PIDs" ]; then
- echo "stop server success"
- echo -------------------------------------------
- break
- fi
- echo "sleep 5s"
- sleep 5
- done
- #如果等待50秒還沒有停止完,直接殺掉
- PIDs=`jps -l | grep $MAIN_CLASS | awk '{print $1}'`
- if [ -n "$PIDs" ]; then
- for PID in $PIDs; do
- kill -9 $PID
- echo "kill -9 $PID"
- done
- fi
- tail -fn200 $LOG_PATH/stdout.log
到此一個閉環非web應用就構建完了,啟停腳本、啟動類、項目代碼都是統一在一處維護,并使用maven-assembly-plugin將這些打包在一起,通過自動部署發布并執行,達到了閉環的目的。
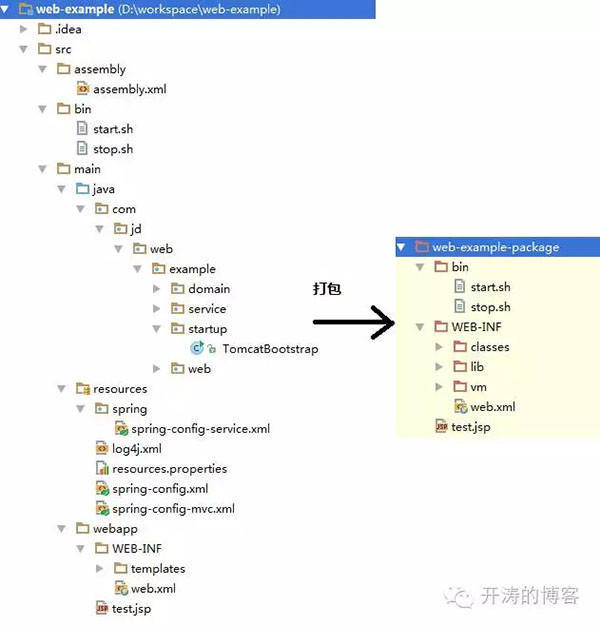
從零構建web應用
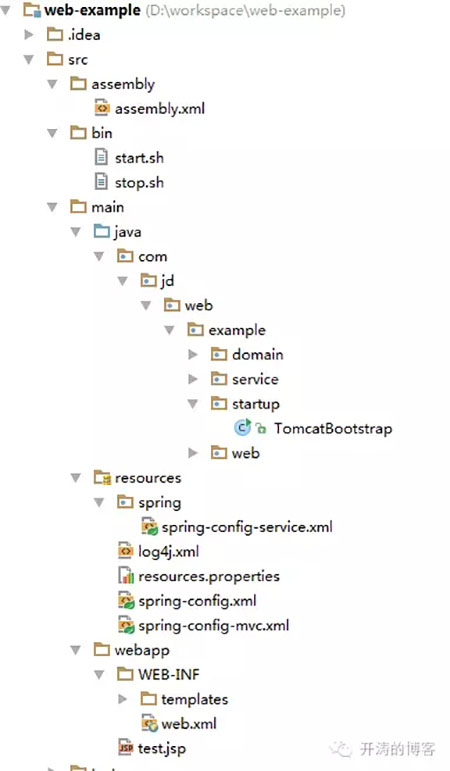
項目結構
maven依賴(pom.xml)
需要自己添加如spring-core、spring-context、spring-web、spring-webmvc、velocity等相關依賴,此處就不展示了。
打包配置(pom.xml)
web-example\pom.xml
- <plugin>
- <groupId>org.apache.maven.plugins</groupId>
- <artifactId>maven-assembly-plugin</artifactId>
- <version>2.6</version>
- <configuration>
- <descriptor>src/assembly/assembly.xml</descriptor>
- <finalName>${project.build.finalName}</finalName>
- </configuration>
- <executions>
- <execution>
- <phase>package</phase>
- <goals>
- <goal>directory</goal>
- </goals>
- </execution>
- </executions>
- </plugin>
使用maven-assembly-plugin進行打包;打包配置如下:
- <id>package</id>
- <formats>
- <format>dir</format>
- </formats>
- <includeBaseDirectory>false</includeBaseDirectory>
- <fileSets>
- <fileSet>
- <directory>src/bin</directory>
- <outputDirectory>bin</outputDirectory>
- <includes>
- <include>*.sh</include>
- </includes>
- <lineEnding>unix</lineEnding>
- <fileMode>0755</fileMode>
- </fileSet>
- <!-- WEB-INF -->
- <fileSet>
- <directory>src/main/webapp</directory>
- <outputDirectory></outputDirectory>
- </fileSet>
- <!-- classes -->
- <fileSet>
- <directory>${project.build.directory}/classes</directory>
- <outputDirectory>WEB-INF/classes</outputDirectory>
- </fileSet>
- </fileSets>
- <!-- 依賴jar包 -->
- <dependencySets>
- <dependencySet>
- <outputDirectory>WEB-INF/lib</outputDirectory>
- <excludes>
- <exclude>com.jd:web-example</exclude>
- </excludes>
- </dependencySet>
- </dependencySets>
主要有三組配置:
- formats:打包格式,此處使用的是dir,還可以是zip、rar等;
- fileSet:拷貝文件,本示例主要有bin文件、classes文件、webapp文件需要拷貝;
- dependencySets:依賴jar,拷貝到WEB-INF\lib目錄;
執行mvn package后形成了將得到如下結構:

打包的目錄結構和普通web結構完全一樣;將該目錄通過自動部署抽包并發布到宿主機器即可。然后自動部署系統執行bin下的啟停腳本執行即可。
啟動類
- public class TomcatBootstrap {
- private static final Logger LOG = LoggerFactory.getLogger(TomcatBootstrap.class);
- public static void main(String[] args) throws Exception{
- //提升性能(https://wiki.apache.org/tomcat/HowTo/FasterStartUp)
- System.setProperty("tomcat.util.scan.StandardJarScanFilter.jarsToSkip", "*.jar");
- //System.setProperty("securerandom.source","file:/dev/./urandom");
- int port =Integer.parseInt(System.getProperty("server.port", "8080"));
- String contextPath = System.getProperty("server.contextPath", "");
- String docBase = System.getProperty("server.docBase", getDefaultDocBase());
- LOG.info("server port : {}, context path : {},doc base : {}",port, contextPath, docBase);
- Tomcat tomcat = createTomcat(port,contextPath, docBase);
- tomcat.start();
- Runtime.getRuntime().addShutdownHook(new Thread() {
- @Override
- public void run(){
- try {
- tomcat.stop();
- } catch (LifecycleException e) {
- LOG.error("stoptomcat error.", e);
- }
- }
- });
- tomcat.getServer().await();
- }
- private static String getDefaultDocBase() {
- File classpathDir = new File(Thread.currentThread().getContextClassLoader().getResource(".").getFile());
- File projectDir =classpathDir.getParentFile().getParentFile();
- return new File(projectDir,"src/main/webapp").getPath();
- }
- private static Tomcat createTomcat(int port,String contextPath, String docBase) throws Exception{
- String tmpdir = System.getProperty("java.io.tmpdir");
- Tomcat tomcat = new Tomcat();
- tomcat.setBaseDir(tmpdir);
- tomcat.getHost().setAppBase(tmpdir);
- tomcat.getHost().setAutoDeploy(false);
- tomcat.getHost().setDeployOnStartup(false);
- tomcat.getEngine().setBackgroundProcessorDelay(-1);
- tomcat.setConnector(newNioConnector());
- tomcat.getConnector().setPort(port);
- tomcat.getService().addConnector(tomcat.getConnector());
- Context context =tomcat.addWebapp(contextPath, docBase);
- StandardServer server =(StandardServer) tomcat.getServer();
- //APR library loader. Documentation at /docs/apr.html
- server.addLifecycleListener(new AprLifecycleListener());
- //Prevent memory leaks due to use of particularjava/javax APIs
- server.addLifecycleListener(new JreMemoryLeakPreventionListener());
- return tomcat;
- }
- //在這里調整參數優化
- private static Connector newNioConnector() {
- Connector connector = new Connector("org.apache.coyote.http11.Http11NioProtocol");
- Http11NioProtocol protocol =(Http11NioProtocol) connector.getProtocolHandler();
- return connector;
- }
- }
通過嵌入Tomcat容器啟動,這種方式的確定是需要先寫Tomcat的啟動代碼,優點也很明顯:以后Tomcat的控制權在我們手中,可以隨時進行切換或者優化,不需要改線上的配置文件。
啟動腳本
- #!/bin/sh
- echo -------------------------------------------
- echo start server
- echo -------------------------------------------
- # 設置項目代碼路徑
- export CODE_HOME="/export/App/web-example-web-package"
- #日志路徑
- export LOG_PATH="/export/Logs/web.example.jd.local"
- mkdir -p $LOG_PATH
- # 設置依賴路徑
- export CLASSPATH="$CODE_HOME/WEB-INF/classes:$CODE_HOME/WEB-INF/lib/*"
- # java可執行文件位置
- export _EXECJAVA="$JAVA_HOME/bin/java"
- # JVM啟動參數
- export JAVA_OPTS="-server -Xms128m -Xmx256m -Xss256k-XX:MaxDirectMemorySize=128m"
- # 服務端端口、上下文、項目根配置
- export SERVER_INFO="-Dserver.port=8090 -Dserver.contextPath=-Dserver.docBase=$CODE_HOME"
- # 啟動類
- export MAIN_CLASS=com.jd.web.example.startup.TomcatBootstrap
- $_EXECJAVA $JAVA_OPTS -classpath $CLASSPATH $SERVER_INFO $MAIN_CLASS &
- tail -f $LOG_PATH/stdout.log
配置項目代碼路徑、日志路徑、依賴路徑、java執行文件路徑、JVM啟動參數、啟動類;相當于非web應用,多了web服務器端口、上下文、項目根路徑配置。
停止腳本
和非web的類似就不再重復了。
到此一個閉環web應用就構建完了,啟停腳本、啟動類、項目代碼都是統一在一處維護,并使用maven-assembly-plugin將這些打包在一起,通過自動部署發布并執行。達到了閉環的目的。
Spring Boot構建非web/web應用
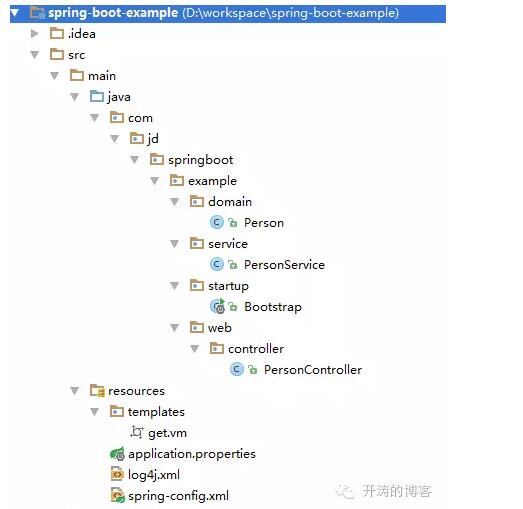
項目結構
maven依賴(pom.xml)
spring-boot-example/pom.xml繼承spring-boot-starter-parent
- <parent>
- <groupId>org.springframework.boot</groupId>
- <artifactId>spring-boot-starter-parent</artifactId>
- <version>1.4.1.BUILD-SNAPSHOT</version>
- </parent>
spring-boot-starter-parent中是一些通用配置,如JDK編碼、依賴管理(它又繼承了spring-boot-dependencies,這里邊定義了所有依賴);
依賴
- <dependency>
- <groupId>org.springframework.boot</groupId>
- <artifactId>spring-boot-starter</artifactId>
- </dependency>
- <dependency>
- <groupId>org.springframework.boot</groupId>
- <artifactId>spring-boot-starter-web</artifactId>
- </dependency>
- <dependency>
- <groupId>org.springframework.boot</groupId>
- <artifactId>spring-boot-starter-velocity</artifactId>
- </dependency>
- <dependency>
- <groupId>org.springframework.boot</groupId>
- <artifactId>spring-boot-starter-log4j2</artifactId>
- </dependency>
spring-boot-starter是最小化的spring boot環境(spring-core、spring-context等);spring-boot-starter-web是spring mvc環境,并使用Tomcat作為web容器;spring-boot-starter-velocity將自動將模板引擎配置為velocity。此處可以看到starter的好處了,需要什么功能只需要引入一個starter,相關的依賴自動添加,而且會自動配置使用該特性。
打包配置(pom.xml)
spring-boot-example-web\pom.xml添加如下maven插件:
- <plugin>
- <groupId>org.springframework.boot</groupId>
- <artifactId>spring-boot-maven-plugin</artifactId>
- </plugin>

啟動類
- package com.jd.springboot.example.web.startup;
- import org.springframework.boot.SpringApplication;
- import org.springframework.boot.autoconfigure.SpringBootApplication;
- import org.springframework.context.annotation.ImportResource;
- @SpringBootApplication(scanBasePackages = "com.jd.springboot.example")
- @ImportResource("classpath:spring-config.xml")
- public class Bootstrap {
- public static void main(String[] args) {
- SpringApplication.run(Bootstrap.class, args);
- }
- }
@SpringBootApplication指定了要掃描的包、可以使用@ImportResource引入xml配置文件。然后可以直接作為普通java應用啟動即可,此時自動使用tomcat作為web容器啟動。
運行 jar -jar spring-boot-example-1.0-SNAPSHOT.jar即可啟動(META-INF\MANIFEST.MF指定了Main-Class)。
個人不太喜歡fat jar的方式。可以使用maven-assembly-plugin配合來打包Java應用。項目結構如下所示:
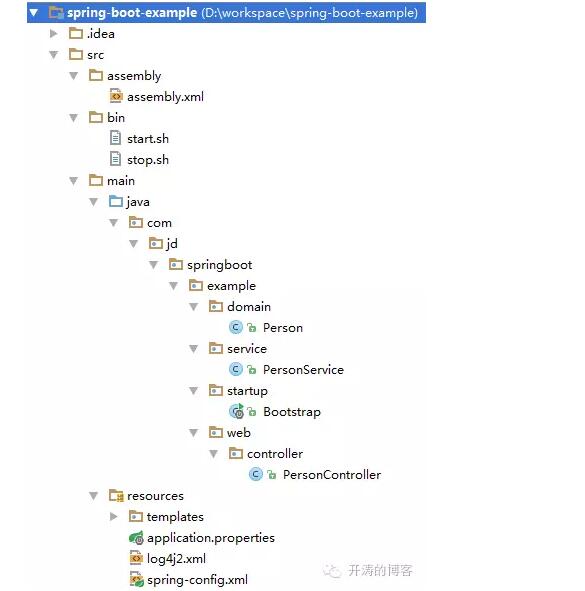
項目結構和之前的區別是多了assembly和bin。
打包配置(pom.xml)
spring-boot-example-web\pom.xml將如下maven插件
- <plugin>
- <groupId>org.springframework.boot</groupId>
- <artifactId>spring-boot-maven-plugin</artifactId>
- </plugin>
更改為assembly插件
- <plugin>
- <groupId>org.apache.maven.plugins</groupId>
- <artifactId>maven-assembly-plugin</artifactId>
- <version>2.6</version>
- <configuration>
- <descriptor>src/assembly/assembly.xml</descriptor>
- <finalName>${project.build.finalName}</finalName>
- </configuration>
- <executions>
- <execution>
- <phase>package</phase>
- <goals>
- <goal>directory</goal>
- </goals>
- </execution>
- </executions>
- </plugin>
assembly.xml和“從零構建非web應用”的類似,就不貼配置了。
執行mvn package時將得到如下打包:

啟停腳本也是類似的,在此也不貼配置了。到此基于spring boot的非fat jar方式的自啟動Java應用就構建好了。
總結
從零構建非web應用/web應用需要我們查找相關依賴并配置,還需要進行一些配置(Spring配置、容器配置),如果構建一個新的項目還是相對較慢的,但是在公司內大家應該都有自己的“starter pom”,因此實際構建也不會很慢。而如果沒有一些項目的積累,使用spring boot可以非常容易而且快速的就能搭建出想要的項目。使用spring boot后:容易添加依賴、啟動類不用自己創建、享受到自動配置的好處等;而自帶的spring-boot-maven-plugin會生成fat jar,不過可以配合maven-assembly-plugin來實現之前的方式的。
另外因筆者所在公司使用Docker容器,一個宿主機器只部署一個JVM示例,示例中的啟停腳本不用考慮單機多JVM實例問題。
創建閉環Java應用,可以更容易的進行如JVM參數調優、修改容器配置文件、非web應用不需要部署到Tomcat容器中;這是筆者想進行閉環Java應用的主要目的。
【本文是51CTO專欄作者張開濤的原創文章,作者微信公眾號:開濤的博客( kaitao-1234567)】