基于Google Vision API和Ionic實現Web開發中圖像識別
譯文一、 簡介
圖像識別允許計算機以一種類似于人類的方式識別圖像。在過去,開發人員必須借助于模式識別這樣復雜的圖像識別技術與算法來實現這一目的。如今,借助于Google Vision API,程序員們可以直接使用這些現成工具中提供的圖像識別功能。
本文將通過一個基于Ionic框架構建的JavaScript Web應用向你展示如何使用Google Vision API實現圖片識別。
二、 開始工作
要想使用Google Vision API需要上傳一個JSON文件,此文件中要包含想要檢測的圖像類型以及該圖像的base64編碼。你需要把這兩部分信息上傳到到Google Vision API端。
下面給出一個JSON文件的示例︰
- {
- "requests":[
- {
- "image":{
- "content":"base64-encoded-image"
- },
- "features":[
- {
- "type":"LABEL_DETECTION",
- "maxResults":1
- }
- ]
- }
- ]
- }
在此示例中,您必須使用圖像的實際base64編碼字符串來代替上面的base64-encoded-image部分。此外,你還需要在屬性features處提供一個對象數組,該數組包含你想要檢測的圖像類型信息。其中,LABEL_DETECTION屬性值的作用是通過指定一個標簽或說明信息來對圖像進行分類。
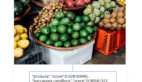
一旦從服務器端返回信息,那么返回信息的形式應當類似如下︰
- {
- "responses": [
- {
- "labelAnnotations": [
- {
- "mid": "/m/0bt9lr",
- "description": "dog",
- "score": 0.89208293
- }
- ]
- }
- ]
- }
因為在前面的請求格式中你指定了LABEL_DETECTION并給maxResults賦值為1;所以,在響應數組中返回的是單個對象。在上面的示例中,數組名是labelAnnotations。
除了使用前面例子中的LABEL_DETECTION外,你還可以使用如下枚舉數據:
l FACE_DETECTION:檢測照片中的人臉部分,返回相應的坐標值,用于根據檢測到范圍來繪制臉部分。
l LANDMARK_DETECTION:檢測標志性建筑,例如悉尼的歌劇院或威爾特郡的巨石陣等。
l LOGO_DETECTION:檢測不同的公司徽標。
l TEXT_DETECTION:采用光學字符識別(OCR)技術從圖像中提取文本。
l SAFE_SEARCH_DETECTION:基于安全搜索參數對圖像進行分類。這里提供的圖像分類分為:成人類、惡搞類、醫療類和暴力類等。
三、 注冊云Vision API
在本文寫作的此時,谷歌云Vision API尚處于beta階段,這意味著開發人員可以免費嘗試使用。為此,你可以導航到谷歌云平臺網站(https://cloud.google.com/vision/),點擊按鈕“try to free”進行操作。上述操作會把你導航到一個頁面,詢問為您的業務和信用信息;但別擔心,谷歌不會收取你任何超過300美元費用的。
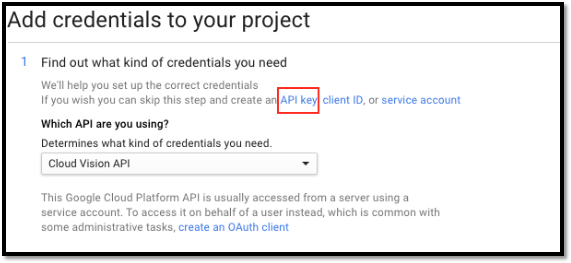
一旦上述操作完成,你就可以在谷歌控制臺創建一個新的項目,并支持項目中進行付費,并啟用云Vision API。你建議你跳過通常的操作過程,但使用選項“API Key”。請參考下面的圖片:
四、 構建應用程序
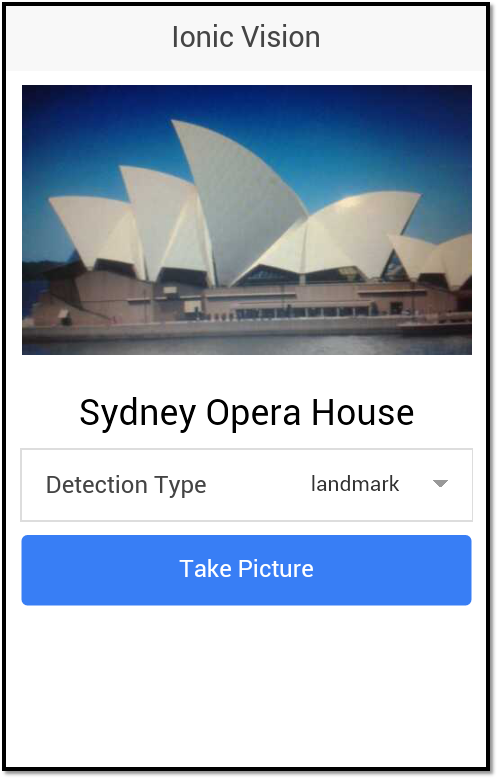
現在,你已準備好要構建應用程序了。但首先,我想簡要概述一下你要構建的應用程序。該應用程序提供了一個頁面,其中包含與云Vision API進行交互所需的所有元素。其中,提供了一個下拉列表用于選擇用戶想使用哪種類型的圖像檢測,用于拍照的按鈕,用于顯示要拍的照片,一個標題部分用于描述顯示的圖片信息。
下面給出的是最終的應用程序的外觀形式︰
你可以在GitHub網站上找到本示例工程的源碼(https://github.com/sitepoint-editors/ionic-vision)。
(一) 安裝依賴性
在你的工作目錄中,打開一個新的終端窗口并建議通過如下方式安裝Cordova和Ionic︰
- npm install -g cordova ionic
然后,通過如下命令使用空白模板創建一個新的Ionic項目︰
- ionic start ionic-vision blank
接下來,添加您想要使用的平臺。我只想安裝Android系統,但是這些代碼應該也可以工作在iOS平臺上。命令如下:
- ionic platform add android
接下來,你需要安裝幾個插件,以便與設備API進行交互,從而可以使用相機、文件和及上傳文件等功能。相關命令如下:
- cordova plugin add cordova-plugin-camera
- cordova plugin add cordova-plugin-file
- cordova plugin add cordova-plugin-file-transfer
接下來再使用bower安裝ngCordova:
- bower install ngCordova
注意:NgCordova庫提供了針對要安裝的插件的AngularJS包裝器。這些包裝器使得在一個Ionic應用程序中使用這些插件更為容易。
(二) 添加控制器
現在,打開目錄www并在js目錄下創建一個文件controllers/HomeController.js。最后添加如下代碼:
- (function(){
- angular.module('starter')
- .controller('HomeController', ['$scope', '$ionicModal', '$cordovaFile', '$cordovaFileTransfer', '$cordovaCamera', HomeController]);
- function HomeController($scope, $ionicModal, $cordovaFile, $cordovaFileTransfer, $cordovaCamera){
- var me = this;
- me.current_image = 'img/koro-sensei.png';
- me.image_description = '';
- me.detection_type = 'LABEL_DETECTION';
- me.detection_types = {
- LABEL_DETECTION: 'label',
- TEXT_DETECTION: 'text',
- LOGO_DETECTION: 'logo',
- LANDMARK_DETECTION: 'landmark'
- };
- var api_key = 'your-google-api-key';
- $scope.takePicture = function(){
- var options = {
- destinationType: Camera.DestinationType.DATA_URL,
- sourceType: Camera.PictureSourceType.CAMERA,
- targetWidth: 500,
- targetHeight: 500,
- correctOrientation: true,
- cameraDirection: 0,
- encodingType: Camera.EncodingType.JPEG
- };
- $cordovaCamera.getPicture(options).then(function(imagedata){
- me.current_image = "data:image/jpeg;base64," + imagedata;
- me.image_description = '';
- me.locale = '';
- var vision_api_json = {
- "requests":[
- {
- "image":{
- "content": imagedata
- },
- "features":[
- {
- "type": me.detection_type,
- "maxResults": 1
- }
- ]
- }
- ]
- };
- var file_contents = JSON.stringify(vision_api_json);
- $cordovaFile.writeFile(
- cordova.file.applicationStorageDirectory,
- 'file.json',
- file_contents,
- true
- ).then(function(result){
- var headers = {
- 'Content-Type': 'application/json'
- };
- options.headers = headers;
- var server = 'https://vision.googleapis.com/v1/images:annotate?key=' + api_key;
- var filePath = cordova.file.applicationStorageDirectory + 'file.json';
- $cordovaFileTransfer.upload(server, filePath, options, true)
- .then(function(result){
- var res = JSON.parse(result.response);
- var key = me.detection_types[me.detection_type] + 'Annotations';
- me.image_description = res.responses[0][key][0].description;
- }, function(err){
- alert('An error occurred while uploading the file');
- });
- }, function(err){
- alert('An error occurred while trying to write the file');
- });
- }, function(err){
- alert('An error occurred getting the picture from the camera');
- });
- }
- }
- })();
現在,讓我們來分片斷介紹上面的代碼。首先,創建控制器并導入需要的庫:
- (function(){
- angular.module('starter')
- .controller('HomeController', ['$scope', '$cordovaFile', '$cordovaFileTransfer', '$cordovaCamera', HomeController]);
- function HomeController($scope, $cordovaFile, $cordovaFileTransfer, $cordovaCamera){
- ...
- }
在控制器中設置視圖所需要的默認數據。這包括:要顯示的圖像的占位符,一個空的描述位置,默認的檢測類型,等等。通常我們都使用LABEL_DETECTION這一選項,因為它相比于其他選項更具通用性。請參考如下代碼:
- var me = this;
- me.current_image = 'img/koro-sensei.png';
- me.image_description = '';
- me.detection_type = 'LABEL_DETECTION';
接下來定義一個對象,它包含所有要檢測的類型以及谷歌提供的API鍵:
- me.detection_types = {
- LABEL_DETECTION: 'label',
- TEXT_DETECTION: 'text',
- LOGO_DETECTION: 'logo',
- LANDMARK_DETECTION: 'landmark'
- };
- var api_key = 'your-google-api-key';
接下來,創建一個當按下相機按鈕時要執行的方法,代碼如下:
- $scope.takePicture = function(){
- ...
- };
在該方法中,首先聲明相機插件有關的選項,把destinationType設置為Camera.DestinationType.DATA_URL。這意味著:一旦選中圖片,回調函數中將會擁有圖像的URI數據。因為此URI已經是base64編碼的數據了,所以不再需要轉換。
sourceType被指定為Camera.PictureSourceType.CAMERA,這樣便可以使用照相機拍攝的圖像作為數據源。然后,targetWidth和targetHeight兩個值分別設置恰當的圖像尺寸。correctOrientation值被設置為true,這樣它會自動把圖像的方向修改為縱向方式。把cameraDirection指定為0,這樣便可以使用后置攝像頭了。最后,把encodingType指定為Camera.EncodingType.JPEG,從而允許你把數據URI預置為data:image/jpeg;base64,從而顯示圖像。
- var options = {
- destinationType: Camera.DestinationType.DATA_URL,
- sourceType: Camera.PictureSourceType.CAMERA,
- targetWidth: 500,
- targetHeight: 500,
- correctOrientation: true,
- cameraDirection: 0,
- encodingType: Camera.EncodingType.JPEG
- };
通過調用$cordovaCamera.getPicture將打開設備上默認的相機應用程序。它使用options作為參數,然后調用then,并提供成功和錯誤操作對應的回調函數。同樣的設計適用于后面你會使用的所有插件。
- $cordovaCamera.getPicture(options).then(function(imagedata){
- ...
- }, function(err){
- alert('An error occurred getting the picture from the camera');
- });
接下來,在成功操作回調函數中更新圖像源(current_image)并把描述內容重置為一個空串:
- me.current_image = "data:image/jpeg;base64," + imagedata;
- me.image_description = '';
然后,使用URI從相機插件得到的數據URI和用戶所選的檢測類型(me.detection_type) 數據一個構建對象。然后,把該對象轉換為一個字符串;這樣一來,你就可以在發送到API的JSON文件中使用它作為內容數據。
- var vision_api_json = {
- "requests":[
- {
- "image":{
- "content": imagedata
- },
- "features":[
- {
- "type": me.detection_type,
- "maxResults": 1
- }
- ]
- }
- ]
- };
- var file_contents = JSON.stringify(vision_api_json);
接下來,使用Cordova文件插件把file_contents寫到存儲在應用程序沙箱根目錄下的文件file.json中。另外,注意writeFile方法的第三個參數是一個布爾類型,用于指定如果文件不存在的話是否創建一個新文件:
- $cordovaFile.writeFile(
- cordova.file.applicationStorageDirectory,
- 'file.json',
- file_contents,
- true
- ).then(function(result){
- ...
- }, function(err){
- alert('An error occurred while writing to the file');
- });
當把內容寫入到文件中時,需要聲明文件傳輸插件所需要使用的變量。下面代碼片斷中的headers變量對應于請求的http頭部。因為你發送一個JSON文件,您必須將Content-Type設置為application/json。另外,server中使用了一個完整路徑形式的URL來向API發送請求; filePath中也使用了一個完整路徑形式來指定要發送的JSON文件。
- var headers = {
- 'Content-Type': 'application/json'
- };
- options.headers = headers;
- var server = 'https://vision.googleapis.com/v1/images:annotate?key=' + api_key;
- var filePath = cordova.file.applicationStorageDirectory + 'file.json';
接下來,使用文件傳輸插件的upload方法將文件發送到服務器。這里,提供給upload方法的第四個參數是一個布爾值,用于設置是否接受來自所有主機的安全證書。一旦你得到一個服務器端的響應,便需要使用JSON.parse方法將其轉換為JavaScript對象。通過串聯當前的檢測類型和Annotations一詞來構建鍵(key)。這允許你形成字符串labelAnnotations,如果用戶選擇LABEL_DETECTION作為檢測類型的話。然后,你可以使用此字符串提取圖像的實際描述。
- $cordovaFileTransfer.upload(server, filePath, options, true)
- .then(function(result){
- var res = JSON.parse(result.response);
- var key = me.detection_types[me.detection_type] + 'Annotations';
- me.image_description = res.responses[0][key][0].description;
- }, function(err){
- alert('An error occured while uploading the file');
- });
(三) 添加視圖
現在,需要創建文件template/home.html,并添加如下代碼:
- <ion-view title="IonicVision" ng-controller="HomeController as home_ctrl">
- <header class="bar bar-header bar-stable">
- <h1 class="title">Ionic Vision</h1>
- </header>
- <ion-content class="has-header padding">
- <img src="{{ home_ctrl.current_image }}" class="picture">
- <h3 class="text-center" ng-show="home_ctrl.image_description">{{ home_ctrl.image_description }}</h3>
- <label class="item item-input item-select">
- <div class="input-label">
- Detection Type
- </div>
- <select ng-model="home_ctrl.detection_type">
- <option value="{{detection_type}}" ng-repeat="(detection_type, detection_type_value) in home_ctrl.detection_types">{{detection_type_value}}</option>
- </select>
- </label>
- <button class="button button-positive button-block" ng-click="takePicture()">
- Take Picture
- </button>
- </ion-content>
- </ion-view>
接下來,對上面的代碼進行逐片分析。
首先,創建一個新的ion-view并指定要使用的控制器:
- <ion-view title="IonicVision" ng-controller="HomeController as home_ctrl">
- </ion-view>
在這個io-view里面是頁眉部分(header)和ion-content。其中,ion-content是你在頁眉部分下部要看到的UI元素部分。再往里面是圖像、圖像描述、檢測類型列表和拍照按鈕等信息。
- <header class="bar bar-header bar-stable">
- <h1 class="title">Ionic Vision</h1>
- </header>
- <ion-content class="has-header padding">
- <img src="{{ home_ctrl.current_image }}" class="picture">
- <h3 class="text-center" ng-show="home_ctrl.image_description">{{ home_ctrl.image_description }}</h3>
- <label class="item item-input item-select">
- <div class="input-label">
- Detection Type
- </div>
- <select ng-model="home_ctrl.detection_type">
- <option value="{{detection_type}}" ng-repeat="(detection_type, detection_type_value) in home_ctrl.detection_types">{{detection_type_value}}</option>
- </select>
- </label>
- <button class="button button-positive button-block" ng-click="takePicture()">
- Take Picture
- </button>
- </ion-content>
五、 格式化
大多數的樣式化工作由Ionic自動完成,因此你僅需要聲明一組樣式即可。為此,需要把下面內容添加到css/style.css文件中:
- .text-center {
- text-align: center;
- }
- .picture {
- max-width: 100%;
- max-height: 100%;
- }
(一) 組合到一起
打開js/app.js文件,其中包含用于初始化Ionic和ngCordova的代碼。如果您選擇使用Ionic提供的空白啟動模板,那么你會注意到大部分的代碼已經填寫了。你僅需要指定ngCordova的用途并編輯config方法的內容為指向文件home.html即可。
- angular.module('starter', ['ionic', 'ngCordova'])
- .run(function($ionicPlatform) {
- $ionicPlatform.ready(function() {
- if(window.cordova && window.cordova.plugins.Keyboard) {
- cordova.plugins.Keyboard.hideKeyboardAccessoryBar(true);
- cordova.plugins.Keyboard.disableScroll(true);
- }
- if(window.StatusBar) {
- StatusBar.styleDefault();
- }
- });
- })
- .config(function($stateProvider, $urlRouterProvider) {
- $stateProvider
- .state('home', {
- url: '/home',
- templateUrl: 'templates/home.html'
- });
- $urlRouterProvider.otherwise('/home');
- });
接下來,打開文件index.html并鏈接到ng-cordova.js文件(接在文件ionic.bundle.js后面即可)。然后,在app.js文件的后面還要鏈接到文件HomeController.js。
別忘記把starter指定為ng-app的值,并在body標記的內部添加ion-nav-view,以便顯示home.html視圖。
- <!DOCTYPE html>
- <html>
- <head>
- <meta charset="utf-8">
- <meta name="viewport" content="initial-scale=1, maximum-scale=1, user-scalable=no, width=device-width">
- <title></title>
- <link href="lib/ionic/css/ionic.css" rel="stylesheet">
- <link href="css/style.css" rel="stylesheet">
- <!-- IF using Sass (run gulp sass first), then uncomment below and remove the CSS includes above
- <link href="css/ionic.app.css" rel="stylesheet">
- -->
- <!-- ionic/angularjs js -->
- <script src="lib/ionic/js/ionic.bundle.js"></script>
- <script src="lib/ngCordova/dist/ng-cordova.js"></script>
- <!-- cordova script (this will be a 404 during development) -->
- <script src="cordova.js"></script>
- <!-- your app's js -->
- <script src="js/app.js"></script>
- <script src="js/controllers/HomeController.js"></script>
- </head>
- <body ng-app="starter">
- <ion-nav-view></ion-nav-view>
- </body>
- </html>
六、 運行應用程序
現在,你可以在你的設備或者模擬器上運行上面的應用程序了,這只需要執行如下命令即可:
- ionic run android
七、 小結
在本教程中,你使用ionic并借助云Vision API構建了一個圖像識別軟件。其中,我討論了使用不同的圖像檢測類型,例如標簽、標志、徽標和文本檢測等。但是,文章中我并沒有涵蓋人臉檢測或安全搜索檢測知識。不過,對于人臉檢測技術,您可以使用像Fabric.js這種框架。此工具會把圖像轉換成一個畫布(Canvas)對象并在檢測到的臉上畫圓。
有關云Vision API更多的知識,請自行閱讀官方文檔(https://cloud.google.com/vision/docs/)。當然,本人也非常希望了解到你的使用體驗與思考結果。
原文標題:Image Recognition with the Google Vision API and Ionic
【51CTO譯稿,合作站點轉載請注明原文譯者和出處為51CTO.com】