《捕魚達人3》講解Cocos引擎3D:魚身波光處理
作者:cocoachina
在上一節的學習中,我們已經掌握了如何使用Cocos2d-x加載魚的模型和播放魚的動畫,這一節我們來學習一下如何為魚的模型增加波光處理,以使它看起來像在海水中游動。
在上一節的學習中,我們已經掌握了如何使用Cocos2d-x加載魚的模型和播放魚的動畫,這一節我們來學習一下如何為魚的模型增加波光處理,以使它看起來像在海水中游動。

在模型的身上加入波光的感覺,是通過紋理動畫來實現的,其原理是給模型增加一個紋理,并循環的移動紋理貼圖尋址的UV坐標,這樣貼在模型表面的紋理就會按照不斷變化的UV值來產生出貼圖運動的效果。下面我們來實際做一下這個效果。
我們需要用到Shader文件UVAnimation.vsh和UVAnimation.fsh,它們在Resources\3D目錄中。 UVAnimation.vsh是一個模型骨骼動畫的計算Shader,而UV動畫的效果在UVAnimation.fsh中進行處理:
- uniform sampler2D u_texture1;
- uniform sampler2D u_lightTexture;
- uniform vec4 v_LightColor; //顏色色彩
- uniform vec2 v_animLight; //UV動畫紋理偏移
- varying vec2 v_texCoord; //模型的紋理UV值
- void main(void)
- {
- //通過UV值的移動形成UV動畫
- vec4 lightcolor = texture2D(u_lightTexture, v_texCoord + v_animLight.xy) * v_LightColor;
- gl_FragColor = texture2D(u_texture1, v_texCoord) + lightcolor;
- }
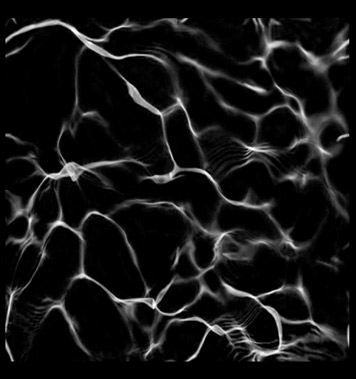
然后我們需要一張波光圖caustics.png,它是黑白圖,用于在模型上增加色值操作,這樣的話,黑色的區域色值為0,與魚原來的紋理色值相加不變,而白色區域的值大于0,與魚原來的紋理色值相加后會有增亮效果。這張圖我們放在工程的Resources\3D目錄中。
我們在FishLayer中增加一個變化的UV值:
- Vec2 _lightani;
在FishLayer::init函數中,我們將上面所寫的vsh,fsh等組合成魚模型可以使用的Shader并使用它:
- // 取得文件管理器
- auto fileUtiles = FileUtils::getInstance();
- // 加載相應的Shader文件
- // 加載UVAnimation.vsh并取得文件內容字符串
- auto vertexFilePath = fileUtiles->fullPathForFilename("UVAnimation.vsh");
- auto vertSource = fileUtiles->getStringFromFile(vertexFilePath);
- // 加載UVAnimation.fsh并取得文件內容字符串
- auto fragmentFilePath = fileUtiles->fullPathForFilename("UVAnimation.fsh");
- auto fragSource = fileUtiles->getStringFromFile(fragmentFilePath);
- // 將vsh與fsh裝配成一個完整的Shader文件。
- auto glprogram = GLProgram::createWithByteArrays(vertSource.c_str(), fragSource.c_str());
- // 由Shader文件創建這個Shader
- auto glprogramstate = GLProgramState::getOrCreateWithGLProgram(glprogram);
- // 給精靈設置所用的Shader
- _sprite->setGLProgramState(glprogramstate);
- //創建海龜所用的貼圖。
- auto textrue1 = Director::getInstance()->getTextureCache()->addImage("tortoise.png");
- //將貼圖設置給Shader中的變量值u_texture1
- glprogramstate->setUniformTexture("u_texture1", textrue1);
- //創建波光貼圖。
- auto textrue2 = Director::getInstance()->getTextureCache()->addImage("caustics.png");
- //將貼圖設置給Shader中的變量值u_lightTexture
- glprogramstate->setUniformTexture("u_lightTexture", textrue2);
- //注意,對于波光貼圖,我們希望它在進行UV動畫時能產生四方連續效果,必須設置它的紋理UV尋址方式為GL_REPEAT。
- Texture2D::TexParams tRepeatParams;
- tRepeatParams.magFilter = GL_LINEAR_MIPMAP_LINEAR;
- tRepeatParams.minFilter = GL_LINEAR;
- tRepeatParams.wrapS = GL_REPEAT;
- tRepeatParams.wrapT = GL_REPEAT;
- textrue2->setTexParameters(tRepeatParams);
- //在這里,我們設置一個波光的顏色,這里設置為白色。
- Vec4 tLightColor(1.0,1.0,1.0,1.0);
- glprogramstate->setUniformVec4("v_LightColor",tLightColor);
- //下面這一段,是為了將我們自定義的Shader與我們的模型頂點組織方式進行匹配。模型的頂點數據一般包括位置,法線,色彩,紋理,以及骨骼綁定信息。而Shader需要將內部相應的頂點屬性通道與模型相應的頂點屬性數據進行綁定才能正確顯示出頂點。
- long offset = 0;
- auto attributeCount = _sprite->getMesh()->getMeshVertexAttribCount();
- for (auto k = 0; k < attributeCount; k++) {
- auto meshattribute = _sprite->getMesh()->getMeshVertexAttribute(k);
- glprogramstate->setVertexAttribPointer(s_attributeNames[meshattribute.vertexAttrib],
- meshattribute.size,
- meshattribute.type,
- GL_FALSE,
- _sprite->getMesh()->getVertexSizeInBytes(),
- (GLvoid*)offset);
- offset += meshattribute.attribSizeBytes;
- }
- //uv滾動初始值設為0
- _lightani.x = _lightani.y = 0;
之后我們重載一下FishLayer的draw函數,加入UV值的變化處理和設置。
- void FishLayer::draw(Renderer* renderer, const Mat4 &transform, uint32_t flags)
- {
- if(_sprite)
- {
- auto glprogramstate = _sprite->getGLProgramState();
- if(glprogramstate)
- {
- _lightani.x += 0.01;
- if(_lightani.x > 1.0)
- {
- _lightani.x-= 1.0;
- }
- _lightani.y += 0.01;
- if(_lightani.y > 1.0)
- {
- _lightani.y-= 1.0;
- }
- glprogramstate->setUniformVec2("v_animLight",_lightani);
- }
- }
- Node::draw(renderer,transform,flags);
- }
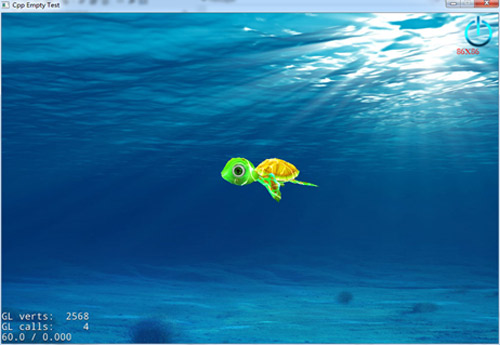
這樣,我們就完成了魚身上的波光處理。
責任編輯:chenqingxiang
來源:
cocoachina