Sencha Touch開發實例:新浪微博iPhone界面
相信不少Sencha Touch的粉絲們都為JavaScript能開發出手機Web App應用而感到興奮。本次示例將以iPhone界面作為參考,使用Sencha Touch開發設計模仿iPhone界面。
首先,將以iPhone下述的界面目標作為參考:

Sencha Touch將采用以下UI組件:
Ext.Panel Ext.List
首先,建立一個html 5頁面和一個js頁面,如下代碼:
- <!DOCTYPE HTML>
- <html>
- <head>
- <meta http-equiv="Content-Type" content="text/html; charset=utf-8">
- <title>demos</title>
- <link rel="stylesheet" type="text/css" href="sencha-touch.css" />
- <script type="text/javascript" src="sencha-touch-debug.js"></script>
- <script type="text/javascript" src="sencha.js" charset="utf-8"></script>
- </head>
- <body>
- </body>
- </html>
sencha.js先增加setup以便文檔加載完后初始化Panel組件,如下代碼:
- Ext.setup({
- onReady: function() {
- var moreObj;
- moreObj = Ext.extend(Ext.Panel, {
- layout : 'card',
- initComponent : function() {
- moreObj.superclass.initComponent.call(this,arguments);
- }
- })
- new moreObj({
- fullscreen : true,
- scroll : 'vertical'
- });
- }
- });
完成初始化Panel組件后,界面將存在一個Panel的UI,此時并沒有任何內容,現在添加一個list以便顯示更多數據列表。在initComponent初始化函數內增加以下一段Ext.list代碼:
- this.list5 = new Ext.List({
- itemTpl: '<tpl if="needsIcon"><img width="26" height="26" src="images/{icon}.jpg" align="absmiddle" /></tpl>{name}',
- store: new Ext.data.Store({
- fields: ['name','icon','needsIcon'],
- data: [
- {"name" : "直接登錄","icon":'login',"needsIcon":true},
- {"name" : "找回密碼","icon":'password',"needsIcon":true},
- {"name" : "聲音提示","icon":'sound',"needsIcon":true},
- {"name" : "關于我們","icon":'version',"needsIcon":false},
- {"name" : "問題反饋","icon":'question',"needsIcon":true},
- {"name" : "客服電話","icon":'phone',"needsIcon":true},
- {"name" : "軟件版本0.92","icon":'version',"needsIcon":true}
- ]
- }),
- title: 'title1'
- });
完成list的初始化后,將list加入到外部Panel中,在initComponent增加如下代碼:
- this.listpanel = new Ext.Panel({
- title: '更多',
- items: [this.list5]
- })
- this.items = [this.listpanel];
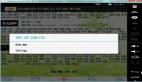
此時大部分sencha代碼都基本完畢,效果如下圖:

相信大家都看到此時的界面仍然不是我們所想要的微博更多界面,那我們現在開始對該list界面進行修飾一翻,在初始化Ext.list內部增加以下幾個屬性:
- ui: 'round',
- scroll : false,
- margin : '10 15 10 15'
增加屬性margin是為了list的數據和上下左右的邊框距離遠一點,以便更好展示按鈕效果。
接著,在html5頁面上增加一個css文件,以便對list的ui進行定制,如下導入css文件:
- <link href="test.css" rel="stylesheet" />
在sencha.js里面的list組件增加兩個css屬性,如下代碼:
- cls : 'list2',
- itemCls : 'list2_item',
第一個cls為list組件的class屬性,第二個為list組件的每個數據項各自的class屬性
最后在test.css文件內增加以下css代碼,以便修正每個數據項的位置以及風格:
- .list2{
- -webkit-border-radius : 10px;
- }
- .list2 .x-list-item{
- background-color : #FFF;
- border:1px solid silver;
- -webkit-border-radius : 10px;
- }
- .list2 .x-list-item:first-of-type{
- margin : 0 0 15px 0;
- border-top:1px solid silver;
- }
- .list2 .x-list-item:nth-of-type(2){
- -webkit-border-bottom-left-radius:0px;
- -webkit-border-bottom-right-radius:0px;
- }
- .list2 .x-list-item:nth-of-type(3){
- border-top:0px;
- margin : 0 0 15px 0;
- -webkit-border-top-left-radius:0px;
- -webkit-border-top-right-radius:0px;
- }
- .list2 .x-list-item:nth-of-type(4){
- -webkit-border-bottom-left-radius:0px;
- -webkit-border-bottom-right-radius:0px;
- }
- .list2 .x-list-item:nth-of-type(5){
- border-top:0px;
- -webkit-border-radius:0px;
- }
- .list2 .x-list-item:nth-of-type(6){
- border-top:0px;
- margin : 0 0 15px 0;
- -webkit-border-top-left-radius:0px;
- -webkit-border-top-right-radius:0px;
- }
- .list2 .x-list-item:nth-of-type(7){
- margin : 0 0 15px 0;
- }
- .list2 .x-item-selected:last-child{
- -webkit-border-bottom-left-radius:10px;
- -webkit-border-bottom-right-radius:10px;
- }
- .list2 .x-item-selected:first-of-type{
- -webkit-border-top-left-radius:10px;
- -webkit-border-top-right-radius:10px;
- }
- .list2 img{
- margin-right:10px;
- }
此處的css更多的是利用radius屬性對每個選項的的四個角進行圓角效果,由于list的每個數據項都需要分組,css里面則采用nth-of-type等選擇符自定義分組,因此存在一定的局限性。
此時代碼已經基本完成。效果圖如下:

這樣,iPhone微博更多UI界面已經制作完成。目前對于此解決方案,存在一種局限性,list數據需固定、分組需固定,暫時無法做到數據的實時性等功能。