Go 桌面開發 Wails 入門與開發環境搭建
作者:馬嘍編程
Wails是一個使用 Go 編寫后端邏輯、前端使用現代前端框架(如Vue、React、Svelte)開發界面的跨平臺桌面應用開發框架。
1. 什么是 Wails?
Wails是一個使用 Go 編寫后端邏輯、前端使用現代前端框架(如Vue、React、Svelte)開發界面的跨平臺桌面應用開發框架。
- 后端語言:Go
- 前端支持:Vue3、React、Svelte
- 跨平臺:Windows / macOS / Linux
- 打包簡單,構建原生應用 .exe / .app / .AppImage
- 類似于Tauri和 Electron,但Wails在調用Go邏輯方面更加直接簡單高效。

2. 為什么要選擇Wails
為什么要選擇Wails?因為我是個愛學習的孩子,而且wails官網的教程簡直無眼看,所以我要將學習的過程記錄下來,供有緣人參考吧。
3. 開發環境準備
(1) 安裝依賴項
請確保自己的電腦上已經安裝了go語言,如果沒有就自個安裝,這里就不演示了。
(2) Node.js + 包管理器(npm/yarn/pnpm)
- 安裝 Node.js(我本機使用的版本是Node v18)
- Node附帶npm,也可以選用yarn或 pnpm(我使用是yarn)
(3) 安裝 Wails CLI
安裝wails cli工具比較簡單,具體命令如下所示:
go install github.com/wailsapp/wails/v2/cmd/wails@latest(4) 安裝驗證,輸出如下信息說明安裝成功
?  ~ wails version
v2.10.1
 ?   If Wails is useful to you or your company, please consider sponsoring the project:
https://github.com/sponsors/leaanthony
??注意:
- windows環境下Wails要求安裝WebView2運行時。 一些 Windows 安裝已經安裝了這個。 我們可以使用wails doctor命令檢查依賴是否缺失,如果缺失根據提示將缺失的依賴補全安裝即可。
- Linux環境下需要安裝gcc構建工具以及libgtk3和libwebkit開發庫。
4. 創建第一個 Wails 項目(以React為例)
(1) 初始化項目,具體命令如下所示
? wails init -n burpsuite-go -t preact-ts
Wails CLI v2.10.1
# Initialising Project 'burpsuite-go'
go: downloading github.com/matryer/is v1.4.1
go: downloading github.com/leaanthony/u v1.1.1
go: downloading github.com/leaanthony/go-ansi-parser v1.6.1
go: downloading github.com/wailsapp/mimetype v1.4.1
go: downloading github.com/wailsapp/go-webview2 v1.0.19
go: downloading github.com/labstack/echo/v4 v4.13.3
go: downloading github.com/tkrajina/go-reflector v0.5.8
go: downloading github.com/bep/debounce v1.2.1
go: downloading github.com/valyala/fasttemplate v1.2.2
go: downloading github.com/jchv/go-winloader v0.0.0-20210711035445-715c2860da7e
go: downloading github.com/valyala/bytebufferpool v1.0.0
Project Name | burpsuite-go
Project Directory | /Users/xxxx/Go/src/github.com/xxxx/burpsuite-go
Template | Preact + Vite (Typescript)
Template Source | https://wails.io
Initialised project 'burpsuite-go' in 2m30.92s.
? If Wails is useful to you or your company, please consider sponsoring the project:
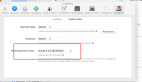
https://github.com/sponsors/leaanthony(2) 運行開發模式,具體命令如下所示:
wails dev

如出現上述圖片,說明你成功的運行了一個wails項目。
5. 代碼結構解釋
.
├── build/ # 項目打包構建目錄
│   ├── appicon.png
│   ├── darwin/
│   └── windows/
├── frontend/ # 一個標準的前端項目目錄
├── go.mod
├── go.sum
├── main.go # 程序入口
└── wails.json # wails項目配置
main.go文件內容:
package main


import (
"embed"


"github.com/wailsapp/wails/v2"
"github.com/wailsapp/wails/v2/pkg/options"
"github.com/wailsapp/wails/v2/pkg/options/assetserver"
)


//go:embed all:frontend/dist
var assets embed.FS


func main() {
// Create an instance of the app structure
	app := NewApp()


// Create application with options
	err := wails.Run(&options.App{
Title:  "burpsuite-go",
Width:  1024,
Height: 768,
AssetServer: &assetserver.Options{
Assets: assets,
		},
BackgroundColour: &options.RGBA{R: 27, G: 38, B: 54, A: 1},
OnStartup:        app.startup,
Bind: []interface{}{
			app,
		},
	})


if err != nil {
println("Error:", err.Error())
	}
}
(1) 嵌入指令
- 使用 //go:embed`指令將前端構建產物(`frontend/dist`)打包進 Go 的二進制文件中
- embed.FS類型表示一個虛擬的只讀文件系統
- all:表示遞歸包含整個目錄
(2) app := NewApp()
- 創建一個后端邏輯對象,NewApp() 是自定義的函數,通常返回一個 *App 類型結構體實例。
- 這個結構體中包含你要暴露給前端的Go方法(如攔截器控制、請求記錄等)
(3) wails.Run方法
- 設置窗口標題為burpsuite-go
- 初始窗口大小為 1024 x 768 像素
- AssetServer: &assetserver.Options{ Assets: assets }告訴 Wails 使用assets作為靜態資源服務源assets包含了frontend/dist中構建好的 HTML + JS + CSS 文件
- BackgroundColour: &options.RGBA{R: 27, G: 38, B: 54, A: 1}設置窗口背景顏色(RGBA),對應深色藍灰風格
- OnStartup: app.startup注冊一個啟動鉤子函數,當應用啟動后執行app.startup(ctx)可用于初始化、預加載數據等操作
- Bind: []interface{}{ app }
app.tsx內容如下所示:
import './App.css'
import logo from "./assets/images/logo-universal.png"
import {Greet} from "../wailsjs/go/main/App";
import {useState} from "preact/hooks";
import {h} from 'preact';


export function App(props: any) {
    const [resultText, setResultText] = useState("Please enter your name below ??");
    const [name, setName] = useState('');
    const updateName = (e: any) => setName(e.target.value);
    const updateResultText = (result: string) => setResultText(result);


    function greet() {
        Greet(name).then(updateResultText);
    }


    return (
        <>
            <div id="App">
                <img src={logo} id="logo" alt="logo"/>
                <div id="result" className="result">{resultText}</div>
                <div id="input" className="input-box">
                    <input id="name" className="input" onChange={updateName} autoComplete="off" name="input"
                           type="text"/>
                    <button className="btn" onClick={greet}>Greet</button>
                </div>
            </div>
        </>
    )
}- import {Greet} from "../wailsjs/go/main/App";
- <button className="btn" notallow={greet}>Greet</button>
Greet是由Wails自動生成的TypeScript綁定,代表 Go 后端的Greet(name string) 方法。當點擊按鈕時:
- 調用 自動綁定的 Greet(name) 函數
- 它會發起與Go后端的通信請求
- 后端返回字符串,前端通過 then(updateResultText) 更新結果
6. 小結
在本章中你學會了:
- 安裝Wails所需工具(Go、Node、Wails CLI)
- 創建并運行第一個React + Go的桌面應用
- 簡單的了解了前后端交互機制(Go 方法 → JS 調用)
責任編輯:趙寧寧
來源:
馬嘍編程筆記