React-flow 工作流案例詳解
上期和大家分享了我最近做的 React-Flow 中文文檔。到今天為止, 核心部分已經完全翻譯完成。大家可以直接使用中文文檔快速學習和使用 React-Flow 搭建自己的工作流。
 圖片
圖片
github: https://github.com/MrXujiang/react-flow
文檔地址: http://react-flow.com
接下來我會基于我寫的中文文檔, 帶大家做一個非常有意思的工作流案例, 方便大家快速上手 React-Flow。
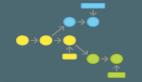
案例展示
 圖片
圖片
這個案例主要包含幾個技術點:
- 如何自定義節點
- 如何自定義邊
- 如何設置畫布縮略圖和畫布控件
- 如何實現嵌套節點
- 如何設置畫布樣式
- 如何拖拽框選多個節點
掌握了以上幾點, 我們可以實現各種場景的流程圖或者工作流。上圖的案例我已經推送到 Github, 大家也可以下載代碼參考學習。
自定義節點
因為官方提供的節點樣式比較有限,所以我們需要自定義節點和節點樣式. 上述我做的案例中有三個自定義節點:
- 按鈕節點
- 圖片節點
- 圖文標簽節點(頂部根節點)
如下圖所示:
 圖片
圖片
具體的自定義節點的方式我在中文文檔中也有詳細介紹和 demo, 這里給大家分享一下實現方式:
function LogoNode({ data, isConnectable }) {
    const { src, text } = data;
    return (
      <div className="flow-logo">
        <Handle
            type="source"
            position={Position.Bottom}
            id="a"
            // style={handleStyle}
            isConnectable={isConnectable}
        />
        <Handle
            type="source"
            position={Position.Bottom}
            id="b"
            isConnectable={isConnectable}
        />
        <div>
          <img src={src} />
          <div className="flow-logo-text">{ text }</div>
        </div>
      </div>
    );
  }
做好之后我們只需要在 app 入口注冊節點即可:
const nodeTypes = useMemo(() => ({ textUpdater: TextUpdaterNode }), []);

return <ReactFlow nodeTypes={nodeTypes} />;
是不是非常簡單? 大家可以按照React-Flow 中文文檔來學習更加復雜的自定義節點功能。
自定義邊
自定義邊和自定義節點的方式類似, 我們先來看一下自定義邊的案例:
 圖片
圖片
大家在網上看到的花里胡哨的思維導圖, 流程圖的連接線, 我們其實都可以用自定義邊來實現:
import {
  BaseEdge,
  EdgeLabelRenderer,
  getStraightPath,
  useReactFlow,
} from '@xyflow/react';

export default function CustomEdge({ id, sourceX, sourceY, targetX, targetY }) {
  const { setEdges } = useReactFlow();
  const [edgePath] = getStraightPath({
    sourceX,
    sourceY,
    targetX,
    targetY,
  });

  return (
    <>
      <BaseEdge id={id} path={edgePath} />
      <EdgeLabelRenderer>
        <button
          onClick={() => setEdges((edges) => edges.filter((e) => e.id !== id))}
        >
          刪除
        </button>
      </EdgeLabelRenderer>
    </>
  );
}
設置畫布縮略圖和畫布控件
一般用過figma或者設計類軟件的小伙伴可能比較熟悉畫布控件和縮略圖的概念。
它們可以幫助我們更高效的瀏覽圖表和進行更便捷的圖表操作。當然 react-flow 也提供了開箱即用的插件來實現。
 圖片
圖片
話不多說, 接下來我們就來看看具體的實現:
import { ReactFlow, MiniMap } from '@xyflow/react';

const defaultNodes = [
  {
    id: '1',
    type: 'input',
    data: { label: 'Dooring用戶' },
    position: { x: 250, y: 25 },
    style: { backgroundColor: '#6ede87', color: 'white' },
  },

  {
    id: '2',
    // you can also pass a React component as a label
    data: { label: <div>Dooring零代碼平臺</div> },
    position: { x: 100, y: 125 },
    style: { backgroundColor: '#ff0072', color: 'white' },
  },
  {
    id: '3',
    type: 'output',
    data: { label: '發布頁面' },
    position: { x: 250, y: 250 },
    style: { backgroundColor: '#6865A5', color: 'white' },
  },
];
const defaultEdges = [
  { id: 'e1-2', source: '1', target: '2' },
  { id: 'e2-3', source: '2', target: '3', animated: true },
];

const nodeColor = (node) => {
  switch (node.type) {
    case 'input':
      return '#6ede87';
    case 'output':
      return '#6865A5';
    default:
      return '#ff0072';
  }
};

function Flow() {
  return (
    <div style={{ width: '100%', height: '60vh' }}>
    <ReactFlow defaultNodes={defaultNodes} defaultEdges={defaultEdges} fitView>
      <MiniMap nodeColor={nodeColor} nodeStrokeWidth={3} zoomable pannable />
    </ReactFlow>
    </div>

  );
}

export default Flow;
通過上述代碼我們就能實現一個非常簡單的自定義縮略圖的功能, 如下圖所示:
 圖片
圖片
如何實現嵌套節點
要想實現起嵌套節點的效果, 我們只需要調整節點結構, 即可輕松實現如下效果:
 圖片
圖片
如果要將一個節點添加為另一個節點的子節點,則需要使用 parentId(在以前的版本中稱為parentNode)選項(您可以在節點選項部分找到所有選項的列表)。一旦我們這樣做了,子節點就會相對于其父節點定位。 { x: 0, y: 0 } 的位置是父級的左上角。
代碼案例如下:
import { useCallback, useState } from 'react';
import {
  ReactFlow,
  addEdge,
  applyEdgeChanges,
  applyNodeChanges,
  Background,
} from '@xyflow/react';

const initialNodes = [
  {
    id: 'A',
    type: 'group',
    data: { label: null },
    position: { x: 0, y: 0 },
    style: {
      width: 170,
      height: 140,
    },
  },
  {
    id: 'B',
    type: 'input',
    data: { label: 'Dooring Node' },
    position: { x: 10, y: 10 },
    parentId: 'A',
    extent: 'parent',
  },
  {
    id: 'C',
    data: { label: 'React Flow' },
    position: { x: 10, y: 90 },
    parentId: 'A',
    extent: 'parent',
  },
];

const initialEdges = [
  { id: 'b-c', source: 'B', target: 'C' }
];

const rfStyle = {
  backgroundColor: '#D0C0F7',
};

function Flow() {
  const [nodes, setNodes] = useState(initialNodes);
  const [edges, setEdges] = useState(initialEdges);

  const onNodesChange = useCallback(
    (changes) => setNodes((nds) => applyNodeChanges(changes, nds)),
    [setNodes],
  );
  const onEdgesChange = useCallback(
    (changes) => setEdges((eds) => applyEdgeChanges(changes, eds)),
    [setEdges],
  );
  const onConnect = useCallback(
    (connection) => setEdges((eds) => addEdge(connection, eds)),
    [setEdges],
  );

  return (
    <div style={{width: '100%', height: '30vh'}}>
      <ReactFlow
        nodes={nodes}
        edges={edges}
        onNodesChange={onNodesChange}
        onEdgesChange={onEdgesChange}
        onConnect={onConnect}
        fitView
        style={rfStyle}
        attributionPosition="top-right"
      >
        <Background />
      </ReactFlow>
    </div>
  );
}

export default Flow;
如何拖拽框選多個節點
如果我們更喜歡 Figma/sketch/design 工具控件,可以設置panOnScroll={true}和selectinotallow={true}:
- 平移:空格+拖動鼠標、滾動、鼠標中鍵或右鍵
- 縮放:俯仰或 cmd + 滾動
- 創建選區:拖動鼠標
這樣就能實現類似多選框選的效果了:
 圖片
圖片
代碼如下:
import { useCallback } from 'react';
import {
  ReactFlow,
  addEdge,
  useEdgesState,
  useNodesState,
  SelectionMode,
} from '@xyflow/react';

const initialNodes = [
  {
    id: '1',
    data: { label: 'Dooring' },
    position: { x: 150, y: 0 },
  },
  {
    id: '2',
    data: { label: 'Nest-Admin' },
    position: { x: 0, y: 150 },
  },
  {
    id: '3',
    data: { label: 'Next-Admin' },
    position: { x: 300, y: 150 },
  },
];

const initialEdges = [
  { id: 'e1-2', source: '1', target: '2' },
  { id: 'e1-3', source: '1', target: '3' },
];

function Flow() {
  const [nodes, setNodes, onNodesChange] = useNodesState(initialNodes);
  const [edges, setEdges, onEdgesChange] = useEdgesState(initialEdges);

  const onConnect = useCallback(
    (connection) => setEdges((eds) => addEdge(connection, eds)),
    [setEdges],
  );

  const panOnDrag = [1, 2];

  return (
    <div style={{width: '100%', height: '30vh'}}>
      <ReactFlow
        nodes={nodes}
        edges={edges}
        onNodesChange={onNodesChange}
        onEdgesChange={onEdgesChange}
        onConnect={onConnect}
        panOnScroll
        selectionOnDrag
        panOnDrag={panOnDrag}
        selectionMode={SelectionMode.Partial}
        fitView
      />
    </div>

  );
}

export default Flow;
文章最開頭的案例的源碼我已經上傳 Github 了, 大家感興趣可以學習參考一下。完整案例效果圖:
 圖片
圖片