OpenHarmony構(gòu)建編譯實戰(zhàn)

前言
本人是一名大一學(xué)生,有幸被選拔進(jìn)了深圳技術(shù)大學(xué)第一屆開源鴻蒙菁英班,并在暑期培訓(xùn)進(jìn)行線上分享,故將講解的內(nèi)容也制作成帖子發(fā)上來作為學(xué)習(xí)筆記。在準(zhǔn)備分享的過程中,我基于學(xué)長們的先前成果,結(jié)合開源鴻蒙源碼的最新版本進(jìn)行了相應(yīng)的調(diào)整和優(yōu)化,幫助大家更好地理解和應(yīng)用開源鴻蒙技術(shù)。
環(huán)境
- OpenHarmony-4.0 源碼
- 九聯(lián) unionpi_whale 開發(fā)板
一、OpenHarmony源碼的模塊劃分
1.OpenHarmony內(nèi)核分類
系統(tǒng)分為三種不同體量的系統(tǒng),本文主要講解基于Linux的標(biāo)準(zhǔn)系統(tǒng)構(gòu)建。
建編譯實戰(zhàn)-鴻蒙開發(fā)者社區(qū)")
2.系統(tǒng)代碼版本
Openharmony有主干代碼與發(fā)行版代碼兩種,代碼的獲取請參考官方文檔。
建編譯實戰(zhàn)-鴻蒙開發(fā)者社區(qū)")
建編譯實戰(zhàn)-鴻蒙開發(fā)者社區(qū)")
3.OpenHarmony源碼體系
OpenHarmony的源碼架構(gòu)基于模塊化設(shè)計,為了方便系統(tǒng)的功能的增加和裁剪,設(shè)計了基于GN構(gòu)建的模塊系統(tǒng)。整個模塊可從大到小劃分為產(chǎn)品(product)、領(lǐng)域/子系統(tǒng)集(domain)、子系統(tǒng)(sub_system)、部件(component)、模塊/組件(module)、特性(feature)幾個部分,這種模塊化的樹狀編譯框架,非常方便根據(jù)目標(biāo)產(chǎn)品硬件資源的大小進(jìn)行靈活的裁剪,從而實現(xiàn)**“統(tǒng)一0S,彈性部署”**的目標(biāo)。
4.各部分的關(guān)系
一個產(chǎn)品(product)可以包含1-n個子系統(tǒng)(subsystem),一個子系統(tǒng)可以包含1-~n個部件(component),一個部件可以包含1-n個模塊(modue),不同產(chǎn)品的中的相同部件可以編譯不同的特性(feature),**子系統(tǒng)集(domain)**在源代碼一級根目錄有體現(xiàn)。
不同產(chǎn)品相同模塊可以通過特性feature進(jìn)行差異化定義。
建編譯實戰(zhàn)-鴻蒙開發(fā)者社區(qū)")
5.南向開發(fā)的概念
開源鴻蒙系統(tǒng)的南向開發(fā),主要是針對設(shè)備或者終端的軟件開發(fā),例如各種智能家居設(shè)備、穿戴設(shè)備等。由于這些設(shè)備種類繁多,硬件配置和操作系統(tǒng)都各不相同,因此需要進(jìn)行適配和優(yōu)化,以確保設(shè)備能夠順利地運行開源鴻蒙系統(tǒng)。
二、OpenHarmony源碼的產(chǎn)品、子系統(tǒng)、部件、組件配置詳解
1.產(chǎn)品
產(chǎn)品解決方案為基于開發(fā)板的完整產(chǎn)品,主要包含產(chǎn)品對OS的適配、部件拼裝配置、啟動配置和文件系統(tǒng)配置等。產(chǎn)品解決方案的源碼路徑規(guī)則為:vendor/{產(chǎn)品解決方案廠商}/{產(chǎn)品名稱}。
vendor/company/product/config.json config.json為編譯構(gòu)建的主入口,包含了開發(fā)板、OS部件和內(nèi)核等配置信息。
2.領(lǐng)域
OpenHarmony技術(shù)架構(gòu)中有四大子系統(tǒng)集:“系統(tǒng)基本能力子系統(tǒng)集”、“基礎(chǔ)軟件服務(wù)子系統(tǒng)集"、“增強軟件服務(wù)子系統(tǒng)集"、“硬件服務(wù)子系統(tǒng)集”。四大子系統(tǒng)不會直接出現(xiàn)在編譯選項或者參數(shù)中,而是有對應(yīng)的一級源代碼文件夾:“系統(tǒng)基本能力子系統(tǒng)集”對應(yīng)源碼foundation文件夾;“基礎(chǔ)軟件服務(wù)子系統(tǒng)集”和“硬件服務(wù)子系統(tǒng)集”對應(yīng)源碼base文件夾;“增強軟件服務(wù)子系統(tǒng)集"對應(yīng)源碼domains文件夾。
建編譯實戰(zhàn)-鴻蒙開發(fā)者社區(qū)")
- vendor倉:存放廠商驅(qū)動代碼,配置文件
- device倉:存放硬件設(shè)備代碼,板級配置和驅(qū)動代碼
3.子系統(tǒng)
子系統(tǒng)是一個邏輯概念,它具體由對應(yīng)的組件構(gòu)成。配置規(guī)則如下:
{
  "arkui": {
    "path": "foundation/arkui",      # 路徑
    "name": "arkui"                  # 子系統(tǒng)名
  },
  "ai": {
    "path": "foundation/ai",
    "name": "ai"
  },
  "account": {
    "path": "base/account",
    "name": "account"
  },
  "distributeddatamgr": {
    "path": "foundation/distributeddatamgr",
    "name": "distributeddatamgr"
  },
  "security": {
    "path": "base/security",
    "name": "security"
  },
  ...
}
子系統(tǒng)的配置規(guī)則主要是在build/subsystem_config.json中指定子系統(tǒng)的路徑和子系統(tǒng)名稱。
4.部件(組件)
對子系統(tǒng)的進(jìn)一步拆分,可復(fù)用的軟件單元,它包含源碼、配置文件、資源文件和編譯腳本;能獨立構(gòu)建,以二進(jìn)制方式集成,具備獨立驗證能力的二進(jìn)制單元。
部件的bundle.json放在部件源碼的根目錄下。配置規(guī)則如下:
{
    "name": "@ohos/sensor_lite",	 # HPM部件英文名稱,格式"@組織/部件名稱"
    "description": "Sensor services",	# 部件功能一句話描述
    "version": "3.1",		# 版本號,版本號與OpenHarmony版本號一致
    "license": "MIT",		# 部件License
    "publishAs": "code-segment",		 # HPM包的發(fā)布方式
    "segment": {
        "destPath": ""
    },		 # 發(fā)布類型為code-segment時為必填項,定義發(fā)布類型code-segment的代碼還原路徑(源碼路徑)
    "dirs": {"base/sensors/sensor_lite"},	 # HPM包的目錄結(jié)構(gòu),字段必填內(nèi)容可以留空
    "scripts": {},			            # HPM包定義需要執(zhí)行的腳本,字段必填,值非必填
    "licensePath": "COPYING",
    "readmePath": {
        "en": "README.rst"
    },
    "component": {			               # 部件屬性
        "name": "sensor_lite",			   # 部件名稱
        "subsystem": "",		           # 部件所屬子系統(tǒng)
        "syscap": [],				      # 部件為應(yīng)用提供的系統(tǒng)能力
        "features": [],                     # 部件對外的可配置特性列表,一般與build中的sub_component對應(yīng),可供產(chǎn)品配置
        "adapted_system_type": [],		   # 輕量(mini)小型(small)和標(biāo)準(zhǔn)(standard),可以是多個
        "rom": "92KB",                     # 部件ROM值
        "ram": "~200KB",                   # 部件RAM估值
        "deps": {
        "components": [                    # 部件依賴的其他部件
          "samgr_lite",
          "ipc_lite"
        ],
        "third_party": [                   # 部件依賴的三方開源軟件
          "bounds_checking_function"
        ],
        "hisysevent_config": []           # 部件HiSysEvent打點配置文件編譯入口
      }
        "build": {				         # 編譯相關(guān)配置
            "sub_component": [
                ""http://base/sensors/sensor_lite/services:sensor_service"",  # 部件編譯入口
            ],			                                                # 部件編譯入口,模塊在此處配置
            "inner_kits": [],						                   # 部件間接口
            "test": []							                       # 部件測試用例編譯入口
        }
    }
 }
5.模塊
編譯子系統(tǒng)通過模塊、部件和產(chǎn)品三層配置來實現(xiàn)編譯和打包。模塊就是編譯子系統(tǒng)的一個目標(biāo),包括(動態(tài)庫、靜態(tài)庫、配置文件、預(yù)編譯模塊等)。模塊要定義屬于哪個部件,一個模塊只能歸屬于一個部件。這里列出了初學(xué)者常用的幾個模版及其配置規(guī)則:
# C/C++模板
ohos_shared_library  # 動態(tài)庫gn腳本
ohos_static_library  # 靜態(tài)庫gn腳本
ohos_executable      # 可執(zhí)行文件gn腳本

# 配置文件
ohos_prebuilt_etc    # etc模塊gn腳本
配置中只有sources和part_name是必選,其他都是可選的。
- ohos_shared_library示例
import("http://build/ohos.gni")
ohos_shared_library("helloworld") {
  sources = ["file"]
  include_dirs = []             # 如有重復(fù)頭文件定義,優(yōu)先使用前面路徑頭文件。
  cflags = []                   # 如重復(fù)沖突定義,后面的參數(shù)優(yōu)先生效,也就是該配置項中優(yōu)先生效。
  cflags_c = []
  cflags_cc = []
  ldflags = []                  # 如重復(fù)沖突定義,前面參數(shù)優(yōu)先生效,也就是ohos_template中預(yù)制參數(shù)優(yōu)先生效。
  configs = []
  deps = []                     # 部件內(nèi)模塊依賴

  external_deps = [             # 跨部件模塊依賴定義
  "part_name:module_name",      # 定義格式為 "部件名:模塊名稱"。
  ]                             # 這里依賴的模塊必須是依賴的部件聲明在inner_kits中的模塊。

  output_name = [string]        # 模塊輸出名
  output_extension = []         # 模塊名后綴
  module_install_dir = ""       # 模塊安裝路徑,缺省在/system/lib64或/system/lib下; 模塊安裝路徑從system/,vendor/后開始指定。
  relative_install_dir = ""     # 模塊安裝相對路徑,相對于/system/lib64或/system/lib;如果有module_install_dir配置時,該配置不生效。

  part_name = ""                # 必選,所屬部件名稱
  output_dir

  # Sanitizer配置,每項都是可選的,默認(rèn)為false/空。
  sanitize = {
    # 各個Sanitizer開關(guān)
    cfi = [boolean]               # 控制流完整性檢測
    cfi_cross_dso = [boolean]     # 開啟跨so調(diào)用的控制流完整性檢測
    integer_overflow = [boolean]  # 整數(shù)溢出檢測
    boundary_sanitize = [boolean] # 邊界檢測
    ubsan = [boolean]             # 部分ubsan選項
    all_ubsan = [boolean]         # 全量ubsan選項
    ...

    debug = [boolean]             # 調(diào)測模式
    blocklist = [string]          # 屏蔽名單路徑
  }

  testonly = [boolean]
  license_as_sources = []
  license_file = []               # 后綴名是.txt的文件
  remove_configs = []
  no_default_deps = []
  install_images = []
  install_enable = [boolean]
  symlink_target_name = []
  version_script = []
  use_exceptions = []
}- ohos_static_library示例
import("http://build/ohos.gni")
ohos_static_library("helloworld") {
  sources = ["file"]            # 后綴名是.c的相關(guān)文件
  include_dirs = ["dir"]        # 包含目錄
  configs = []                  # 配置
  deps = []                     # 部件內(nèi)模塊依賴
  part_name = ""                # 部件名稱
  subsystem_name = ""           # 子系統(tǒng)名稱
  cflags = []

  external_deps = [             # 跨部件模塊依賴定義,
  "part_name:module_name",      # 定義格式為 "部件名:模塊名稱"
  ]                             # 這里依賴的模塊必須是依賴的部件聲明在inner_kits中的模塊。

  lib_dirs = []
  public_configs = []

  # Sanitizer配置,每項都是可選的,默認(rèn)為false/空
  sanitize = {
    # 各個Sanitizer開關(guān)
    cfi = [boolean]               # 控制流完整性檢測
    cfi_cross_dso = [boolean]     # 開啟跨so調(diào)用的控制流完整性檢測
    integer_overflow = [boolean]  # 整數(shù)溢出檢測
    boundary_sanitize = [boolean] # 邊界檢測
    ubsan = [boolean]             # 部分ubsan選項
    all_ubsan = [boolean]         # 全量ubsan選項
    ...

    debug = [boolean]             # 調(diào)測模式
    blocklist = [string]          # 屏蔽名單路徑
  }

  remove_configs = []
  no_default_deps = []
  license_file = []               # 后綴名是.txt的文件
  license_as_sources = []
  use_exceptions = []
}- ohos_executable示例
import("http://build/ohos.gni")
ohos_executable("helloworld") {
  configs = []                       # 配置
  part_name = ""                     # 部件名稱
  subsystem_name = ""                # 子系統(tǒng)名稱
  deps = []                          # 部件內(nèi)模塊依賴

  external_deps = [                  # 跨部件模塊依賴定義,
  "part_name:module_name",           # 定義格式為 "部件名:模塊名稱"
  ]                                  # 這里依賴的模塊必須是依賴的部件聲明在inner_kits中的模塊。
  ohos_test = []
  test_output_dir = []

  # Sanitizer配置,每項都是可選的,默認(rèn)為false/空
  sanitize = {
    # 各個Sanitizer開關(guān)
    cfi = [boolean]               # 控制流完整性檢測
    cfi_cross_dso = [boolean]     # 開啟跨so調(diào)用的控制流完整性檢測
    integer_overflow = [boolean]  # 整數(shù)溢出檢測
    boundary_sanitize = [boolean] # 邊界檢測
    ubsan = [boolean]             # 部分ubsan選項
    all_ubsan = [boolean]         # 全量ubsan選項
    ...

    debug = [boolean]             # 調(diào)測模式
    blocklist = [string]          # 屏蔽名單路徑
  }

  testonly = [boolean]
  license_as_sources = []
  license_file = []                  # 后綴名是.txt的文件
  remove_configs = []
  static_link = []
  install_images = []
  module_install_dir = ""            # 模塊安裝路徑,從system/,vendor/后開始指定
  relative_install_dir = ""
  symlink_target_name = []
  output_dir = [directory]           # 存放輸出文件的目錄
  install_enable = [boolean]
  version_script = []
  use_exceptions = []
}- ohos_prebuilt_etc示例
import("http://build/ohos.gni")
ohos_prebuilt_etc("helloworld") {
  # ohos_prebuilt_etc模板最常用屬性:
  source = "file"                          # 指定單個原文件
  module_install_dir = ""                  # 模塊安裝路徑,從system/,vendor/后開始指定
  subsystem_name = ""                      # 子系統(tǒng)名
  part_name = ""                           # 必選,所屬部件名稱
  install_images = []
  relative_install_dir = ""                # 模塊安裝相對路徑,相對于system/etc;如果有module_install_dir配置時,該配置不生效。

  # ohos_prebuilt_etc模板不常用屬性:
  deps = []                                # 部件內(nèi)模塊依賴
  testonly = [boolean]
  visibility = []
  public_configs = []
  symlink_target_name = [string]
  license_file = [string]
  license_as_sources = []
}
6.特性
特性是部件用于體現(xiàn)不同產(chǎn)品之間的差異,通常不同特性可以定義不同編譯宏或者代碼。
三、子系統(tǒng)樣例源碼實戰(zhàn)
1.單模塊示例
本示例目標(biāo)是編寫一個helloworld程序。在OpenHarmony源碼目錄下創(chuàng)建子系統(tǒng)文件夾Mysample,其下創(chuàng)建部件文件夾Myhello,下設(shè)include和src文件夾分別用于存放頭文件和源碼。創(chuàng)建如下文件:
建編譯實戰(zhàn)-鴻蒙開發(fā)者社區(qū)")
(忽略圖片中我自己的其他部件)
Mysample/Myhello/include/helloworld.h
#ifndef HELLOWORLD_H //條件編譯指令
#define HELLOWORLD_H
#ifdef __cplusplus //C++ 編譯器
#if __cplusplus
extern "C" { //表示下面的代碼將以 C 語言的方式進(jìn)行編譯
#endif
#endif

void HelloPrint();

#ifdef __cplusplus
#if __cplusplus
}
#endif
#endif
#endif // HELLOWORLD_H
Mysample/Myhello/src/helloworld.c
#include <stdio.h>
#include "helloworld.h"
// #include "../include/helloworld.h"

int main(int argc, char **argv)
{
    HelloPrint();
    return 0;
}

void HelloPrint()
{
    printf("\n\n");
    printf("\n\t\tHello World!\n");
    printf("\n\n");
}
在部件文件夾Myhello下創(chuàng)建配置文件:
Mysample/Myhello/BUILD.gn
import("http://build/ohos.gni")  # 導(dǎo)入編譯模板
ohos_executable("helloworld") { # 可執(zhí)行模塊,target組件、模塊
  sources = [       # 模塊源碼
    "src/helloworld.c"
  ]
  include_dirs = [  # 模塊依賴頭文件目錄
    "include"
  ]
  cflags = []
  cflags_c = []
  cflags_cc = []
  ldflags = []
  configs = []
  deps =[]    # 部件內(nèi)部依賴
  part_name = "Myhello"    # 所屬部件名稱,必選
  install_enable = true  # 是否默認(rèn)安裝(缺省默認(rèn)不安裝),可選
}
Mysample/Myhello/bundle.json
{
    "name": "@ohos/Myhello",
    "description": "Hello world example.",
    "version": "3.1",
    "license": "Apache License 2.0",
    "publishAs": "code-segment",
    "segment": {
        "destPath": "Mysample/Myhello"
    },
    "dirs": {},
    "scripts": {},
    "component": {
        "name": "Myhello",
        "subsystem": "Mysample",
        "syscap": [],
        "features": [],
        "adapted_system_type": [ "mini", "small", "standard" ],
        "rom": "10KB",
        "ram": "10KB",
        "deps": {
            "components": [],
            "third_party": []
        },
        "build": {
            "sub_component": [
                "http://Mysample/Myhello:helloworld"
            ],
            "inner_kits": [],
            "test": []
        }
    }
}
修改模塊配置文件:
vendor/unionman/unionpi_whale/config.json
{
      "subsystem": "Mysample",
      "components": [
        {
          "component": "Myhello",
          "features": []
        }
      ]
    }
修改子系統(tǒng)配置文件:
build/subsystem_config.json
"Mysample": {
    "path": "Mysample",
    "name": "Mysample"
  },
2.多模塊示例
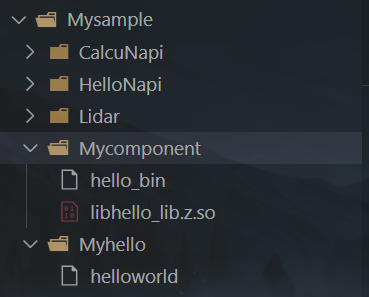
本示例目標(biāo)是帶大家使用幾個編譯模板。在OpenHarmony源碼目錄下創(chuàng)建子系統(tǒng)文件夾Mysample,其下創(chuàng)建部件文件夾Mycomponent,下設(shè)module1、module2和’module3`文件夾分別用于3個模塊。創(chuàng)建如下文件:
建編譯實戰(zhàn)-鴻蒙開發(fā)者社區(qū)")
- 需要注意的是:每個模塊有自己的配置文件BUILD.gn,組件還需要一個group模板的BUILD.gn。
Mysample/Mycomponent/module1/include/hello1.h
#ifndef HELLO1_H //條件編譯指令
#define HELLO1_H
#ifdef __cplusplus //C++ 編譯器
#if __cplusplus
extern "C" { //表示下面的代碼將以 C 語言的方式進(jìn)行編譯
#endif
#endif

void HelloPrint1();

#ifdef __cplusplus
#if __cplusplus
}
#endif
#endif
#endif // HELLO1_H
Mysample/Mycomponent/module1/src/hello1.cpp
#include <iostream>
#include "hello1.h"

void HelloPrint1()
{
    printf("\n\n");
    printf("\n\t\tHello1!\n");
    printf("\n\n");
}
Mysample/Mycomponent/module1/BUILD.gn
import("http://build/ohos.gni")

config("hello_lib_config") {
 include_dirs = [ "include" ]
}

ohos_shared_library("hello_lib") {
  sources = [
    "include/hello1.h",
    "src/hello1.cpp",
  ]
  public_configs = [ ":hello_lib_config" ]
  part_name = "Mycomponent"
}
Mysample/Mycomponent/module2/include/hello2.h
#ifndef HELLO2_H //條件編譯指令
#define HELLO2_H
#ifdef __cplusplus //C++ 編譯器
#if __cplusplus
extern "C" { //表示下面的代碼將以 C 語言的方式進(jìn)行編譯
#endif
#endif

void HelloPrint2();

#ifdef __cplusplus
#if __cplusplus
}
#endif
#endif
#endif // HELLO2_H
Mysample/Mycomponent/module2/src/hello2.cpp
#include <iostream>
#include "hello1.h"
#include "hello2.h"

int main(int argc, char **argv)
{
    HelloPrint2();
    return 0;
}

void HelloPrint2()
{
    HelloPrint1();
    printf("\n\n");
    printf("\n\t\tHello2!\n");
    printf("\n\n");
}
Mysample/Mycomponent/module2/BUILD.gn
import("http://build/ohos.gni")

ohos_executable("hello_bin") {
  sources = [
    "src/hello2.cpp"
  ]
  include_dirs = [ "include" ]
  deps = [                                # 依賴部件內(nèi)模塊
    "../module1:hello_lib"
  ]
  install_enable = true                   # 可執(zhí)行程序缺省不安裝,需要安裝時需要指定
  part_name = "Mycomponent"
}
Mysample/Mycomponent/module3/src/config.conf
var_a = 10
var_b = 20
var_c = 30
Mysample/Mycomponent/module3/BUILD.gn
import("http://build/ohos.gni")

ohos_prebuilt_etc("hello_etc") {
  source = "src/config.conf"
  relative_install_dir = "init"    #可選,模塊安裝相對路徑,相對于默認(rèn)安裝路徑;默認(rèn)在/system/etc目錄
  part_name = "Mycomponent"
}
在部件文件夾Mycomponent下創(chuàng)建配置文件:
Mysample/Mycomponent/BUILD.gn
import("http://build/ohos.gni")

group("mycomponent"){
    deps = [
        "module1:hello_lib",
        "module2:hello_bin",
        "module3:hello_etc"
    ]
}
Mysample/Mycomponent/bundle.json
{
    "name": "@ohos/Mycomponent",
    "description": "Hello world example.",
    "version": "3.1",
    "license": "Apache License 2.0",
    "publishAs": "code-segment",
    "segment": {
        "destPath": "Mysample/Mycomponent"
    },
    "dirs": {},
    "scripts": {},
    "component": {
        "name": "Mycomponent",
        "subsystem": "Mysample",
        "syscap": [],
        "features": [],
        "adapted_system_type": [ "mini", "small", "standard" ],
        "rom": "10KB",
        "ram": "10KB",
        "deps": {
            "components": [],
            "third_party": []
        },
        "build": {
            "sub_component": [
                "http://Mysample/Mycomponent:mycomponent"
            ],
            "inner_kits": [],
            "test": []
        }
    }
}
修改模塊配置文件:
vendor/unionman/unionpi_whale/config.json
{
      "subsystem": "Mysample",
      "components": [
        {
          "component": "Myhello",
          "features": []
        },
        {
          "component": "Mycomponent",
          "features": []
        }
      ]
    },
3.編譯
- 命令行方式
./build.sh --product-name {product_name} #全量編譯
./build.sh --product-name {product_name}  --build-target {target_name} #單獨編譯部件
./build.sh --product-name {product_name} --build-target {target_name} --fast-rebuild #快速重建- hb方式
hb set #設(shè)置編譯參數(shù)
hb build #全量編譯
hb build -T {target_name} #單獨編譯部件
hb build -T {target_name} --fast-rebuild #快速重建- 我們這里使用hb方式來進(jìn)行編譯。在終端輸入命令hb set,選擇standard和unionpi_whale,在終端輸入命令hb build -T Myhello。耗時1:26,編譯成功日志如下:
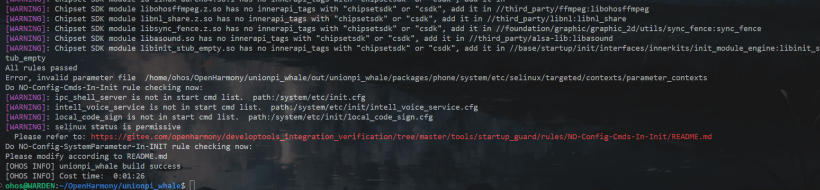
- 由于編譯Myhello部件的已經(jīng)檢查了一遍編譯關(guān)系,而我們又沒有改動編譯構(gòu)建文件,故可以使用快速重建命令hb build -T Mycomponent --fast-rebuild編譯Mycomponent部件。編譯成功日志如下:

- 可見所用時間大大減少。
- 編譯產(chǎn)物在out/board/product目錄下。
4.燒錄
- 全量燒錄: 適合更新版本或者代碼大變動
打包鏡像->RKDevTool燒錄。 - HDC工具:適合代碼更新時單獨發(fā)送所需文件(以helloworld為例)
- 找到可執(zhí)行文件helloworld,并將其放置到電腦hdc.exe同級目錄下。
- 連接設(shè)備:將開發(fā)板上電,并連接電腦。
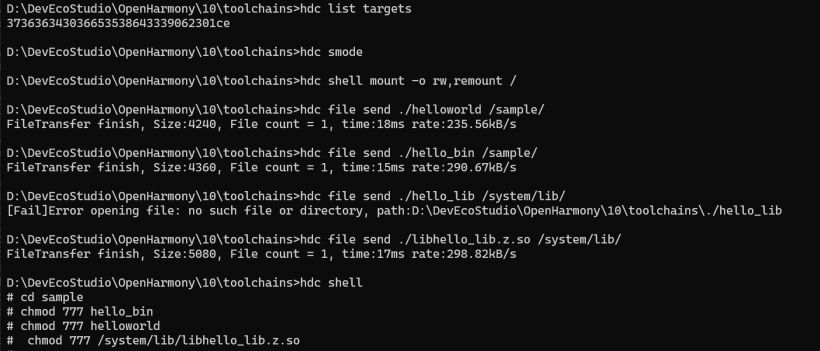
- 從hdc文件夾下進(jìn)入終端,輸入hdc list targets檢查是否連接好,檢測到設(shè)備后輸-入hdc smode授予進(jìn)程root權(quán)限,再輸入hdc shell mount -o rw,remount /掛載分區(qū),并且賦予可寫權(quán)限。
- 輸入hdc shell進(jìn)入開發(fā)板終端,mkdir sample創(chuàng)建文件夾,exit退出終端。
- hdc file send ./helloworld /sample/傳輸文件。(將當(dāng)前目錄下的hello文件傳輸?shù)介_發(fā)板的sample目錄下)
- hdc shell再次進(jìn)入開發(fā)板終端,cd sample進(jìn)入文件夾,chmod 777 *給程序賦予可執(zhí)行權(quán)限。
5.燒錄測試并執(zhí)行
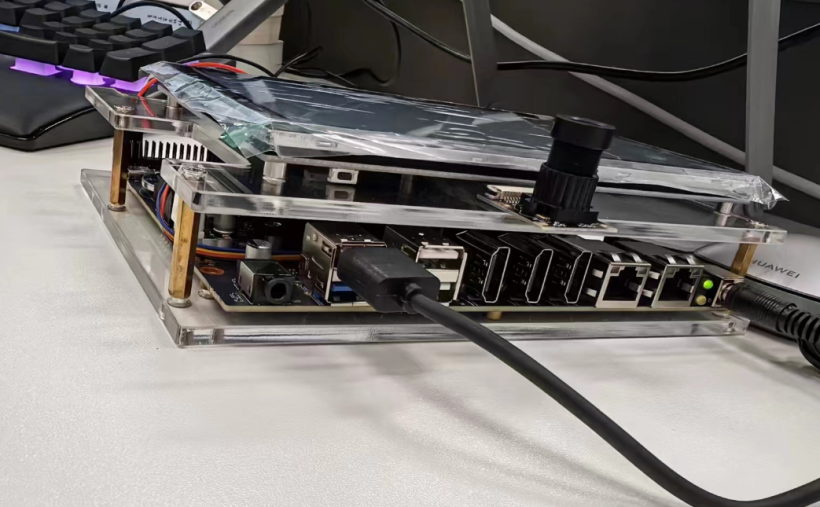
- 燒錄:
- whale開發(fā)板燒錄口為藍(lán)色USB口上層口,使用USBtoUSB線燒錄。
- 需要注意:可執(zhí)行文件可以發(fā)送到任意目錄,而動態(tài)庫文件libhello_lib.z.so需要發(fā)送到/system/lib/目錄下。
- 使用命令./可執(zhí)行程序名執(zhí)行程序。在終端查看輸出結(jié)果。

- 測試成功
總結(jié)
在本人看來,入門開源鴻蒙南向設(shè)備學(xué)習(xí),有很大可能會被這么多的配置選項和新概念勸退,所以在暑期培訓(xùn)我選擇分享這部分的內(nèi)容,希望對大家有幫助。