useEffect 實踐案例之一

序
對于 useEffect 的掌握是 React hooks 學習的重中之重。因此我們還需要花一些篇幅繼續圍繞它講解。
在上一篇文章中,我們使用兩個案例分析了 useEffect 的理論知識。接下來,我們通過一些具體的實踐案例來學習 useEffect 的運用。
一、需求
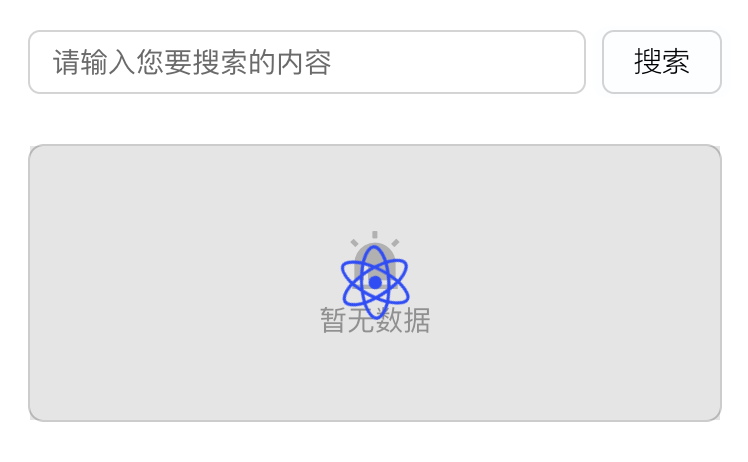
現有一個簡單的需求,要實現一個搜索框,輸入內容之后,點擊搜索按鈕,然后得到一個列表。
當列表為空時,顯示暫無數據。

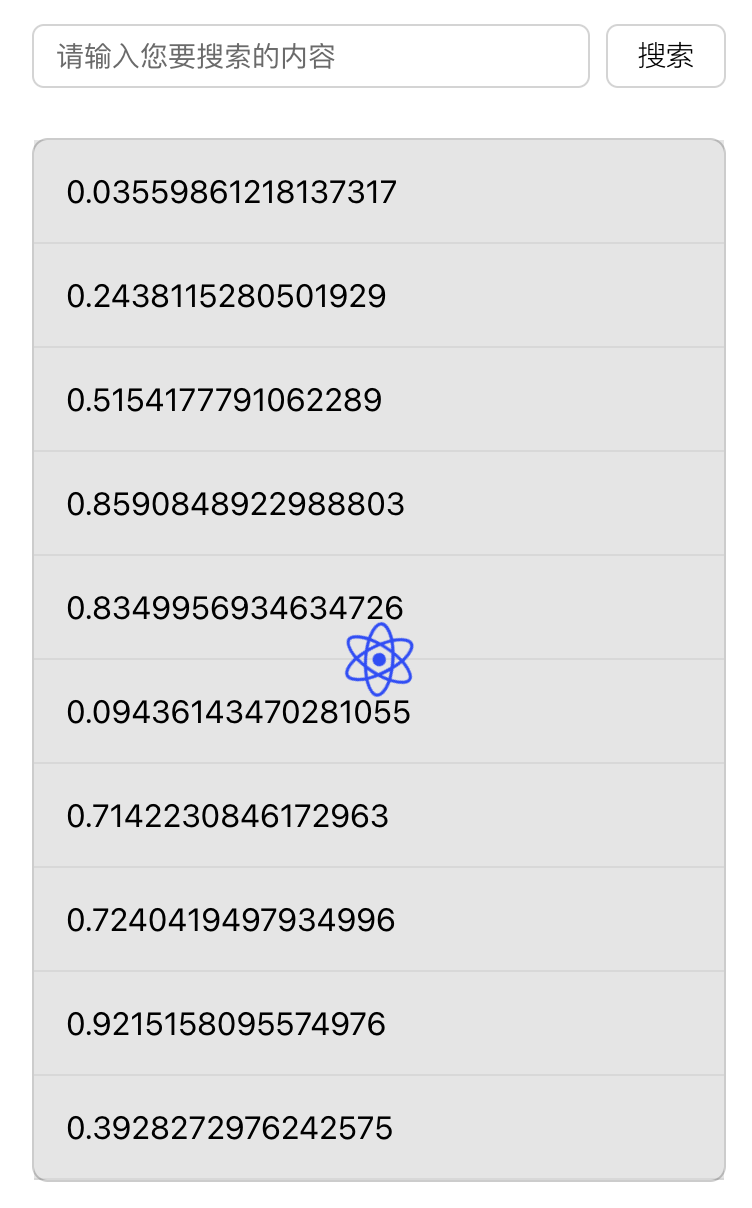
接口請求過程中,需要顯示 Loading 狀態。
Loading 狀態隨便用的一個轉圈圖標來表示,和下面的圖標有點重疊,以后有機會再調整一下 UI。
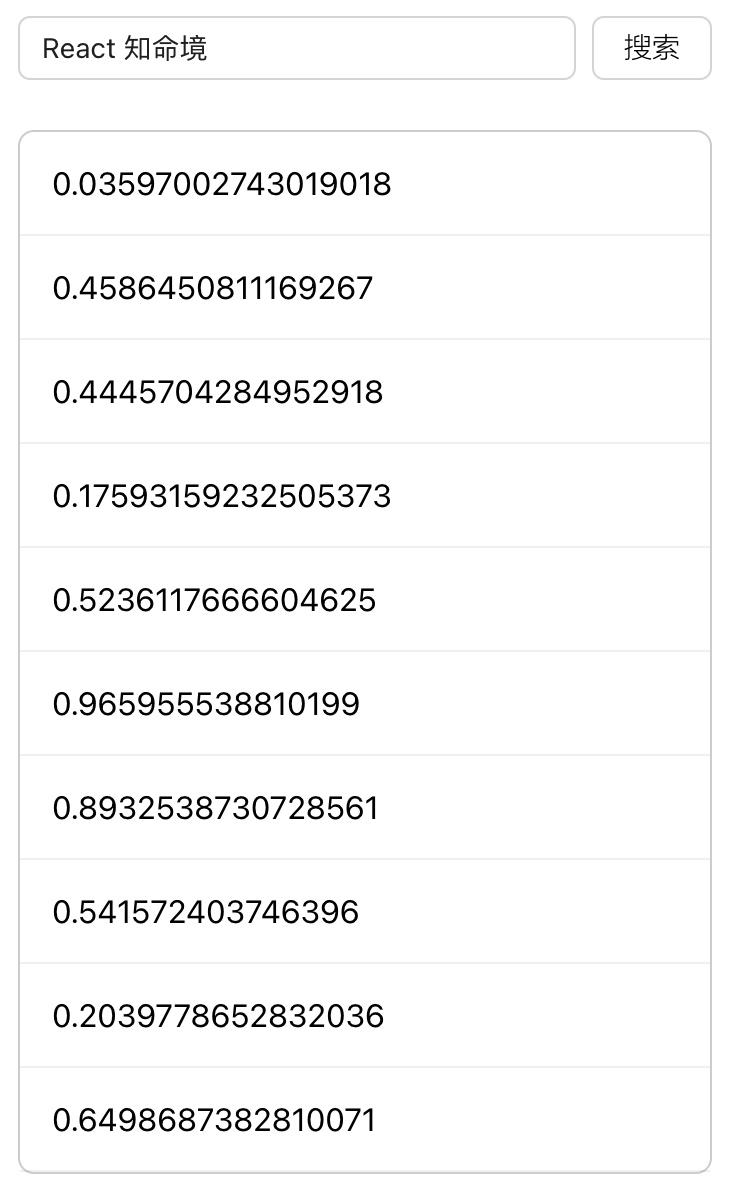
接口請求成功之后,顯示一個列表。
再次搜索時,顯示 Loading 狀態。
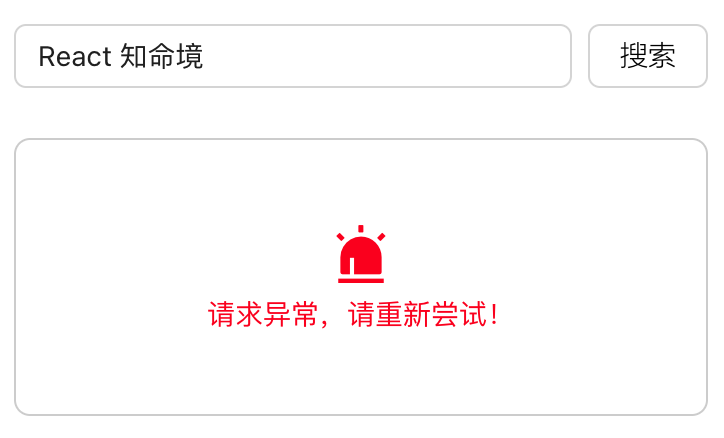
如果接口請求出錯,顯示錯誤頁面。
在實踐中,這是針對一個請求所需要的常規狀態處理,當然很多時候我們在學習的過程中簡化了空數據/Loading/異常等狀態,就導致了許多自學的朋友沒有在工作中友好處理這些狀態的習慣。
二、實現
我們一步一步來實現該需求。
我們假設一個請求需要花費 600ms,在學習階段,我們可以借助 Promise 與 setTimeout 來模擬一個接口請求。
單獨創建一個 api.ts 文件。
在該文件中,我們聲明一個名為 searchApi 的函數,該函數接收一個字符串作為參數。
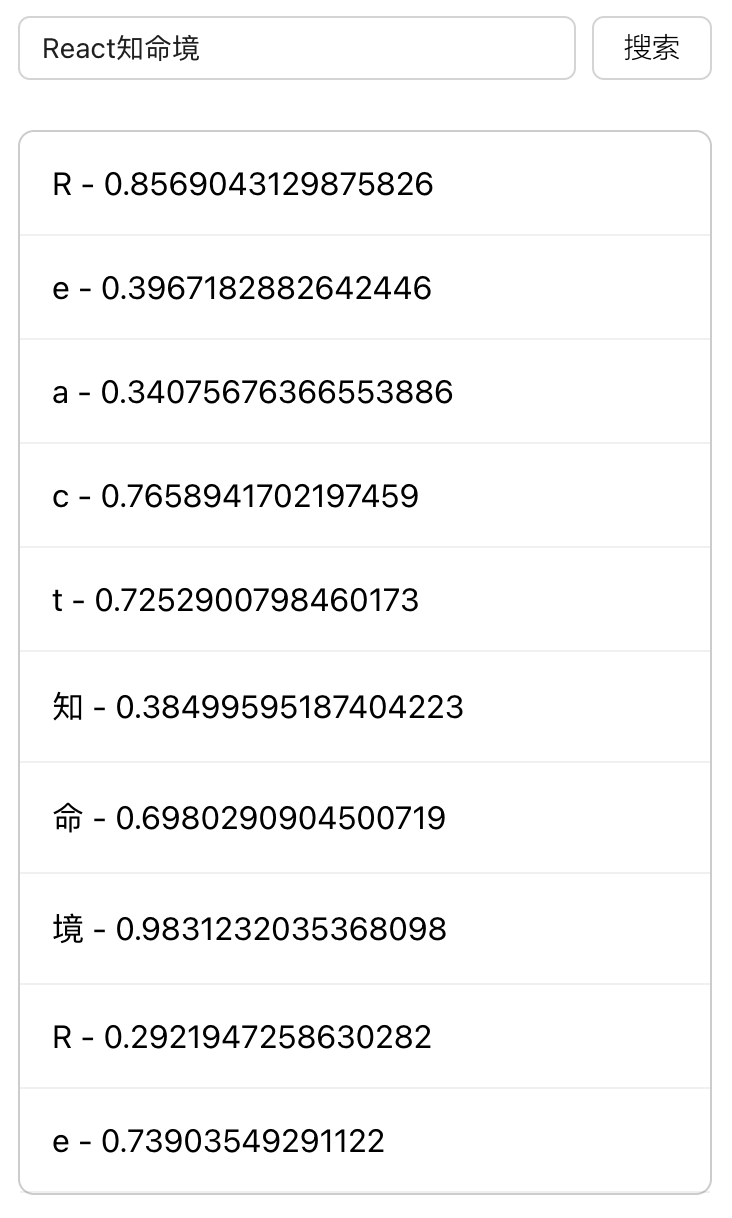
我計劃設計該函數最終返回一個 Promise 對象。并將一個字符串數組 resolve 出來。該字符串由搜索條件的一個字符與Math.random 產生的隨機數組成。
輸出的列表長這樣。
該 api 函數具體代碼如下:
// ./api.ts
export function searchApi(param: string) {
  return new Promise<string[]>((resolve, reject) => {
    const p = param.split('')
    const arr: string[] = []
    for(var i = 0; i < 10; i++) {
      const pindex = i % p.length
      arr.push(`${p[pindex] || '^ ^'} - ${Math.random()}`)
    }
    setTimeout(() => {
      if (Math.random() * 10 > 1) {
        resolve(arr)
      } else {
        reject('請求異常,請重新嘗試!')
      }
    }, 600)
  })
}
在該函數中,我們使用泛型明確了 Promise 的輸出類型,在后續的使用中就可以利用 TypeScript 的自動類型推導得到具體的返回類型。

接下來我們要創建組件函數。
// index.tsx
export default function DemoOneNormal() {
  // ...
}
然后我們根據 UI 的情況去分析應該在代碼中設計哪些數據。
首先有一個列表需要展示。
const [list, setList] = useState<string[]>([])然后有一個 Loading 的顯示與隱藏需要控制。
const [loading, setLoading] = useState(false)還有一個錯誤信息需要顯示。
const [error, setError] = useState('')還有一個稍微有一些特殊的,輸入框中輸入的內容。我們要注意準確分析內容:該內容的展示在已有的 UI 中,是根據鍵盤輸入而展示內容,它不由數據來驅動。
我們在該案例中,僅僅只是記錄輸入的內容,并傳入 searchApi即可。因此我們可以使用 useRef 來存儲該變量。
const str = useRef('')如果情況有變,有其他的 UI 需要該數據來驅動,那么我們就需要將其調整為使用 useState 來存儲。
接下來思考 JSX 代碼的編寫。
首先是一個輸入框 input 與按鈕 button。
<input
  className={s.input}
  placeholder="請輸入您要搜索的內容"
  notallow={(e) => str.current = e.target.value}
/>
<Button
  className={s.button}
  onClick={onSure}
>
  搜索
</Button>
案例中的樣式使用了 css module,因此 className 的語法會與前面介紹的有所不同,我們把 s.input 當成一個字符串來看待即可。
代碼中,借助 input 的 onChange 回調來記錄當前輸入的值。
// const str = useRef('')
notallow={(e) => str.current = e.target.value}
點擊按鈕時,修改對應的狀態,并開始發送請求。此時 Loading 應該修改為 true。
function onSure() {
  setLoading(true)
  searchApi(str.current).then(res => {
    setList(res)
    setLoading(false)
    setError('')
  }).catch(err => {
    setLoading(false)
    setError(err)
  })
}
請求成功之后,Loading 改回 false,list 得到新的數據。如果請求失敗,Loading 依然需要改成 false,并記錄錯誤信息。
接下來我們要思考列表的 UI 代碼。
首先,空數據、錯誤信息、正常列表的顯示情況是互斥的,他們三個只能存在一個。Loading 狀態是每個情況下都有可能發生的,與他們的關系是分別共存的。
因此,當有錯誤信息時,這一塊的內容應該為。
if (error) {
  return (
    <div className={s.wrapper}>
      {loading && (
        <div className={s.loading_wrapper}>
          <Icon spin type='loading' style={{ fontSize: 40 }} />
        </div>
      )}
      <Icon type='event' color='red' style={{ fontSize: 32 }} />
      <div className={s.error}>{error}</div>
    </div>
  )
}
案例中出現的 Icon 組件是一個圖標,該組件是我們這個項目自己封裝好的基礎組件。
當是空列表時。
if (list.length === 0) {
  return (
    <div className={s.wrapper}>
      {loading && (
        <div className={s.loading_wrapper}>
          <Icon spin type='loading' color='#2860Fa' style={{ fontSize: 38 }} />
        </div>
      )}
      <Icon type='event' color='#ccc' style={{ fontSize: 32 }} />
      <div className={s.nodata}>暫無數據</div>
    </div>
  )
}
正常列表有數據時。
<div className={s.list}>
  {loading && (
    <div className={s.loading_wrapper}>
      <Icon spin type='loading' color='#2860Fa' style={{ fontSize: 38 }} />
    </div>
  )}

  {list.map(item => (
    <div key={item} className={s.item}>{item}</div>
  ))}
</div>
OK,此時所有的邏輯已經考慮完畢。
三、優化封裝
我們會發現,列表相關的邏輯實在是有點繁瑣。如果每次遇到一個列表就要處理這么多,豈不是非常消耗時間?
因此我們這里考慮將這些邏輯統一封裝到 List 組件里,下次要使用直接拿出來用就可以了。
// ./List/index.tsx
export default function List(props) {}
在封裝時,我們首先要考慮哪些屬性需要作為 props 傳入該 List 組件。關于封裝的思考,和其他的邏輯封裝是一樣的,我們需要先考慮在不同的場景之下,他們的共性與差異分別是什么,差異的部分作為參數傳入。
三個數據,error,loading,list 都是差異部分,他們需要作為 props 傳入。
先定義一個類型聲明如下:
interface ListProps<T> {
  loading?: boolean,
  error?: string,
  list?: T[]
}
此時我們看到由于 list 的每一項具體數據內容,可能每一個列表都不一樣,我們無法在這里確認他的類型,因此此處使用泛型來表示。
不知道 list 的每一項具體數據是什么,也就意味著對應的 UI 我們也無法提前得知,只有在使用時才知道,因此還應該補上一個新的 props 屬性。
interface ListProps<T> {
  loading?: boolean,
  error?: string,
  list?: T[],
+ renderItem: (item: T) => ReactNode
}
然后我們只需要把差異部分與共同部分在組件邏輯中組合起來即可,List 組件完整代碼如下:
import Icon from 'components/Icon'
import { ReactNode } from 'react'
import s from './index.module.scss'

interface ListProps<T> {
  loading?: boolean,
  error?: string,
  list?: T[],
  renderItem: (item: T) => ReactNode
}

export default function List<T>(props: ListProps<T>) {
  const {list = [], loading, error, renderItem} = props

  if (error) {
    return (
      <div className={s.wrapper}>
        {loading && (
          <div className={s.loading_wrapper}>
            <Icon spin type='loading' style={{ fontSize: 40 }} />
          </div>
        )}
        <Icon type='event' color='red' style={{ fontSize: 32 }} />
        <div className={s.error}>{error}</div>
      </div>
    )
  }

  if (list.length === 0) {
    return (
      <div className={s.wrapper}>
        {loading && (
          <div className={s.loading_wrapper}>
            <Icon spin type='loading' color='#2860Fa' style={{ fontSize: 38 }} />
          </div>
        )}
        <Icon type='event' color='#ccc' style={{ fontSize: 32 }} />
        <div className={s.nodata}>暫無數據</div>
      </div>
    )
  }

  return (
    <div className={s.list}>
      {loading && (
        <div className={s.loading_wrapper}>
          <Icon spin type='loading' color='#2860Fa' style={{ fontSize: 38 }} />
        </div>
      )}

      {list.map(renderItem)}
    </div>
  )
}
封裝好之后,使用起來就非常簡單了,我們只需要把當前上下文中的數據傳入進去即可。
<List
  list={list}
  loading={loading}
  error={error}
  renderItem={(item) => (
    <div key={item} className={s.item}>{item}</div>
  )}
/>
該案例組件文件路徑:src/pages/demos/effect/search/Normal.tsx
四、需求改進
在某些場景,初始化時我們并不需要展示空數組,而是需要請求一次接口,然后展示對應的列表,因此,在這種需求的情況下,代碼需要進行一些調整。
首先,Loading 的初始化狀態需要從 false 改為 true,表示一開始就會立即請求數據。
- const [loading, setLoading] = useState(false)
+ const [loading, setLoading] = useState(true)
然后初始化請求數據的操作,在 useEffect 中完成,傳入空數組作為依賴項,表示只在組件首次渲染完成之后執行一次。
...

+ useEffect(() => {
+   searchApi(str.current).then(res => {
+     setList(res)
+     setLoading(false)
+     setError('')
+   }).catch(err => {
+     setLoading(false)
+     setError(err)
+   })
+ }, [])

function onSure() {
  setLoading(true)
  searchApi(str.current).then(res => {
    setList(res)
    setLoading(false)
    setError('')
  }).catch(err => {
    setLoading(false)
    setError(err)
  })
}

...
OK,這樣需求就完整的被解決,不過此時我們發現,useEffect 的邏輯與 onSure 的邏輯高度重合,他們一個代表初始化邏輯,一個代表更新邏輯。
因此在代碼上做一些簡單的調整。
function getList() {
    searchApi(str.current).then(res => {
      setList(res)
      setLoading(false)
      setError('')
    }).catch(err => {
      setLoading(false)
      setError(err)
    })
  }

  useEffect(() => {
    getList()
  }, [])

  function onSure() {
    setLoading(true)
    getList()
  }
這樣調整了之后,我們發現一個有趣的事情,當點擊搜索按鈕觸發 onSure 時,我們會執行一次把 loading 修改為 true 的操作。
setLoading(true)那如果這個時候,我們就可以把 loading 作為 useEffect 的依賴項傳入,onSure 里就可以只保留這一行代碼。
useEffect(() => {
  loading && getList()
}, [loading])

function onSure() {
  setLoading(true)
}
這就是我們在本書唯一付費章節「React 哲學」中提到的開關思維。在日常生活中,如果我想要打開電視機,我們只需要關注開關按鈕那一下操作,在這里也是一樣,如果我想要重新請求列表搜索,我只需要關注如何操作 loading 這個開關即可
該案例組件文件路徑:src/pages/demos/effect/search/Normal2.tsx。
接下來我們將要學習自定義 hook,進一步感受開關思維的魅力。