玩轉(zhuǎn)SpringBoot—SpringBoot簡(jiǎn)介和基本用法

學(xué)習(xí)目標(biāo)
- 微服務(wù)架構(gòu)的演進(jìn)——推導(dǎo)單體架構(gòu)到微服務(wù)架構(gòu)一路走來(lái)的根本原因。
- 深層次理解spring的問(wèn)題。
- 理解spring一路走來(lái)所做的努力。
- springboot對(duì)spring的優(yōu)化。
- springboot使用。
第1章:微服務(wù)架構(gòu)的演進(jìn)
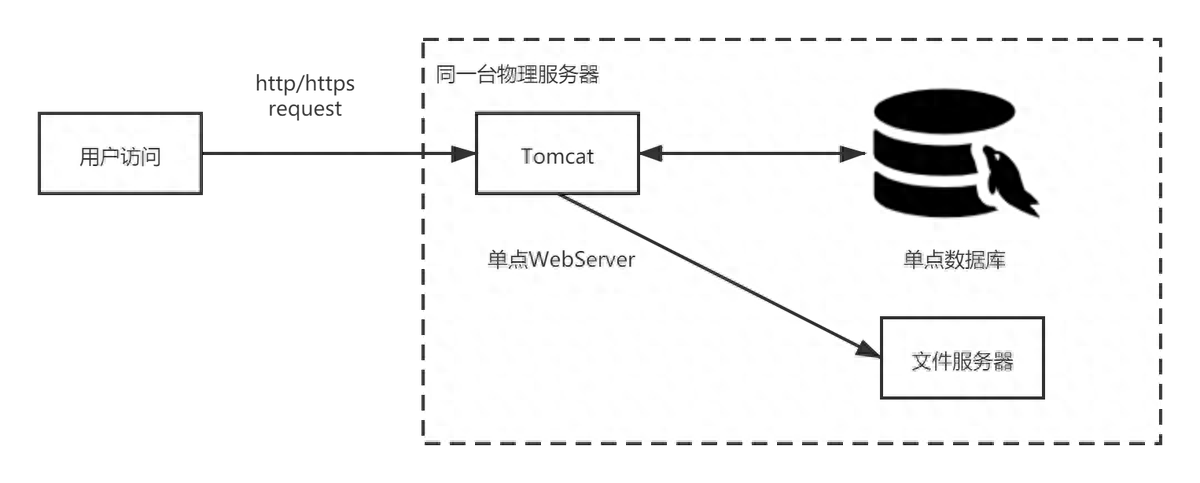
1、單體架構(gòu)
任何一個(gè)網(wǎng)站在發(fā)布初期幾乎都不可能立馬就擁有龐大的用戶(hù)流量和海量數(shù)據(jù),都是在不停地試錯(cuò)過(guò)程中一步一步演變其自身架構(gòu),滿足其自身業(yè)務(wù)。比如現(xiàn)在能夠抗住雙十一這么大流量的淘寶,它的技術(shù)最早用的是 LAMP(Linux+Apache+Mysql+Php)。
實(shí)際上,架構(gòu)越復(fù)雜,意味著業(yè)務(wù)的體量越龐大。
對(duì)于一個(gè)剛剛起步的項(xiàng)目,我們會(huì)選擇最簡(jiǎn)單最快速的方式來(lái)實(shí)現(xiàn)。而單體架構(gòu)是最好的選擇,目前很多的傳統(tǒng)軟件行業(yè)仍然采用這類(lèi)的架構(gòu)。
一般的實(shí)施方案是,把所有的功能模塊都打包在一個(gè)(jar、war),并且部署在一個(gè) web 容器下,比如 tomcat、weblogic、jboss 中運(yùn)行
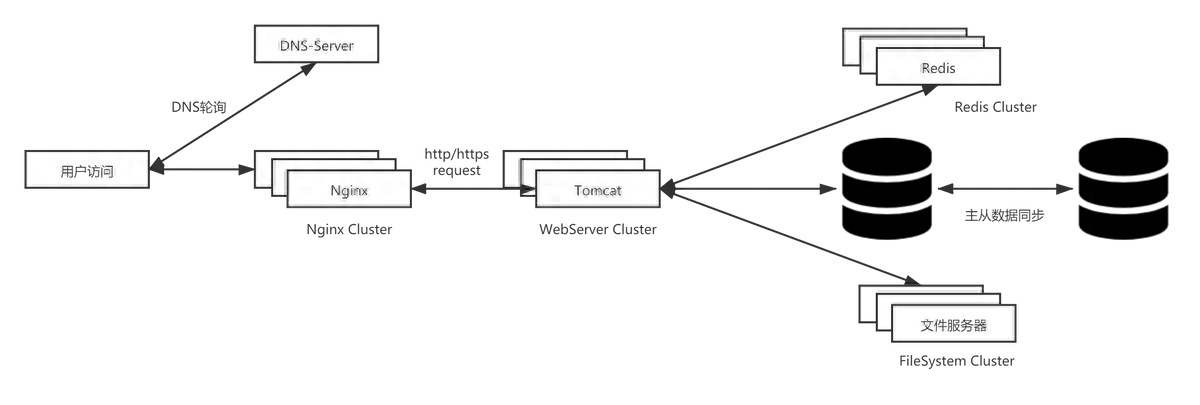
2、集群架構(gòu)
一旦用戶(hù)量以及流量開(kāi)始增加,服務(wù)器的性能就會(huì)遇到瓶頸,這個(gè)時(shí)候必須要對(duì)系統(tǒng)架構(gòu)做調(diào)整以及優(yōu)化。而在這個(gè)階段主要需要解決的問(wèn)題是提升業(yè)務(wù)系統(tǒng)的并行處理能力,降低單機(jī)系統(tǒng)負(fù)載,以便支撐更多的用戶(hù)訪問(wèn)操作。
集群就是一種很好的方式,它可以把多臺(tái)獨(dú)立的服務(wù)器通過(guò)網(wǎng)絡(luò)連接進(jìn)行組合,對(duì)外形成一個(gè)整體提供服務(wù)。當(dāng)一臺(tái)服務(wù)器的處理能力接近或已超出其容量上限時(shí),我們不會(huì)去嘗試換一個(gè)更高性能的服務(wù)器,因?yàn)橥度氘a(chǎn)出比不高,一般的做法就是采用集群技術(shù),通過(guò)增加新的服務(wù)器來(lái)分散并發(fā)訪問(wèn)流量,只要業(yè)務(wù)系統(tǒng)能夠隨意支持服務(wù)器的橫向擴(kuò)容,那么從理論上來(lái)說(shuō)就應(yīng)該無(wú)懼任何挑戰(zhàn),從而實(shí)現(xiàn)可伸縮性和高可用性架構(gòu)。
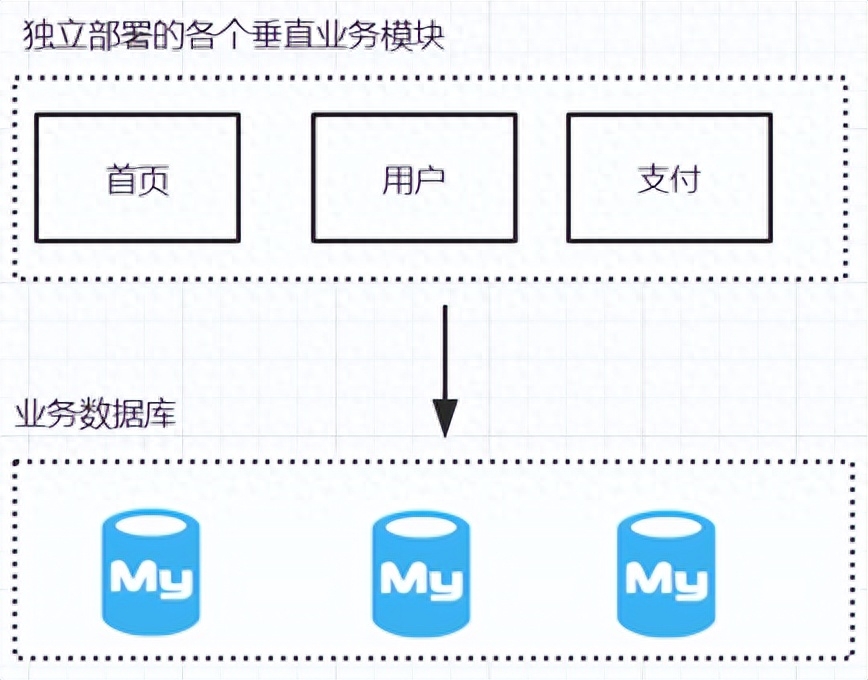
3、業(yè)務(wù)垂直化拆分
雖然通過(guò)集群可以提升并行處理能力以及對(duì)于高可用的實(shí)現(xiàn),但是同時(shí)還需要考慮到業(yè)務(wù)的復(fù)雜度,如果仍然把所有的業(yè)務(wù)邏輯全部耦合在一起放在一個(gè) war 包中來(lái)管理,那對(duì)于代碼的維護(hù)和擴(kuò)展來(lái)說(shuō)是非常困難的。而且如果某個(gè)業(yè)務(wù)功能出現(xiàn)故障,會(huì)導(dǎo)致整個(gè)系統(tǒng)不可用。所以這個(gè)階段要做的就是降低業(yè)務(wù)的耦合度,提升系統(tǒng)的容錯(cuò)性。
所以這個(gè)時(shí)候可以對(duì)業(yè)務(wù)進(jìn)行垂直化拆分,簡(jiǎn)單來(lái)說(shuō),就是可以按照系統(tǒng)的業(yè)務(wù)功能拆分出多個(gè)業(yè)務(wù)模塊,比如電商網(wǎng)站,會(huì)拆分出:首頁(yè)、用戶(hù)、搜索、訂單、支付、商品等子系統(tǒng)。每個(gè)子系統(tǒng)由不同的業(yè)務(wù)團(tuán)隊(duì)負(fù)責(zé)。
4、服務(wù)化改造
隨著對(duì)業(yè)務(wù)系統(tǒng)進(jìn)行垂直化改造之后,以業(yè)務(wù)功能緯度拆分出來(lái)多個(gè)子系統(tǒng),而在各個(gè)子系統(tǒng)中,會(huì)存在比較多的共享業(yè)務(wù),比如用戶(hù)信息查詢(xún),在支付業(yè)務(wù)中會(huì)涉及到、在首頁(yè)中也會(huì)涉及到。那么勢(shì)必會(huì)造成重復(fù)開(kāi)發(fā)產(chǎn)生非常多的冗余代碼。那么這個(gè)時(shí)候就引入了服務(wù)化改造的思想,也就是 SOA把一些通用的、會(huì)被多個(gè)上層服務(wù)調(diào)用的模塊獨(dú)立拆分出來(lái),形成一些共享的基礎(chǔ)服務(wù)。這些被拆分出來(lái)的共享服務(wù)相對(duì)來(lái)說(shuō)是比較獨(dú)立,并且可重用。 比如用戶(hù)管理服務(wù),包含用戶(hù)注冊(cè)、用戶(hù)查詢(xún)等功能。比如單點(diǎn)登錄服務(wù);
SOA 的核心目標(biāo)就是通過(guò)服務(wù)的流程化來(lái)實(shí)現(xiàn)業(yè)務(wù)的靈活性,而這個(gè)流程化其實(shí)就是由一系列相關(guān)聯(lián)的任務(wù)組成,這一系列相關(guān)聯(lián)的任務(wù)可以通過(guò)一系列的服務(wù)組合來(lái)實(shí)現(xiàn)具體的業(yè)務(wù)功能SOA 面向服務(wù)架構(gòu),從語(yǔ)義上說(shuō),它與面向過(guò)程、面向?qū)ο蟆⒚嫦蚪M件一樣,是一種軟件組建及開(kāi)發(fā)的方式。所以在 SOA 中,服務(wù)是最核心的抽象手段,業(yè)務(wù)被劃分為一些列粗粒度的業(yè)務(wù)服務(wù)和業(yè)務(wù)流程
SOA 中更強(qiáng)調(diào) ESB 企業(yè)服務(wù)總線,企業(yè)服務(wù)總線可以使得服務(wù)之間的交互是動(dòng)態(tài)的,以及服務(wù)位置是透明的。這樣的好處是服務(wù)的調(diào)用者和服務(wù)的提供者之間是高度解耦的。從而使得服務(wù)有更高的靈活性以及隔離性。
ESB: 是從面相服務(wù)架構(gòu)(SOA)發(fā)展過(guò)來(lái)的,主要是對(duì)多個(gè)系統(tǒng)中的服務(wù)調(diào)用者和服務(wù)提供者的解耦。ESB 本身提供了服務(wù)暴露、接入、協(xié)議轉(zhuǎn)化、數(shù)據(jù)格式轉(zhuǎn)化、路由等功能。
SOA 主要解決的問(wèn)題是:
- 信息孤島
- 互聯(lián)互通
- 業(yè)務(wù)重用
5、微服務(wù)架構(gòu)
業(yè)務(wù)系統(tǒng)實(shí)施服務(wù)化改造后,原本共享的業(yè)務(wù)被拆分,形成可復(fù)用的服務(wù),可以在最大程度上避免共享業(yè)務(wù)的重復(fù)建設(shè)、資源連接瓶頸等問(wèn)題出現(xiàn)。那么那些被拆分出來(lái)的服務(wù),是否也需要以業(yè)務(wù)功能為維度來(lái)進(jìn)行拆分,使之能夠獨(dú)立進(jìn)行部署,以降低業(yè)務(wù)藕合和提升容錯(cuò)性呢?
微服務(wù)并不是一種新思想的方法。它更像是一種思想的精煉,是一種服務(wù)化思想的最佳實(shí)踐方向而已,所以我認(rèn)為微服務(wù)其實(shí)是在 SOA 思路下,隨著各個(gè)企業(yè)對(duì)于服務(wù)化治理上不斷地完善,以及對(duì)軟件的交付鏈路以及基礎(chǔ)設(shè)施逐步成熟之下的一種自然的產(chǎn)物。 微服務(wù)也是一種面向服務(wù)的架構(gòu)模型,只是它更強(qiáng)調(diào)服務(wù)的粒度。也就是服務(wù)的職責(zé)更加單一更加精煉我們也可以把 SOA 看成是微服務(wù)的超集。 也就是說(shuō)多個(gè)微服務(wù)可以組成一個(gè) soa 服務(wù)。
6、微服務(wù)和 SOA 架構(gòu)的區(qū)別
經(jīng)常會(huì)有同學(xué)問(wèn),微服務(wù)和 SOA 架構(gòu)有什么區(qū)別。這個(gè)區(qū)別一定要從架構(gòu)的發(fā)展過(guò)程來(lái)了解。這兩種架構(gòu)模式,其實(shí)本質(zhì)上應(yīng)該是在分布式架構(gòu)這條時(shí)間線上,基于服務(wù)化思想的不斷完善,以及基礎(chǔ)設(shè)施的逐步成熟之下的一種升級(jí)。既然存在于時(shí)間線的先后,那也就意味著,這兩種架構(gòu)模式所關(guān)注的點(diǎn)不一樣
- SOA 關(guān)注的是服務(wù)的重用性、以及解決企業(yè)內(nèi)部的信息孤島問(wèn)題。
- 微服務(wù)關(guān)注的是解耦,解耦和可重用性在特定的角度來(lái)看是一樣,但本質(zhì)上是不同的。解耦是降低業(yè)務(wù)之間的耦合度(也就是微服務(wù)關(guān)注的服務(wù)粒度),而可重用性關(guān)注的是服務(wù)的復(fù)用。
- 微服務(wù)會(huì)使用更輕量級(jí)的通信協(xié)議,使用 Restful 風(fēng)格的 API。輕量級(jí)協(xié)議可以很好地支持跨語(yǔ)言,使得語(yǔ)言生態(tài)更加豐富。
- 微服務(wù)會(huì)更多地關(guān)注 Devops 持續(xù)交付,因?yàn)榉?wù)粒度更細(xì)使得開(kāi)發(fā)運(yùn)維變得更加重要。所以微服務(wù)與容器化技術(shù)的結(jié)合更加緊密。
- SOA 應(yīng)該是微服務(wù)的超集。
隨著架構(gòu)的不斷演進(jìn),底層框架為了滿足需求也在不斷地努力,spring為了簡(jiǎn)化開(kāi)發(fā),從最開(kāi)始xml配置到后面的注解配置,其實(shí)都在簡(jiǎn)化開(kāi)發(fā)這條路上不斷努力,但是spring依然做的不夠,而且也無(wú)法滿足微服務(wù)架構(gòu)的各種組件引入帶來(lái)的各種配置,這個(gè)時(shí)候springboot產(chǎn)生了,那么接下來(lái),我們先來(lái)看看spring做出了哪些努力,又有什么不足之處。
第2章:Spring的演進(jìn)
spring的核心思想實(shí)際上就是IoC、DI、AOP三大塊,它的核心目的就是為了簡(jiǎn)化開(kāi)發(fā),容器化管理我們的bean對(duì)象。基于這個(gè)目的,spring做了很多努力,在一定程度上,spring確實(shí)簡(jiǎn)化了開(kāi)發(fā),但是隨著業(yè)務(wù)復(fù)雜度越來(lái)越深,功能需求越來(lái)越大,各種組件的出現(xiàn),spring的使用也開(kāi)始變的吃力,這個(gè)吃力實(shí)際上就體現(xiàn)在兩個(gè)方便:bean對(duì)象注入到IoC容器的過(guò)程越來(lái)越麻煩;配置文件越來(lái)越多,無(wú)法統(tǒng)一管理。事實(shí)上,spring也做過(guò)很多的努力,我們現(xiàn)在看看它的發(fā)展史吧。
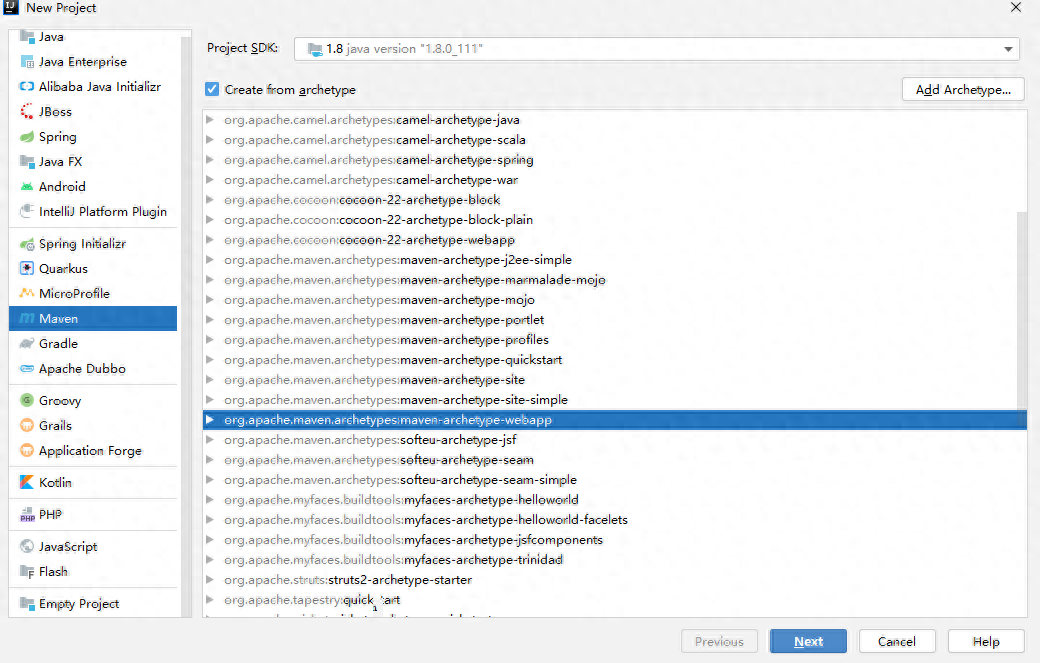
先創(chuàng)建spring的maven項(xiàng)目,然后通過(guò)集成springMVC和Mybatis舉例
項(xiàng)目創(chuàng)建
添加依賴(lài)包
<?xml versinotallow="1.0" encoding="UTF-8"?>
<project xmlns="http://maven.apache.org/POM/4.0.0" xmlns:xsi="http://www.w3.org/2001/XMLSchema-instance"
  xsi:schemaLocation="http://maven.apache.org/POM/4.0.0 http://maven.apache.org/xsd/maven-4.0.0.xsd">
  <modelVersion>4.0.0</modelVersion>

  <groupId>com.example</groupId>
  <artifactId>spring-vip-jt-demo</artifactId>
  <version>1.0-SNAPSHOT</version>
  <packaging>war</packaging>

  <name>spring-vip-jt-demo Maven Webapp</name>
  <!-- FIXME change it to the project's website -->
  <url>http://www.example.com</url>

  <properties>
    <project.build.sourceEncoding>UTF-8</project.build.sourceEncoding>
    <maven.compiler.source>1.8</maven.compiler.source>
    <maven.compiler.target>1.8</maven.compiler.target>
    <!--spring 版本號(hào)-->
    <spring.version>5.2.8.RELEASE</spring.version>
    <!--mybatis 版本號(hào)-->
    <mybatis.version>3.5.6</mybatis.version>
  </properties>

  <dependencies>
    <!--spring 核心包-->
    <!-- spring start -->
    <dependency>
      <groupId>org.springframework</groupId>
      <artifactId>spring-core</artifactId>
      <version>${spring.version}</version>
    </dependency>
    <dependency>
      <groupId>org.springframework</groupId>
      <artifactId>spring-web</artifactId>
      <version>${spring.version}</version>
    </dependency>
    <dependency>
      <groupId>org.springframework</groupId>
      <artifactId>spring-oxm</artifactId>
      <version>${spring.version}</version>
    </dependency>
    <dependency>
      <groupId>org.springframework</groupId>
      <artifactId>spring-tx</artifactId>
      <version>${spring.version}</version>
    </dependency>
    <dependency>
      <groupId>org.springframework</groupId>
      <artifactId>spring-jdbc</artifactId>
      <version>${spring.version}</version>
    </dependency>
    <dependency>
      <groupId>org.springframework</groupId>
      <artifactId>spring-webmvc</artifactId>
      <version>${spring.version}</version>
    </dependency>
    <dependency>
      <groupId>org.springframework</groupId>
      <artifactId>spring-aop</artifactId>
      <version>${spring.version}</version>
    </dependency>
    <dependency>
      <groupId>org.springframework</groupId>
      <artifactId>spring-context-support</artifactId>
      <version>${spring.version}</version>
    </dependency>
    <dependency>
      <groupId>org.springframework</groupId>
      <artifactId>spring-test</artifactId>
      <version>${spring.version}</version>
    </dependency>
    <!-- spring end -->

    <!--mybatis核心包-->
    <dependency>
      <groupId>org.mybatis</groupId>
      <artifactId>mybatis</artifactId>
      <version>${mybatis.version}</version>
    </dependency>

    <dependency>
      <groupId>junit</groupId>
      <artifactId>junit</artifactId>
      <version>4.11</version>
      <scope>test</scope>
    </dependency>
    <!--日志-->
    <dependency>
      <groupId>org.slf4j</groupId>
      <artifactId>slf4j-log4j12</artifactId>
      <version>1.8.0-alpha0</version>
      <scope>test</scope>
    </dependency>

    <!--j2ee相關(guān)包 servlet、jsp、jstl-->
    <dependency>
      <groupId>javax.servlet</groupId>
      <artifactId>javax.servlet-api</artifactId>
      <version>4.0.0</version>
      <scope>provided</scope>
    </dependency>
    <dependency>
      <groupId>javax.servlet.jsp</groupId>
      <artifactId>jsp-api</artifactId>
      <version>2.2</version>
    </dependency>
    <dependency>
      <groupId>javax.servlet</groupId>
      <artifactId>jstl</artifactId>
      <version>1.2</version>
    </dependency>

    <!--mybatis/spring 包-->
    <dependency>
      <groupId>org.mybatis</groupId>
      <artifactId>mybatis-spring</artifactId>
      <version>2.0.6</version>
    </dependency>

    <!--MySQL 驅(qū)動(dòng)包-->
    <dependency>
      <groupId>mysql</groupId>
      <artifactId>mysql-connector-java</artifactId>
      <version>5.1.39</version>
    </dependency>

    <dependency>
      <groupId>org.apache.maven</groupId>
      <artifactId>maven-model</artifactId>
      <version>3.0</version>
    </dependency>
  </dependencies>
</project>
配置web.xml
<?xml version="1.0" encoding="UTF-8"?>
<web-app xmlns="http://xmlns.jcp.org/xml/ns/javaee"
         xmlns:xsi="http://www.w3.org/2001/XMLSchema-instance"
         xsi:schemaLocation="http://xmlns.jcp.org/xml/ns/javaee http://xmlns.jcp.org/xml/ns/javaee/web-app_3_1.xsd"
         version="3.1">

    <display-name>Archetype Created Web Application</display-name>
    <!--welcome pages-->
    <welcome-file-list>
        <welcome-file>index.jsp</welcome-file>
    </welcome-file-list>

    <!-- 解決post亂碼解決在url中傳遞中文參數(shù)時(shí)的亂碼 -->
    <filter>
        <filter-name>CharacterEncodingFilter</filter-name>
        <filter-class>org.springframework.web.filter.CharacterEncodingFilter</filter-class>
        <init-param>
            <param-name>encoding</param-name>
            <param-value>utf-8</param-value>
        </init-param>
        <init-param>
            <param-name>forceEncoding</param-name>
            <param-value>true</param-value>
        </init-param>
    </filter>
    <!-- 配置所有請(qǐng)求都經(jīng)過(guò)該攔截器,即所有資源都統(tǒng)一使用 utf-8 防止亂碼 -->
    <filter-mapping>
        <filter-name>CharacterEncodingFilter</filter-name>
        <url-pattern>/*</url-pattern>
    </filter-mapping>

    <!--配置springmvc DispatcherServlet-->
    <servlet>
        <servlet-name>springMVC</servlet-name>
        <servlet-class>org.springframework.web.servlet.DispatcherServlet</servlet-class>
        <init-param>
            <!--配置dispatcher.xml作為mvc的配置文件-->
            <param-name>contextConfigLocation</param-name>
            <param-value>classpath:springMVC.xml</param-value>
        </init-param>
        <!--
 1、load-on-startup元素標(biāo)記容器是否在啟動(dòng)的時(shí)候就加載這個(gè)servlet(實(shí)例化并調(diào)用其init()方法);
 2、當(dāng)值為0或者大于0時(shí),表示容器在應(yīng)用啟動(dòng)時(shí)就加載并初始化這個(gè)servlet;
 3、當(dāng)值小于0或者沒(méi)有指定時(shí),則表示容器在該servlet被選擇時(shí)才會(huì)去加載;
 4、正數(shù)的值越小,該servlet的優(yōu)先級(jí)越高,應(yīng)用啟動(dòng)時(shí)就越先加載;
 5、當(dāng)值相同時(shí),容器就會(huì)自己選擇順序來(lái)加載。
 -->
        <load-on-startup>1</load-on-startup>
        <async-supported>true</async-supported>
    </servlet>

    <servlet-mapping>
        <servlet-name>springMVC</servlet-name>
        <!--  /* 可以匹配所有的請(qǐng)求-->
        <!-- 會(huì)匹配到所有像 /login 這樣的路徑型url,但不會(huì)匹配到 后綴型的url(即 *.html等) -->
        <url-pattern>/</url-pattern>
    </servlet-mapping>
    <!--把a(bǔ)pplicationContext.xml加入到配置文件中-->
    <context-param>
        <param-name>contextConfigLocation</param-name>
        <param-value>classpath:applicationContext.xml</param-value>
    </context-param>
    <listener>
        <listener-class>org.springframework.web.context.ContextLoaderListener</listener-class>
    </listener>
</web-app>
配置springMCV.xml
<?xml version="1.0" encoding="UTF-8"?>
<beans xmlns="http://www.springframework.org/schema/beans"
       xmlns:xsi="http://www.w3.org/2001/XMLSchema-instance" xmlns:mvc="http://www.springframework.org/schema/mvc"
       xmlns:context="http://www.springframework.org/schema/context"
       xsi:schemaLocation="http://www.springframework.org/schema/beans
                            http://www.springframework.org/schema/beans/spring-beans.xsd
                            http://www.springframework.org/schema/mvc
                            http://www.springframework.org/schema/mvc/spring-mvc.xsd
                            http://www.springframework.org/schema/context
                            http://www.springframework.org/schema/context/spring-context.xsd">

    <!--此文件負(fù)責(zé)整個(gè)mvc中的配置-->
    <!-- 自動(dòng)掃描裝配 -->
    <context:component-scan base-package="com.example"/>

    <!--啟用spring的一些annotation -->
    <context:annotation-config/>

    <!-- 配置注解驅(qū)動(dòng) 可以將request參數(shù)與綁定到controller參數(shù)上 -->
    <mvc:annotation-driven/>

    <!--靜態(tài)資源映射-->
    <!--本項(xiàng)目把靜態(tài)資源放在了webapp的statics目錄下,資源映射如下-->
    <mvc:resources mapping="/css/**" location="/css/"/>
    <mvc:resources mapping="/js/**" location="/js/"/>
    <mvc:resources mapping="/image/**" location="/images/"/>
    <mvc:default-servlet-handler />  <!--這句要加上,要不然可能會(huì)訪問(wèn)不到靜態(tài)資源,具體作用自行百度-->

    <!-- 對(duì)模型視圖名稱(chēng)的解析,即在模型視圖名稱(chēng)添加前后綴(如果最后一個(gè)還是表示文件夾,則最后的斜杠不要漏了) 使用JSP-->
    <!-- 默認(rèn)的視圖解析器 在上邊的解析錯(cuò)誤時(shí)使用 (默認(rèn)使用html)- -->
    <bean id="defaultViewResolver" class="org.springframework.web.servlet.view.InternalResourceViewResolver">
        <property name="viewClass" value="org.springframework.web.servlet.view.JstlView"/>
        <property name="prefix" value="/WEB-INF/views/"/><!--設(shè)置JSP文件的目錄位置-->
        <property name="suffix" value=".jsp"/>
        <property name="exposeContextBeansAsAttributes" value="true"/>
    </bean>
</beans>
配置applicationContext.xml
<?xml version="1.0" encoding="UTF-8"?>
<beans xmlns="http://www.springframework.org/schema/beans"
       xmlns:xsi="http://www.w3.org/2001/XMLSchema-instance"
       xmlns:context="http://www.springframework.org/schema/context"
       xsi:schemaLocation="http://www.springframework.org/schema/beans http://www.springframework.org/schema/beans/spring-beans.xsd http://www.springframework.org/schema/context http://www.springframework.org/schema/context/spring-context.xsd">
    <!-- demo02包通過(guò)注解自動(dòng)掃描 -->
    <context:component-scan base-package="com.example.demo02"/>
</beans>
創(chuàng)建a.jsp
<html>
    <body>
        <h2>${version}</h2>
        <h2>${name}:${msg}</h2>
    </body>
</html>
(1)Spring1.x時(shí)代
在此時(shí)因?yàn)閖dk1.5剛剛出來(lái),注解開(kāi)發(fā)并未盛行,因此一切Spring配置都是xml格式,想象一下所有的bean都用xml配置,細(xì)思極恐啊,心疼那個(gè)時(shí)候的程序員2秒
在applicationContext.xml中配置
<!-- demo01包通過(guò)xml配置 -->
<bean id="helloService01" class="com.example.demo01.HelloService01"/>
controller
package com.example.demo01;

import org.springframework.beans.factory.annotation.Autowired;
import org.springframework.stereotype.Controller;
import org.springframework.web.bind.annotation.RequestMapping;
import org.springframework.web.bind.annotation.RequestParam;
import org.springframework.web.servlet.ModelAndView;

import javax.servlet.http.HttpServletRequest;
import javax.servlet.http.HttpServletResponse;

/**
 * @author Eclipse_2019
 * @create 2021/7/31 17:52
 */
@Controller
public class HelloController01 {

    @Autowired
    private HelloService01 helloService01;

    @RequestMapping("/hello01")
    public ModelAndView hello01(@RequestParam String name){
        ModelAndView modelAndView = new ModelAndView();
        modelAndView.addObject("version","1.X版本");
        modelAndView.addObject("name",name);
        modelAndView.addObject("msg",helloService01.sayHello(name));
        modelAndView.setViewName("a");
        return modelAndView;
    }

}
service
public class HelloService01 {
    public String sayHello(String name){
        return "你真棒!"+name;
    }
}
測(cè)試
public class DemoMain {
    public static void main(String[] args) {
//        ApplicationContext context = new ClassPathXmlApplicationContext("applicationContext.xml");
        ApplicationContext context = new FileSystemXmlApplicationContext("classpath:applicationContext.xml");
        System.out.println(context.getBean(HelloService01.class));
    }
}
Tomcat啟動(dòng)。
(2)Spring2.x時(shí)代
Spring引入了注解開(kāi)發(fā),但是因?yàn)椴⒉煌晟疲虼瞬⑽赐耆娲鷛ml,此時(shí)的程序員往往是把xml與注解進(jìn)行結(jié)合,貌似我們之前都是這種方式。
- @Required/@Repository/@Aspect
spring 2.5
- @Component
- @Service
- @Controller
- @RequestMapping
在applicationContext.xml增加配置
<context:component-scan base-package="com.example.demo02"/>controller
@Controller
public class HelloController02 {

    @Autowired
    private HelloService02 helloService02;

    @RequestMapping("/hello02")
    public ModelAndView hello(@RequestParam String name){
        ModelAndView modelAndView = new ModelAndView();
        modelAndView.addObject("version","2.X版本");
        modelAndView.addObject("name",name);
        modelAndView.addObject("msg",helloService02.sayHello(name));
        modelAndView.setViewName("a");
        return modelAndView;
    }
}
service
@Service
public class HelloService02 {
    public String sayHello(String name){
        return "你好帥啊!";
    }
}
測(cè)試
public class Demo02Main {
    public static void main(String[] args) {
        ApplicationContext context = new FileSystemXmlApplicationContext("classpath:applicationContext.xml");
        System.out.println(context.getBean(HelloController02.class));
    }
}
Tomcat啟動(dòng)。
3、Spring3.x時(shí)代
(1)Configuration
3.0以后Spring的注解已經(jīng)非常完善了,因此Spring推薦大家使用完全的java配置來(lái)代替以前的xml,不過(guò)似乎在國(guó)內(nèi)并未推廣盛行。然后當(dāng)SpringBoot來(lái)臨,人們才慢慢認(rèn)識(shí)到j(luò)ava配置的優(yōu)雅。
- @Configuration 去XML化
configuration
package com.example.demo03;

import org.springframework.context.annotation.Bean;
import org.springframework.context.annotation.Configuration;

/**
 * @author Eclipse_2019
 * @create 2021/8/3 17:16
 */
@Configuration
public class SpringConfiguration {

    @Bean
    public HelloService03 helloService03(){
        return new HelloService03();
    }

    @Bean
    public HelloController03 helloController03(){
        return new HelloController03();
    }
}
controller同2.x版本
service
public class HelloService03 {
    public String sayHello(String name){
        return "你好帥啊!";
    }
}
測(cè)試同上。
(2)Import
案例見(jiàn)spring-vip-jt-demo的demo04中//
(3)Enable
案例見(jiàn)spring-vip-jt-demo的demo05中。
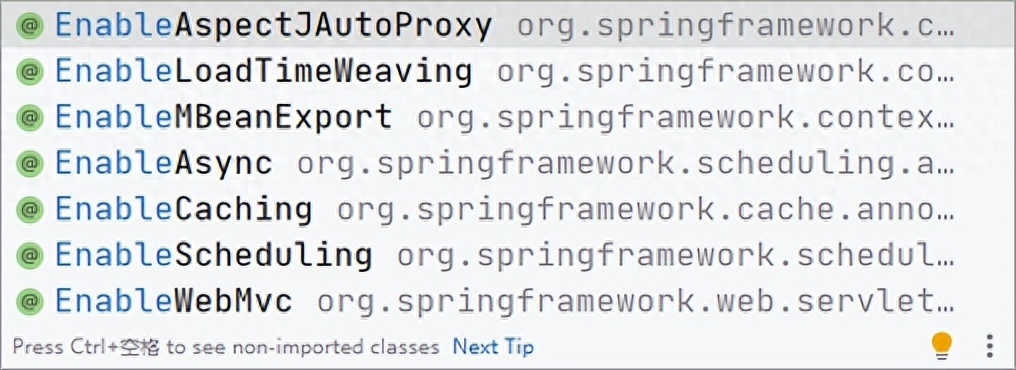
- @Enable模塊驅(qū)動(dòng)
(3)Spring4.x時(shí)代
- @Conditional
案例見(jiàn)spring-vip-jt-demo的demo06中
springboot條件注解
@ConditionalOnBean(僅僅在當(dāng)前上下文中存在某個(gè)對(duì)象時(shí),才會(huì)實(shí)例化一個(gè)Bean)。
@ConditionalOnClass(某個(gè)class位于類(lèi)路徑上,才會(huì)實(shí)例化一個(gè)Bean)。
@ConditionalOnExpression(當(dāng)表達(dá)式為true的時(shí)候,才會(huì)實(shí)例化一個(gè)Bean)。
@ConditionalOnMissingBean(僅僅在當(dāng)前上下文中不存在某個(gè)對(duì)象時(shí),才會(huì)實(shí)例化一個(gè)Bean)。
@ConditionalOnMissingClass(某個(gè)class類(lèi)路徑上不存在的時(shí)候,才會(huì)實(shí)例化一個(gè)Bean)。
@ConditionalOnNotWebApplication(不是web應(yīng)用)。
5、集成Mybatis
集成Redis或者mybatis要怎么做:
1.導(dǎo)包
2.創(chuàng)建配置文件
mybatis配置舉例:
配置spring-mybatis.xml
<?xml versinotallow="1.0" encoding="UTF-8"?>
<beans xmlns="http://www.springframework.org/schema/beans"
       xmlns:xsi="http://www.w3.org/2001/XMLSchema-instance"
       xmlns:context="http://www.springframework.org/schema/context"
       xsi:schemaLocation="http://www.springframework.org/schema/beans
        http://www.springframework.org/schema/beans/spring-beans.xsd
        http://www.springframework.org/schema/context
        http://www.springframework.org/schema/context/spring-context.xsd">

    <!--1 引入屬性文件,在配置中占位使用 -->
    <context:property-placeholder location="classpath*:db.properties" />

    <bean id="dataSource" class="com.alibaba.druid.pool.DruidDataSource" init-method="init" destroy-method="close">
        <!--配置數(shù)據(jù)庫(kù)信息-->
        <property name="url" value="${jdbc.url}"/>
        <property name="username" value="${jdbc.username}"/>
        <property name="password" value="${jdbc.password}"/>
    </bean>

    <!--聲明MyBatis中提供的SqlSessionFactoryBean,用于創(chuàng)建SqlSessionFactory-->
    <bean id="sqlSessionFactory" class="org.mybatis.spring.SqlSessionFactoryBean">
        <!--引用注入,將數(shù)據(jù)庫(kù)連接池賦值給dataSource-->
        <property name="dataSource" ref="dataSource"/>
        <!--MyBatis主配置文件位置,configLocation為Resource類(lèi)型,讀取配置文件-->
        <property name="configLocation" value="classpath:mybatis.xml"></property>
        <!--用于指定mapper.xml文件的位置
            如果Mapper.xml與Dao接口文件在同一個(gè)包下且同名,spring中MapperScannerConfigurer掃描Dao接口文件的同時(shí)會(huì)自動(dòng)掃描同名的Mapper.xml并裝配到Dao接口文件
            如果Mapper.xml與Dao接口文件不在同一個(gè)包下或者不同名,就必須使用配置mapperLocations指定mapper.xml的位置
            此時(shí)spring是通過(guò)識(shí)別mapper.xml中的<mapper namespace=""> namespace的值來(lái)確定對(duì)應(yīng)的Mapper.class-->
        <property name="mapperLocations" value="classpath:mapper/*Mapper.xml"/>
    </bean>

    <!--創(chuàng)建Dao對(duì)象,使用SqlSession的getMapper(dao.class)
        MapperScannerConfigurer:在內(nèi)部調(diào)用getMapper()生成每個(gè)Dao接口的代理對(duì)象-->
    <bean class="org.mybatis.spring.mapper.MapperScannerConfigurer">
        <!--指定sqlSessionFactory的ID-->
        <property name="sqlSessionFactoryBeanName" value="sqlSessionFactory"/>
        <!--指定包名,包名為Dao接口所在包名,MapperScannerConfigurer掃描該包,為每個(gè)接口執(zhí)行g(shù)etMapper()方法,
            得到每個(gè)接口的Dao對(duì)象,創(chuàng)建好的Dao對(duì)象放入Spring容器-->
        <property name="basePackage" value="com.example.demo07"/>
    </bean>
</beans>
配置mybatis.xml
<?xml version="1.0" encoding="UTF-8" ?>
<!DOCTYPE configuration
        PUBLIC "-//mybatis.org//DTD Config 3.0//EN"
        "http://mybatis.org/dtd/mybatis-3-config.dtd">
<configuration>

    <!-- settings -->
    <settings>
        <!-- 打開(kāi)延遲加載的開(kāi)關(guān) -->
        <setting name="lazyLoadingEnabled" value="true"/>
        <!-- 將積極加載改為消極加載(即按需加載) -->
        <setting name="aggressiveLazyLoading" value="false"/>
        <!-- 打開(kāi)全局緩存開(kāi)關(guān)(二級(jí)緩存)默認(rèn)值就是 true -->
        <setting name="cacheEnabled" value="true"/>
    </settings>

    <!-- 別名定義 -->
    <typeAliases>
        <package name="com.example.demo07"/>
    </typeAliases>

    <!-- 加載映射文件 -->
    <mappers>
        <mapper class="com.example.demo07.UserDao"/>
    </mappers>
</configuration>
通過(guò)上面這種方式才能把mybatis注入到我們springIOC容器中,但是這種方式太麻煩了。怎么做更簡(jiǎn)便呢?
第3章:SpringBoot應(yīng)運(yùn)而生
1、簡(jiǎn)介
(1)是什么
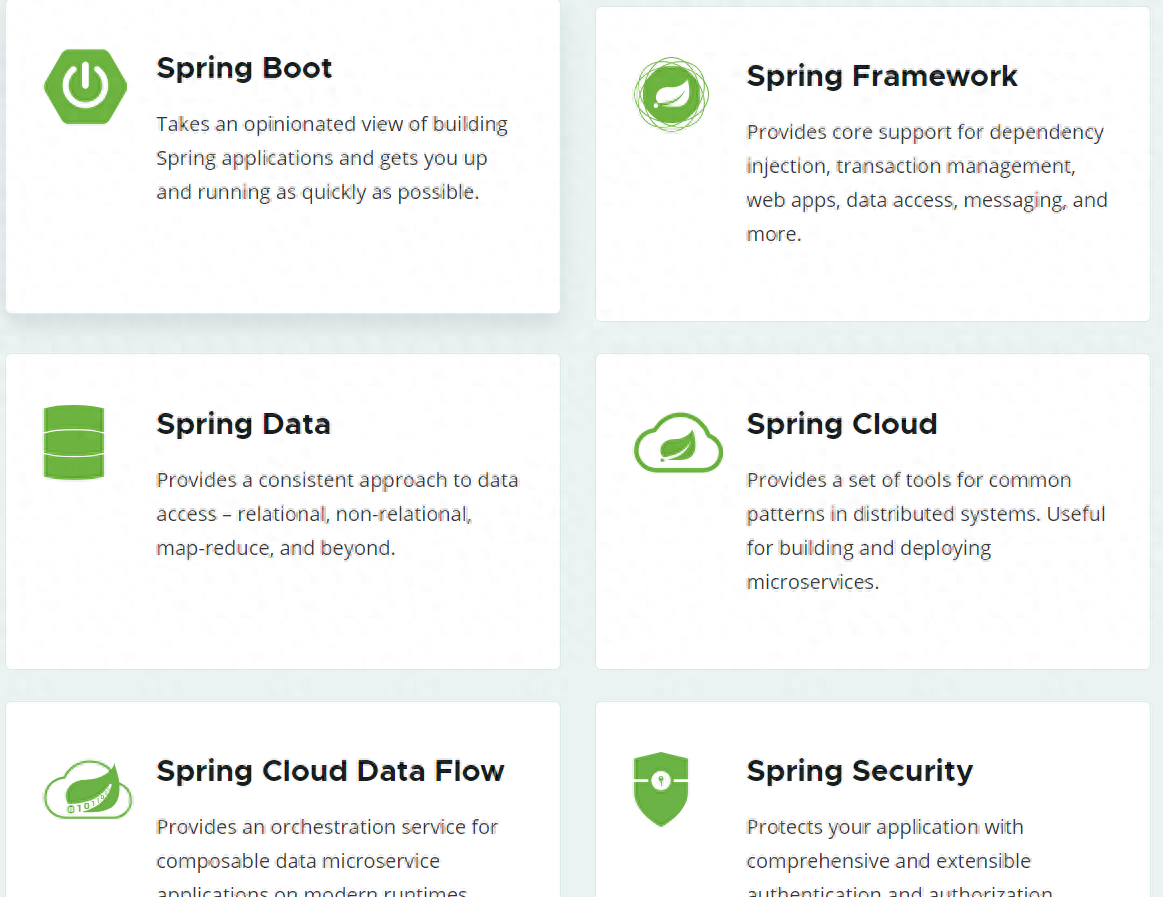
Springboot是Spring項(xiàng)目中的一個(gè)子工程,與我們所熟知的Spring-framework 同屬于spring的產(chǎn)品:
官網(wǎng)地址
:https://spring.io/projectsactuator:https://docs.spring.io/spring-boot/docs/current/reference/html/actuator.html#actuator.endpoints
我們可以看到下面的一段介紹:
Takes an opinionated view of building production-ready Spring applications. Spring Boot favors convention over configuration and is designed to get you up and running as quickly as possible.
翻譯一下:
用一些固定的方式來(lái)構(gòu)建生產(chǎn)級(jí)別的spring應(yīng)用。Spring Boot 推崇約定大于配置的方式以便于你能夠盡可能快速的啟動(dòng)并運(yùn)行程序。
其實(shí)人們把Spring Boot 稱(chēng)為搭建程序的腳手架。其最主要作用就是幫我們快速的構(gòu)建龐大的spring項(xiàng)目,并且盡可能的減少一切xml配置,做到開(kāi)箱即用,迅速上手,讓我們關(guān)注與業(yè)務(wù)而非配置。
(2)為什么
java一直被人詬病的一點(diǎn)就是臃腫、麻煩。當(dāng)我們還在辛苦的搭建項(xiàng)目時(shí),可能Python程序員已經(jīng)把功能寫(xiě)好了。為了解決這些問(wèn)題,然后出現(xiàn)了一個(gè)框架叫做Spring,Spring翻譯過(guò)來(lái)就是春天,意味著程序員的春天來(lái)了,但是真的是這樣嗎?其實(shí)大佬們創(chuàng)建出Spring這個(gè)框架本質(zhì)上就是為了給程序員們減負(fù),為了使我們構(gòu)建項(xiàng)目更加便捷,為了讓我們開(kāi)發(fā)更加快速,但是呢,早期的Spring框架還是會(huì)有很多問(wèn)題,最主要的兩點(diǎn)就是:
- 復(fù)雜的配置
項(xiàng)目各種配置其實(shí)是開(kāi)發(fā)時(shí)的損耗, 因?yàn)樵谒伎?Spring 特性配置和解決業(yè)務(wù)問(wèn)題之間需要進(jìn)行思維切換,所以寫(xiě)配置擠占了寫(xiě)應(yīng)用程序邏輯的時(shí)間。
- 一個(gè)是混亂的依賴(lài)管理
項(xiàng)目的依賴(lài)管理也是件吃力不討好的事情。決定項(xiàng)目里要用哪些庫(kù)就已經(jīng)夠讓人頭痛的了,你還要知道這些庫(kù)的哪個(gè)版本和其他庫(kù)不會(huì)有沖突,這難題實(shí)在太棘手。并且,依賴(lài)管理也是一種損耗,添加依賴(lài)不是寫(xiě)應(yīng)用程序代碼。一旦選錯(cuò)了依賴(lài)的版本,隨之而來(lái)的不兼容問(wèn)題毫無(wú)疑問(wèn)會(huì)是生產(chǎn)力殺手。
而SpringBoot讓這一切成為過(guò)去!
Spring Boot 簡(jiǎn)化了基于Spring的應(yīng)用開(kāi)發(fā),只需要“run”就能創(chuàng)建一個(gè)獨(dú)立的、生產(chǎn)級(jí)別的Spring應(yīng)用。Spring Boot為Spring平臺(tái)及第三方庫(kù)提供開(kāi)箱即用的設(shè)置(提供默認(rèn)設(shè)置,存放默認(rèn)配置的包就是啟動(dòng)器),這樣我們就可以簡(jiǎn)單的開(kāi)始。多數(shù)Spring Boot應(yīng)用只需要很少的Spring配置。
我們可以使用SpringBoot創(chuàng)建java應(yīng)用,并使用java –jar 啟動(dòng)它,就能得到一個(gè)生產(chǎn)級(jí)別的web工程。
(3)特性
Spring Boot 主要目標(biāo)是:
- 為所有 Spring 的開(kāi)發(fā)者提供一個(gè)非常快速的、廣泛接受的入門(mén)體驗(yàn)
- 開(kāi)箱即用(啟動(dòng)器starter-其實(shí)就是SpringBoot提供的一個(gè)jar包),但通過(guò)自己設(shè)置參數(shù)(.properties),即可快速擺脫這種方式。
- 提供了一些大型項(xiàng)目中常見(jiàn)的非功能性特性,如內(nèi)嵌服務(wù)器、安全、指標(biāo),健康檢測(cè)、外部化配置等
- 絕對(duì)沒(méi)有代碼生成,也無(wú)需 XML 配置。
自動(dòng)配置、Starter組件、Actuator、命令行界面(CLI) 是 Spring Boot 最重要的 4 大核心特性,其中 CLI 是 Spring Boot 的可選特性,雖然它功能強(qiáng)大,但也引入了一套不太常規(guī)的開(kāi)發(fā)模型,因而這里僅關(guān)注其它 3 種特性。
2、快速入門(mén)
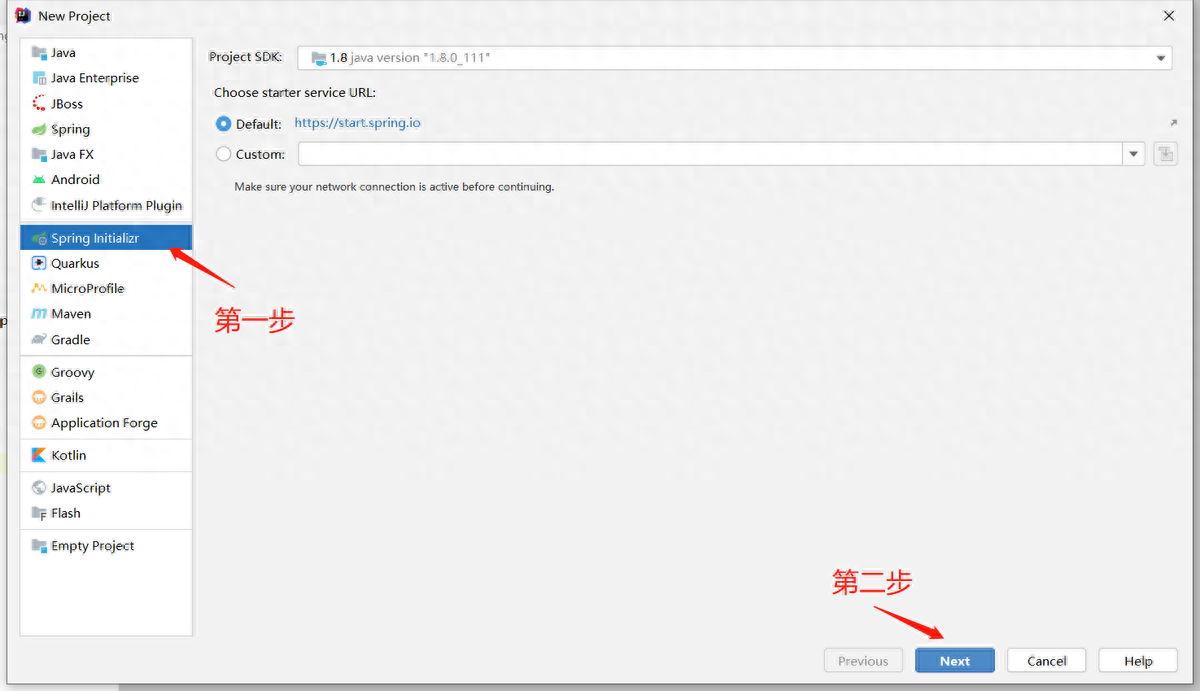
接下來(lái),我們就來(lái)利用Springboot快速搭建一個(gè)web工程
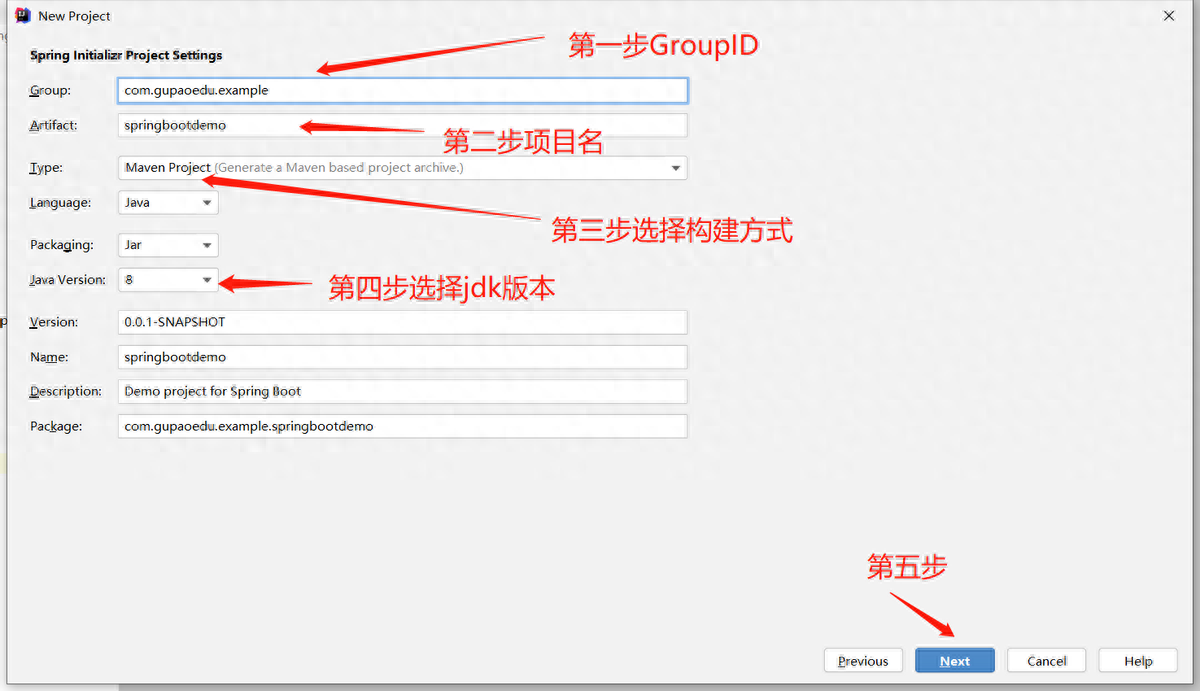
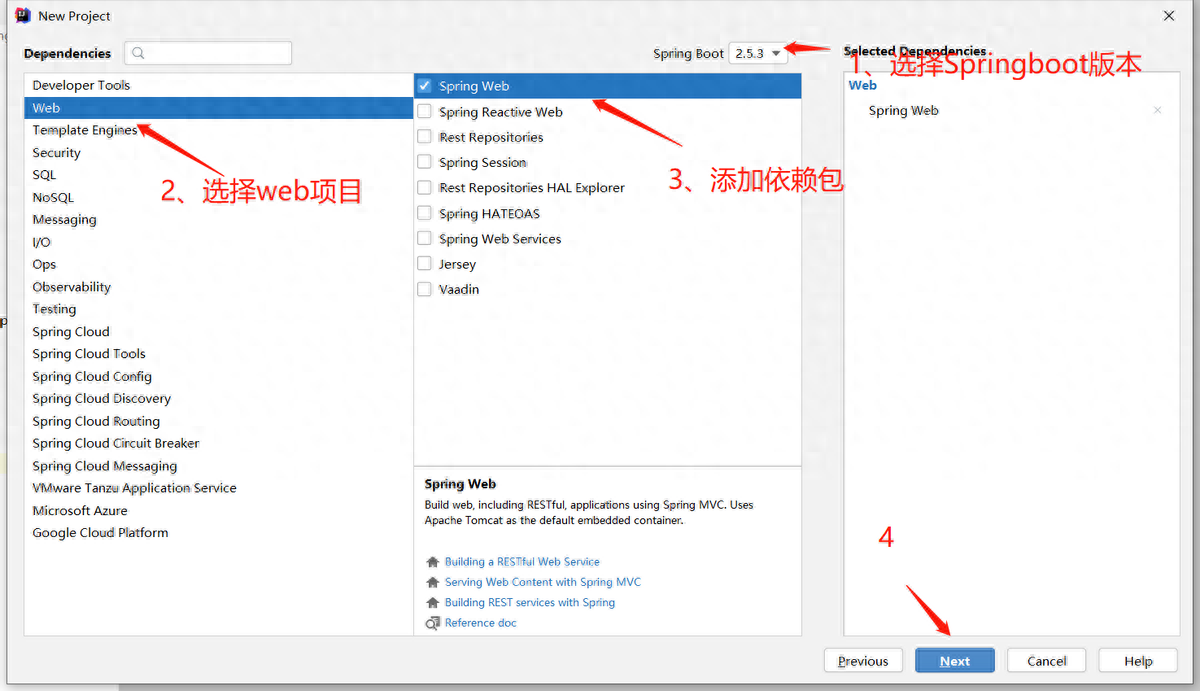
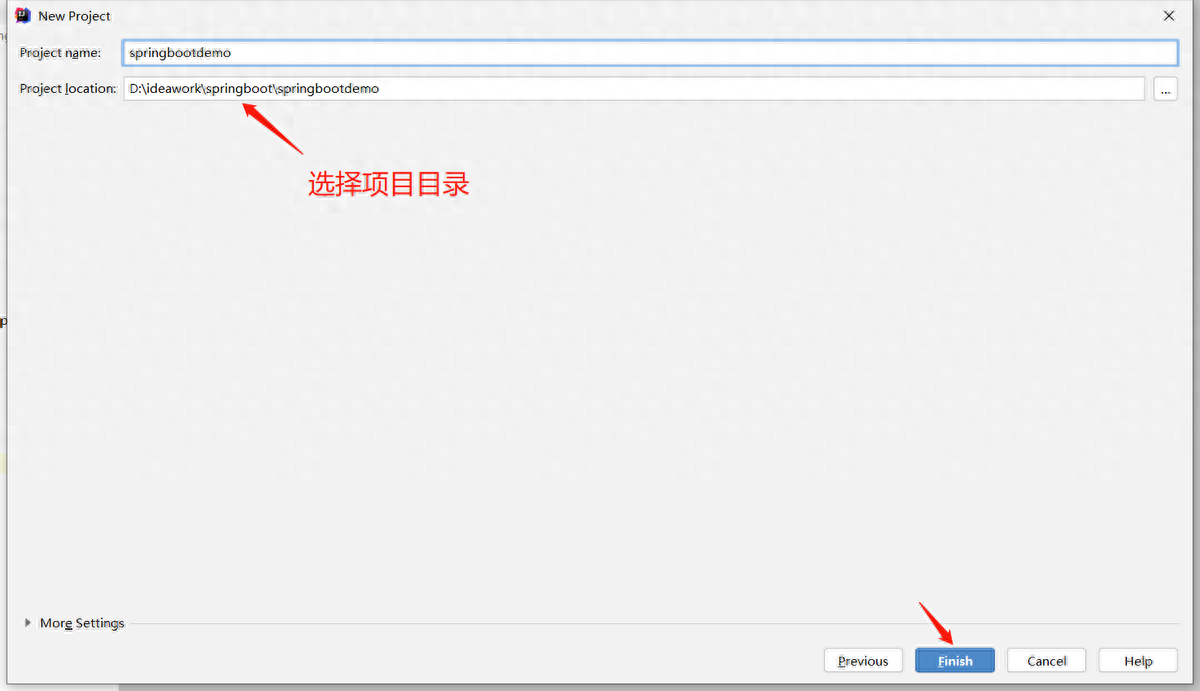
(1)創(chuàng)建工程
(2)編寫(xiě)controller
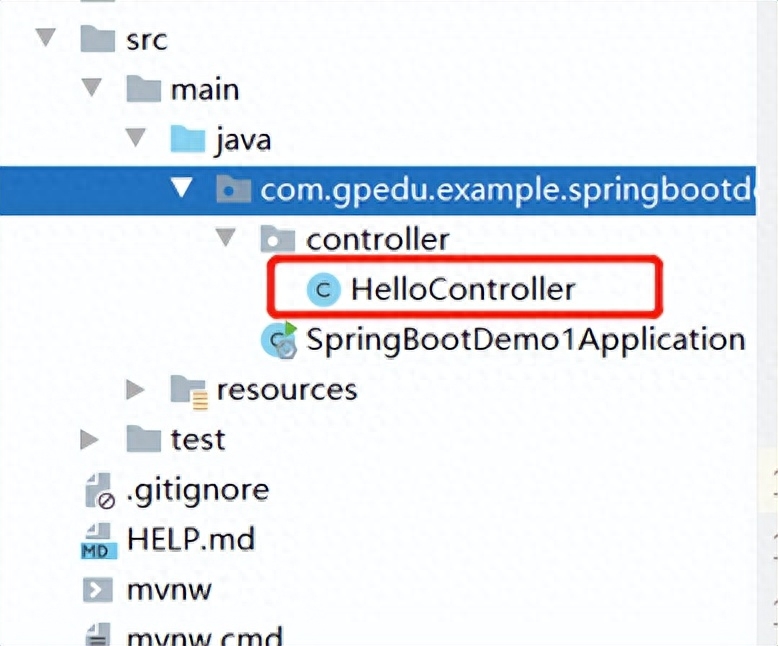
代碼:
@RestController
public class HelloController {
    @GetMapping("hello")
    public String hello(){
        return "hello, spring boot!";
    }
}
(3)啟動(dòng)項(xiàng)目
接下來(lái),我們運(yùn)行main函數(shù),查看控制臺(tái):
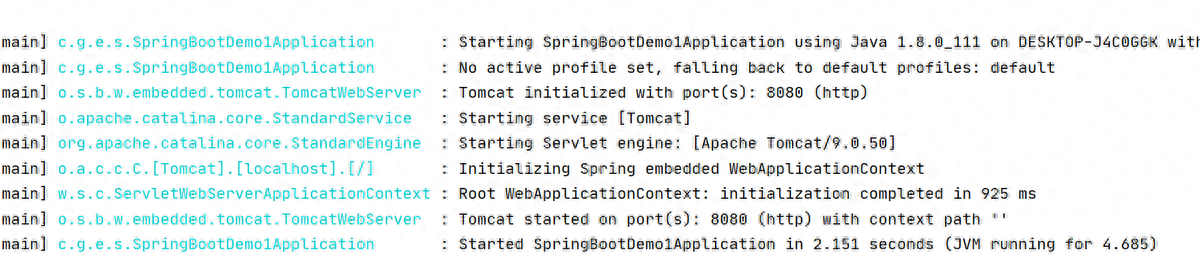
- 監(jiān)聽(tīng)的端口是8080
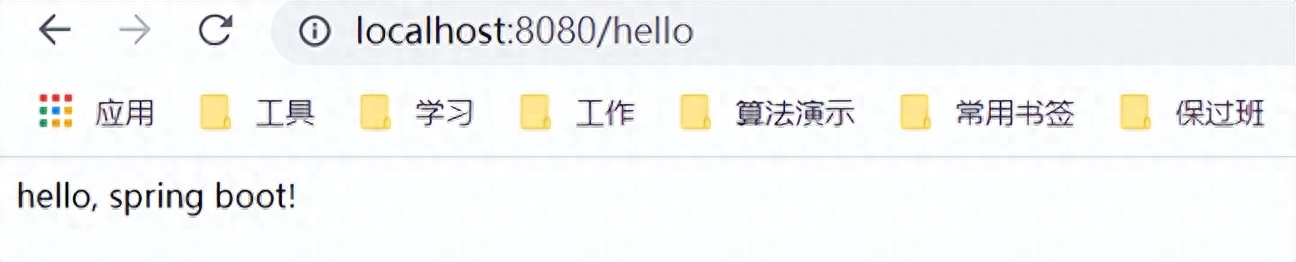
打開(kāi)頁(yè)面訪問(wèn):http://localhost:8080/hello
3、集成mybatis
引包
<dependency>
    <groupId>org.mybatis.spring.boot</groupId>
    <artifactId>mybatis-spring-boot-starter</artifactId>
    <version>2.1.3</version>
</dependency>
<dependency>
    <groupId>mysql</groupId>
    <artifactId>mysql-connector-java</artifactId>
</dependency>
配置文件
spring.datasource.username=root
spring.datasource.password=jingtian
spring.datasource.driver-class-name=com.mysql.jdbc.Driver
spring.datasource.url=jdbc:mysql://192.168.8.74:3306/test
server.port=8080

mybatis.mapper-locations=classpath:*Mapper.xml
controller
package com.example.springbootvipjtdemo.demo01.controller;

import com.example.springbootvipjtdemo.demo01.dao.entity.User;
import com.example.springbootvipjtdemo.demo01.services.IUserService;
import org.springframework.beans.factory.annotation.Autowired;
import org.springframework.web.bind.annotation.GetMapping;
import org.springframework.web.bind.annotation.PostMapping;
import org.springframework.web.bind.annotation.RequestBody;
import org.springframework.web.bind.annotation.RestController;

/**
 * @author Eclipse_2019
 * @create 2021/8/2 16:33
 */
@RestController
public class HelloController {

    @Autowired
    IUserService userService;

    @PostMapping("addUser")
    public String addUser(@RequestBody User user){
        int a = userService.insert(user);
        if(a!=0){
            return "插入成功";
        }else{
            return "失敗";
        }
    }
}
service
package com.example.springbootvipjtdemo.demo01.services;
import com.example.springbootvipjtdemo.demo01.dao.entity.User;
public interface IUserService {
    int insert(User user);
}
package com.example.springbootvipjtdemo.demo01.services.impl;

import com.example.springbootvipjtdemo.demo01.dao.entity.User;
import com.example.springbootvipjtdemo.demo01.dao.mappers.UserMapper;
import com.example.springbootvipjtdemo.demo01.services.IUserService;
import org.springframework.beans.factory.annotation.Autowired;
import org.springframework.stereotype.Service;
/**
 * @author Eclipse_2019
 * @create 2021/8/2 16:47
 */
@Service
public class UserServiceImpl implements IUserService {
    @Autowired
    UserMapper userMapper;

    @Override
    public int insert(User user) {
        return userMapper.insert(user);
    }
}
dao
package com.example.springbootvipjtdemo.demo01.dao.mappers;
import com.example.springbootvipjtdemo.demo01.dao.entity.User;
import org.apache.ibatis.annotations.Mapper;

@Mapper
public interface UserMapper {

    int insert(User user);
}
mapper
<?xml version="1.0" encoding="UTF-8" ?>
<!DOCTYPE mapper PUBLIC "-//mybatis.org//DTD Mapper 3.0//EN" "http://mybatis.org/dtd/mybatis-3-mapper.dtd">
<mapper namespace="com.example.springbootvipjtdemo.demo01.dao.mappers.UserMapper">

    <resultMap id="BaseResultMap" type="com.example.springbootvipjtdemo.demo01.dao.entity.User">
        <id column="userid" property="userID"/>
        <result column="username" property="userName"/>
    </resultMap>

    <insert id="insert" parameterType="com.example.springbootvipjtdemo.demo01.dao.entity.User" keyProperty="userId" useGeneratedKeys="true">
        insert into user(username,age) values(#{userName,jdbcType=VARCHAR},#{age,jdbcType=BIGINT})
    </insert>
</mapper>
啟動(dòng)類(lèi)
package com.example.springbootvipjtdemo.demo01;

import org.mybatis.spring.annotation.MapperScan;
import org.springframework.boot.SpringApplication;
import org.springframework.boot.autoconfigure.SpringBootApplication;

@MapperScan("com.example.springbootvipjtdemo.demo01.dao.mappers")
@SpringBootApplication(scanBasePackages = {"com.example.springbootvipjtdemo.demo01"})
public class SpringBootDemoApplication {

    public static void main(String[] args) {
        SpringApplication.run(SpringBootDemoApplication.class, args);
    }

}