OpenHarmony應用開發之自定義彈窗

應用場景
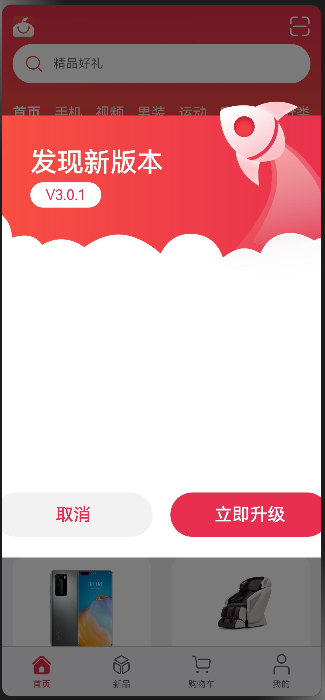
在應用的使用和開發中,彈窗是一個很常見的場景,自定義彈窗又因為極高的自由度得以廣泛應用。本文以橘子購物中一個應用更新提示的彈窗介紹OpenHarmony的自定義彈窗。
 OpenHarmony應用開發之自定義彈窗-開源基礎軟件社區
接口
自定義彈窗官方文檔:自定義彈窗-彈窗-全局UI方法-組件參考(基于ArkTS的聲明式開發范式)-ArkTS API參考-HarmonyOS應用開發。
CustomDialogController是自定義彈窗對應的接口,詳細介紹如下:
CustomDialogController(value:{builder: CustomDialog, cancel?: () => void, autoCancel?: boolean, alignment?: DialogAlignment,
                      offset?: Offset, customStyle?: boolean, gridCount?: number, maskColor?: ResourceColor,
                      openAnimation?: AnimateParam, closeAnimation?: AnimateParam})
參數:
參數名 | 參數類型 | 必填 | 參數描述 |
builder | CustomDialog | 是 | 自定義彈窗內容構造器。 |
cancel | () => void | 否 | 點擊遮障層退出時的回調。 |
autoCancel | boolean | 否 | 是否允許點擊遮障層退出。默認值:true |
alignment | 否 | 彈窗在豎直方向上的對齊方式。默認值:DialogAlignment.Default | |
offset | 否 | 彈窗相對alignment所在位置的偏移量。 | |
customStyle | boolean | 否 | 彈窗容器樣式是否自定義。默認值:false,彈窗容器的寬度根據柵格系統自適應, 不跟隨子節點;高度自適應子節點,最大為窗口高度的90%;圓角為24vp。 |
gridCount8+ | number | 否 | 彈窗寬度占柵格寬度的個數。默認為按照窗口大小自適應,異常值按默認值處理, 最大柵格數為系統最大柵格數。 |
這其中最重要的就是builder,我們需要自己實現一個構造器,也就是這個彈窗的頁面。
具體實現
定義CustomDialogController
首先,我們需要定義一個CustomDialogController:
UpdateDialogController: CustomDialogController = new CustomDialogController({
  builder: UpdateDialog(),
  customStyle: true
})
這個CustomDialogController就代表彈窗,UpdateDialog()是彈窗的具體實現,customStyle為ture就表示彈窗樣式可以自定義。
設置調用時機
在這個場景中,我們想要每次打開應用的時候彈窗,其他時候不彈窗,我們需要在首頁組件的aboutToAppear中加入以下代碼:
aboutToAppear() {
  if(AppStorage.Get('nowIndex') === undefined || AppStorage.Get('nowIndex') === 0){
    this.UpdateDialogController.open()
  }
}
aboutToAppear函數的調用時機是創建自定義組件的新實例后,執行其build()函數之前,所以在首頁組件的aboutToAppear加入CustomDialogController的打開開邏輯可使彈窗僅在應用打開的時候觸發。
aboutToAppear參考文檔:自定義組件的生命周期-組件參考(基于ArkTS的聲明式開發范式)-ArkTS API參考-HarmonyOS應用開發。
實現builder實例
實現實例可以直接在builder后面直接實現,也可以定義在其他文件中,然后通過調用的方式獲取,本文以調用方式實現。
實例組件的定義前需加export才能暴露出去:
export struct UpdateDialog {}彈窗上所需的數據和獲取也需要在在此處定義:
@CustomDialog
export struct UpdateDialog {
  @State currentVersion: string = ''
  @State richTextData: string = ''
  @State lastVersion: string = ''
  @State updateContent: string = ''
  private context?: AbilityContext
  private customDialogController?: CustomDialogController

  async aboutToAppear() {
    this.context = getContext(this) as AbilityContext
    this.richTextData = await dialogFeature.getRichTextData(this.context)
    Logger.info(TAG, `this.richTextData = ${this.richTextData}`)
    await this.getData()
  }

  async getData() {
    try {
      this.currentVersion = await dialogFeature.getCurrentVersion()
      let requestResponseContent: RequestResponseContent = await dialogFeature.getLastVersion()
      if (requestResponseContent.content === null || requestResponseContent.content === undefined) {
        return
      }
      this.updateContent = requestResponseContent.content
      if (requestResponseContent.versionName === null || requestResponseContent.versionName === undefined) {
        return
      }
      this.lastVersion = requestResponseContent.versionName
    } catch (err) {
      Logger.info(TAG, `getApplicationVersion is fail`)
    }
  }
  ...
以上是應用升級所需的數據結構及部分數據獲取。
彈窗具體實現
自定義彈窗的實現就是在原頁面的基礎上再加一層頁面,頁面內容自定義。
彈窗頁面我們可以通過stack組件實現,stack組件會使容器內的子組件堆疊布局,使用stack的好處是可以添加一層遮罩效果。
Stack() {
  // mask 遮罩層
  Column()
    .width('100%')
    .height('100%')
    .backgroundColor('#000000')
    .opacity(.4)

...
以上代碼在stack的第一層設置了backgroundColor和opacity屬性,這樣會產生如開始示意圖的遮罩效果。
需要注意的是,需要在取消按鈕的調用函數中關閉彈窗,具體代碼如下:
Button($r('app.string.cancel'))
  .onClick(() => {
    this.customDialogController.close()
  })
彈窗完整代碼:
build() {
  Stack() {
    // mask 遮罩層
    Column()
      .width('100%')
      .height('100%')
      .backgroundColor('#000000')
      .opacity(.4)
    Column() {
      Stack({ alignContent: Alignment.TopStart }) {
        Text($r('app.string.update_title'))
          .fontSize(30)
          .fontColor('#FFFFFF')
          .fontWeight(500)
          .margin({ top: 70, left: 76 })

        Text(`V${(this.lastVersion || updateData.versionName)}`)
          .fontSize(16)
          .backgroundColor('#FFFFFF')
          .textAlign(TextAlign.Center)
          .fontColor('#E9304E')
          .borderRadius(20)
          .width(80)
          .aspectRatio(2.8)
          .margin({ top: 110, left: 76 })

        Column() {
          // 富文本容器
          Scroll() {
            Column() {
              if (this.richTextData) {
                RichText((this.updateContent || this.richTextData))
                  .width('100%')
                  .height('100%')
              }
            }
            .width('100%')
          }
          .height(200)

          Row() {
            Button($r('app.string.cancel'))
              .commonButtonStyle()
              .fontSize(20)
              .margin({ left: 10 })
              .fontColor('#E92F4F')
              .backgroundColor('rgba(0,0,0,0.05)')
              .margin({ right: 10 })
              .onClick(() => {
                this.customDialogController.close()
              })
              .key("cancel")

            Button($r('app.string.update_now'))
              .commonButtonStyle()
              .fontSize(20)
              .margin({ right: 10 })
              .fontColor('#FFFFFF')
              .backgroundColor('#E92F4F')
              .margin({ left: 10 })
              .onClick(() => {
                this.customDialogController.close()
              })
              .key("Now")
          }
          .margin({ top: 30 })
        }
        .width('100%')
        .padding({ left: 25, right: 25 })
        .margin({ top: 230 })
      }
      .height(600)
      .width('100%')
      .backgroundImage($r('app.media.update'), ImageRepeat.NoRepeat)
      .backgroundImageSize(ImageSize.Contain)
    }
    .width(480)
    .padding({ left: 16, right: 16 })
  }
  .width('100%')
  .height('100%')
}
以上是彈窗完整代碼,需要注意的是,本例并未實現應用升級的具體邏輯,所以升級按鈕的操作也是關閉彈窗。


