大家好,我是冰河~~
目前,我們自己手寫的RPC框架已經(jīng)完成了整體設(shè)計(jì)、服務(wù)提供者的實(shí)現(xiàn)、服務(wù)消費(fèi)者的實(shí)現(xiàn)、注冊(cè)中心的實(shí)現(xiàn)、負(fù)載均衡的實(shí)現(xiàn)、SPI擴(kuò)展序列化機(jī)制、SPI擴(kuò)展動(dòng)態(tài)代理機(jī)制、SPI擴(kuò)展反射機(jī)制、SPI擴(kuò)展負(fù)載均衡策略、SPI擴(kuò)展增強(qiáng)型負(fù)載均衡策略、SPI擴(kuò)展實(shí)現(xiàn)注冊(cè)中心、心跳機(jī)制、增強(qiáng)型心跳機(jī)制、重試機(jī)制、整合Spring、整合SpringBoot和整合Docker等篇章,共計(jì)80+篇文章。
本節(jié),我們就基于《SpringCloud Alibaba》專欄的源碼整合自己手寫的bhrpc框架,替換掉原有項(xiàng)目中使用的Fegin框架。
1、新增shop-service-api工程
(1)新增shop-service-api工程
在父工程shop-springcloud-alibaba下新建shop-service-api子工程,并在shop-service-api子工程的pom.xml文件中添加如下配置。
<dependencies>
    <dependency>
        <groupId>io.binghe.shop</groupId>
        <artifactId>shop-bean</artifactId>
        <version>${project.version}</version>
    </dependency>
</dependencies>
shop-service-api子工程的作用就是將shop-user工程中的UserService接口和shop-product工程中的ProductService接口單獨(dú)分離出來(lái),便于后續(xù)整合bhrpc框架。
(2)新增UserService接口
UserService接口的源碼詳見(jiàn):shop-service-api工程下的io.binghe.shop.service.UserService,如下所示。
public interface UserService {
    /**
     * 根據(jù)id獲取用戶信息
     */
    User getUserById(Long userId);
}
刪除shop-user工程下的io.binghe.shop.user.service.UserService接口,并修改shop-user工程中的報(bào)錯(cuò)信息,將報(bào)錯(cuò)類中原本依賴io.binghe.shop.user.service.UserService接口修改成依賴io.binghe.shop.service.UserService接口。
(3)新增ProductService接口
ProductService接口的源碼詳見(jiàn):shop-service-api工程下的io.binghe.shop.service.ProductService,如下所示。
public interface ProductService {
    /**
     * 根據(jù)商品id獲取商品信息
     */
    Product getProductById(Long pid);
    /**
     * 扣減商品庫(kù)存
     */
    int updateProductStockById(Integer count, Long id);
}
刪除shop-product工程下的io.binghe.shop.product.service.ProductService接口,并修改shop-product工程中的報(bào)錯(cuò)信息,將報(bào)錯(cuò)類中原本依賴io.binghe.shop.product.service.ProductService接口修改成依賴io.binghe.shop.service.ProductService接口。
2、改造shop-user工程
shop-user工程對(duì)應(yīng)bhrpc框架的服務(wù)提供者角色。
(1)添加pom.xml依賴
shop-user工程作為bhrpc框架的服務(wù)提供者,在pom.xml需要添加如下依賴。
<dependency>
    <groupId>io.binghe.rpc</groupId>
    <artifactId>bhrpc-spring-boot-starter-provider</artifactId>
    <version>${bhrpc.version}</version>
</dependency>

<dependency>
    <groupId>io.binghe.shop</groupId>
    <artifactId>shop-service-api</artifactId>
    <version>${project.version}</version>
</dependency>
</dependencies>
(2)修改UserServiceImpl類
UserServiceImpl類的源碼詳見(jiàn):shop-user工程下的io.binghe.shop.user.service.impl.UserServiceImpl,需要將UserServiceImpl類上標(biāo)注的Spring中的@Service注解,替換成bhrpc框架中的@RpcService注解,修改后的源碼如下所示。
@RpcService(interfaceClass = UserService.class, version = "1.0.0", group = "binghe")
public class UserServiceImpl implements UserService {
    @Autowired
    private UserMapper userMapper;

    @Override
    public User getUserById(Long userId) {
        return userMapper.selectById(userId);
    }
}
可以看到,在UserServiceImpl類上標(biāo)注了bhrpc框架中的@RpcService注解,并且指定了interfaceClass、version和group屬性。
(3)修改UserStarter類
UserStarter類的源碼詳見(jiàn):shop-user工程下的io.binghe.shop.UserStarter,主要是在UserStarter類上添加@ComponentScan注解,修改后的源碼如下所示。
@SpringBootApplication
@ComponentScan(basePackages = {"io.binghe.shop", "io.binghe.rpc"})
@EnableTransactionManagement(proxyTargetClass = true)
@MapperScan(value = { "io.binghe.shop.user.mapper" })
@EnableDiscoveryClient
@EnableAsync
public class UserStarter {
    public static void main(String[] args){
        SpringApplication.run(UserStarter.class, args);
    }
}
可以看到,在UserStarter類上標(biāo)注了@ComponentScan注解,并指定了掃描的包路徑為io.binghe.shop和io.binghe.rpc,使其既能夠掃描到微服務(wù)項(xiàng)目中包下的類,也能夠掃描到bhrpc框架包下的類。
(4)添加配置
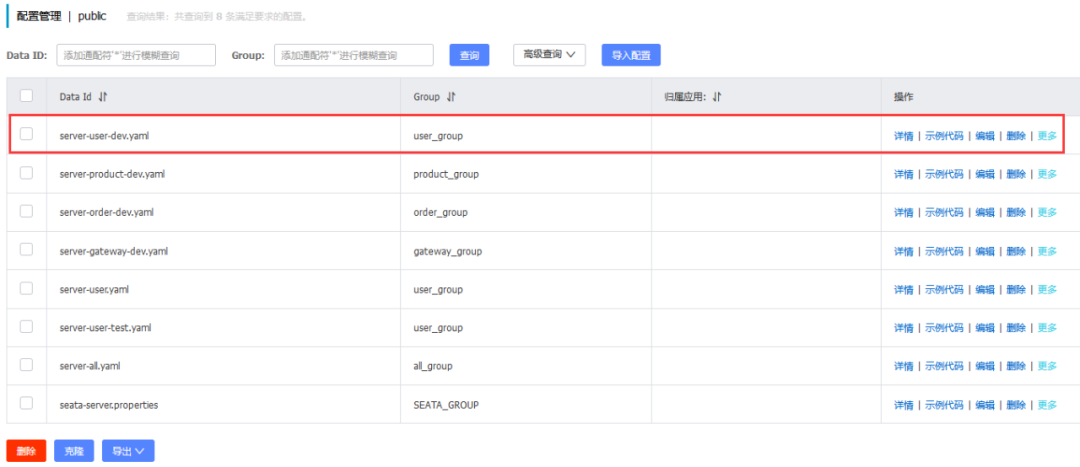
由于項(xiàng)目使用了Nacos作為配置中心,所以,需要在Nacos添加shop-user工程作為服務(wù)提供者的配置,登錄Nacos管理端,找到shop-user工程的配置,如下所示。

shop-user工程的配置
點(diǎn)擊編輯按鈕,在原有配置的基礎(chǔ)上,添加如下配置信息。
bhrpc:
  binghe:
    provider:
      # rpc server
      serverAddress: 127.0.0.1:20880
      # serverRegistryAddress
      serverRegistryAddress: 127.0.0.1:20880
      # zookeeper server
      registryAddress: 127.0.0.1:2181
      # registry center type
      registryType: zookeeper
      #registry loadbalance type
      registryLoadBalanceType: zkconsistenthash
      # reflect type
      reflectType: cglib
      # heartbeatInterval
      heartbeatInterval: 30000
可以看到,配置的內(nèi)容都是bhrpc框架的服務(wù)提供者啟動(dòng)時(shí),需要讀取的一些參數(shù)信息。配置完成后,點(diǎn)擊發(fā)布按鈕進(jìn)行發(fā)布。
至此,shop-user工程改造完成,是不是非常簡(jiǎn)單呢?我們自己手寫的bhrpc框架整合SpringCloud Alibaba項(xiàng)目就是這么簡(jiǎn)單。
3、改造shop-product工程
shop-product工程對(duì)應(yīng)bhrpc框架的服務(wù)提供者角色。改造shop-product工程的步驟與改造shop-user工程的步驟基本相同。
(1)添加pom.xml依賴
shop-product工程同樣作為bhrpc框架的服務(wù)提供者,在pom.xml需要添加如下依賴。
<dependency>
    <groupId>io.binghe.rpc</groupId>
    <artifactId>bhrpc-spring-boot-starter-provider</artifactId>
    <version>${bhrpc.version}</version>
</dependency>

<dependency>
    <groupId>io.binghe.shop</groupId>
    <artifactId>shop-service-api</artifactId>
    <version>${project.version}</version>
</dependency>
(2)修改ProductServiceImpl類
ProductServiceImpl類的源碼詳見(jiàn):shop-product工程下的io.binghe.shop.product.service.impl.ProductServiceImpl,需要將ProductServiceImpl類上標(biāo)注的Spring中的@Service注解,替換成bhrpc框架中的@RpcService注解,修改后的源碼如下所示。
@RpcService(interfaceClass = ProductService.class, version = "1.0.0", group = "binghe")
public class ProductServiceImpl implements ProductService {
    @Autowired
    private ProductMapper productMapper;
    @Override
    public Product getProductById(Long pid) {
        return productMapper.selectById(pid);
    }

    @Override
    public int updateProductStockById(Integer count, Long id) {
        return productMapper.updateProductStockById(count, id);
    }
}
可以看到,在ProductServiceImpl類上標(biāo)注了bhrpc框架中的@RpcService注解,并且指定了interfaceClass、version和group屬性。
(3)修改ProductStarter類
ProductStarter類的源碼詳見(jiàn):shop-product工程下的io.binghe.shop.ProductStarter,主要是在ProductStarter類上添加@ComponentScan注解,修改后的源碼如下所示。
@SpringBootApplication
@ComponentScan(basePackages = {"io.binghe.shop", "io.binghe.rpc"})
@MapperScan(value = { "io.binghe.shop.product.mapper" })
@EnableTransactionManagement(proxyTargetClass = true)
@EnableDiscoveryClient
public class ProductStarter {
    public static void main(String[] args){
        SpringApplication.run(ProductStarter.class, args);
    }
}
可以看到,在ProductStarter類上標(biāo)注了@ComponentScan注解,并指定了掃描的包路徑為io.binghe.shop和io.binghe.rpc,使其既能夠掃描到微服務(wù)項(xiàng)目中包下的類,也能夠掃描到bhrpc框架包下的類。
(4)添加配置
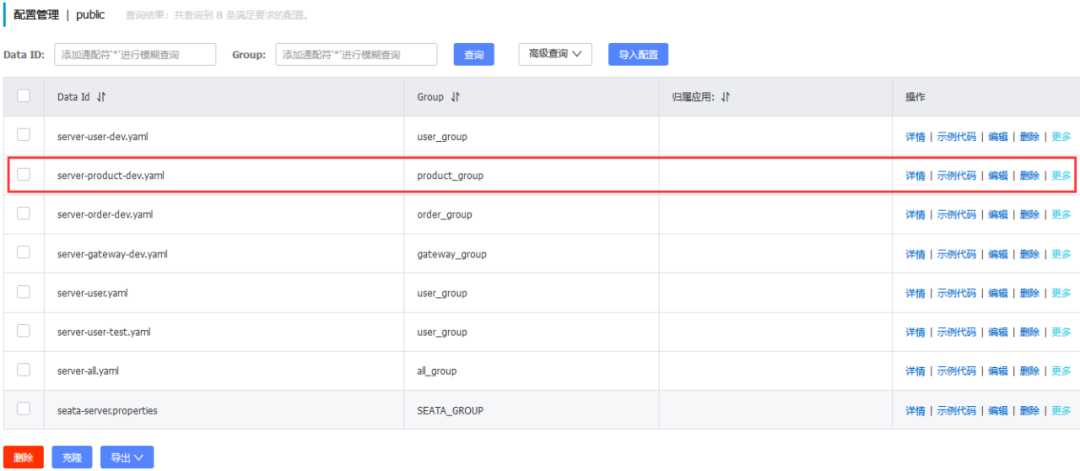
由于項(xiàng)目使用了Nacos作為配置中心,所以,需要在Nacos添加shop-product工程作為服務(wù)提供者的配置,登錄Nacos管理端,找到shop-product工程的配置,如下所示。

shop-product工程的配置
點(diǎn)擊編輯按鈕,在原有配置的基礎(chǔ)上,添加如下配置信息。
bhrpc:
  binghe:
    provider:
      # rpc server
      serverAddress: 127.0.0.1:20881
      # serverRegistryAddress
      serverRegistryAddress: 127.0.0.1:20881
      # zookeeper server
      registryAddress: 127.0.0.1:2181
      # registry center type
      registryType: zookeeper
      #registry loadbalance type
      registryLoadBalanceType: zkconsistenthash
      # reflect type
      reflectType: cglib
      # heartbeatInterval
      heartbeatInterval: 30000
可以看到,配置的內(nèi)容也都是bhrpc框架的服務(wù)提供者啟動(dòng)時(shí),需要讀取的一些參數(shù)信息。配置完成后,點(diǎn)擊發(fā)布按鈕進(jìn)行發(fā)布。
至此,shop-product工程改造完成,也是非常簡(jiǎn)單的。
4、改造shop-order工程
shop-order工程對(duì)應(yīng)bhrpc框架的服務(wù)消費(fèi)者角色。
(1)添加pom.xml依賴
shop-order工程作為bhrpc框架的服務(wù)消費(fèi)者,在pom.xml需要添加如下依賴。
<dependency>
    <groupId>io.binghe.rpc</groupId>
    <artifactId>bhrpc-spring-boot-starter-consumer</artifactId>
    <version>${bhrpc.version}</version>
</dependency>

<dependency>
    <groupId>io.binghe.shop</groupId>
    <artifactId>shop-service-api</artifactId>
    <version>${project.version}</version>
</dependency>
(2)新增OrderServiceV9Impl類
為了不影響整體項(xiàng)目原有的邏輯,復(fù)制OrderServiceV8Impl類的代碼,新增成為OrderServiceV9Impl類,OrderServiceV9Impl類的源碼詳見(jiàn):shop-order工程下的io.binghe.shop.order.service.impl.OrderServiceV9Impl,類框架代碼如下所示。
@Slf4j
@Service("orderServiceV9")
public class OrderServiceV9Impl implements OrderService {
}
(3)改造OrderServiceV9Impl類
將OrderServiceV9Impl類中,原本userService和productService成員變量上標(biāo)注的Spring中的@Autowired注解替換成bhrpc框架中的@RpcReference注解,替換后的源碼如下所示。
@RpcReference(registryType = "zookeeper", registryAddress = "127.0.0.1:2181", loadBalanceType = "zkconsistenthash", version = "1.0.0", group = "binghe", serializationType = "protostuff", proxy = "cglib", timeout = 30000, async = false)
private UserService userService;

@RpcReference(registryType = "zookeeper", registryAddress = "127.0.0.1:2181", loadBalanceType = "zkconsistenthash", version = "1.0.0", group = "binghe", serializationType = "protostuff", proxy = "cglib", timeout = 30000, async = false)
private ProductService productService;
可以看到,userService和productService成員變量上標(biāo)注了bhrpc框架中的@RpcReference注解,并且配置了服務(wù)消費(fèi)者啟動(dòng)時(shí)需要的一些參數(shù)信息。
注意:需要將OrderServiceV9Impl類中的UserService改成引用io.binghe.shop.service.UserService接口,將ProductService改成引用io.binghe.shop.service.ProductService接口,修改OrderServiceV9Impl類中的一些報(bào)錯(cuò)信息。
(4)修改OrderStarter類
OrderStarter類的源碼詳見(jiàn):shop-order工程下的io.binghe.shop.OrderStarter,主要是在OrderStarter類上添加@ComponentScan注解,修改后的源碼如下所示。
@SpringBootApplication
@ComponentScan(basePackages = {"io.binghe.shop", "io.binghe.rpc"})
@EnableTransactionManagement(proxyTargetClass = true)
@MapperScan(value = { "io.binghe.shop.order.mapper" })
@EnableDiscoveryClient
@EnableFeignClients
public class OrderStarter {
    public static void main(String[] args){
        SpringApplication.run(OrderStarter.class, args);
    }
}
可以看到,在OrderStarter類上標(biāo)注了@ComponentScan注解,并指定了掃描的包路徑為io.binghe.shop和io.binghe.rpc,使其既能夠掃描到微服務(wù)項(xiàng)目中包下的類,也能夠掃描到bhrpc框架包下的類。
(5)添加配置
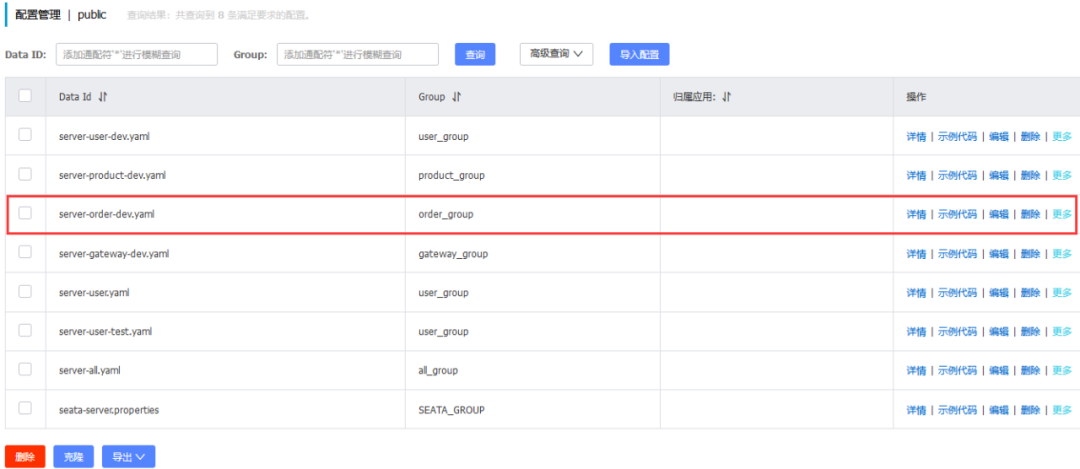
由于項(xiàng)目使用了Nacos作為配置中心,所以,需要在Nacos添加shop-order工程作為服務(wù)消費(fèi)者的配置,登錄Nacos管理端,找到shop-order工程的配置,如下所示。

shop-order工程的配置
點(diǎn)擊編輯按鈕,在原有配置的基礎(chǔ)上,添加如下配置信息。
bhrpc:
  binghe:
    consumer:
      # zookeeper server
      registryAddress: 127.0.0.1:2181
      # registry center type
      registryType: zookeeper
      # registry loadbalance type
      loadBalanceType: zkconsistenthash
      # proxy type
      proxy: cglib
      # version
      version: 1.0.0
      # group
      group: binghe
      # zkconsistenthash
      serializationType: zkconsistenthash
      # timeout
      timeout: 30000
      # async
      async: false
      # oneway
      oneway: false
      # heartbeatInterval
      heartbeatInterval: 15000
      # retryInterval
      retryInterval: 1000
      # retryTimes
      retryTimes: 3
可以看到,配置的內(nèi)容都是bhrpc框架的服務(wù)消費(fèi)者啟動(dòng)時(shí),需要讀取的一些參數(shù)信息。配置完成后,點(diǎn)擊發(fā)布按鈕進(jìn)行發(fā)布。
(6)修改OrderController類
OrderController類的源碼詳見(jiàn):shop-order工程下的io.binghe.shop.order.controller.OrderController,主要是將OrderController類中使用@Qualifier注解標(biāo)識(shí)的orderServiceV8修改成orderServiceV9,如下所示。
@Autowired
@Qualifier(value = "orderServiceV9")
private OrderService orderService;
至此,shop-order工程改造完成,也是非常簡(jiǎn)單的。
目前,在SpringCloud Alibaba項(xiàng)目中整合我們自己手寫的RPC框架就完成了,是不是非常簡(jiǎn)單呢?沒(méi)錯(cuò),我們自己手寫的bhrpc框架整合SpringCloud Alibaba項(xiàng)目就是這么簡(jiǎn)單!
5、測(cè)試?
整合完不測(cè)試下怎么行?
(1)、啟動(dòng)服務(wù)
分別啟動(dòng)Nacos、RocketMQ、Sentinel、ZipKin、Seata和Zookeeper服務(wù),對(duì)應(yīng)服務(wù)的版本在源碼的README.md文件中有說(shuō)明。
(2)、啟動(dòng)工程
按順序分別啟動(dòng)shop-user工程、shop-product工程、shop-order工程和shop-gateway工程。
輸出如下信息,沒(méi)有報(bào)錯(cuò),說(shuō)明bhrpc框架監(jiān)聽(tīng)的是20880端口,表示啟動(dòng)成功。
i.b.r.p.common.server.base.BaseServer : Server started on port 20880
輸出如下信息,沒(méi)有報(bào)錯(cuò),說(shuō)明bhrpc框架監(jiān)聽(tīng)的是20881端口,表示啟動(dòng)成功。
i.b.r.p.common.server.base.BaseServer : Server started on port 20881
輸出如下信息,沒(méi)有報(bào)錯(cuò),說(shuō)明啟動(dòng)成功。
o.s.b.w.embedded.tomcat.TomcatWebServer : Tomcat started on port(s): 8081 (http) with context path '/order'
輸出如下信息,沒(méi)有報(bào)錯(cuò),說(shuō)明啟動(dòng)成功。
io.binghe.shop.GatewayStarter : Started GatewayStarter in 9.604 seconds (JVM running for 10.964)
(3)、查詢數(shù)據(jù)表數(shù)據(jù)
(1)打開cmd終端,進(jìn)入MySQL命令行,并進(jìn)入shop商城數(shù)據(jù)庫(kù),如下所示。
C:\Users\binghe>mysql -uroot -p
Enter password: ****
Welcome to the MySQL monitor.  Commands end with ; or \g.
Your MySQL connection id is 15
Server version: 5.7.35 MySQL Community Server (GPL)

Copyright (c) 2000, 2021, Oracle and/or its affiliates.

Oracle is a registered trademark of Oracle Corporation and/or its
affiliates. Other names may be trademarks of their respective
owners.

Type 'help;' or '\h' for help. Type '\c' to clear the current input statement.

mysql> use shop;
Database changed
(2)查看商品數(shù)據(jù)表,如下所示。
mysql> select * from t_product;
+------+------------+-------------+-------------+
| id   | t_pro_name | t_pro_price | t_pro_stock |
+------+------------+-------------+-------------+
| 1001 | 華為       |     2399.00 |         100 |
| 1002 | 小米       |     1999.00 |         100 |
| 1003 | iphone     |     4999.00 |         100 |
+------+------------+-------------+-------------+
3 rows in set (0.00 sec)
這里,我們以id為1001的商品為例,此時(shí)發(fā)現(xiàn)商品的庫(kù)存為100。
(3)查詢訂單數(shù)據(jù)表,如下所示。
mysql> select * from t_order;
Empty set (0.00 sec)
可以發(fā)現(xiàn)訂單數(shù)據(jù)表為空。
(4)查詢訂單條目數(shù)據(jù)表,如下所示。
mysql> select * from t_order_item;
Empty set (0.00 sec)
可以看到,訂單條目數(shù)據(jù)表為空。
(4)、訪問(wèn)項(xiàng)目
打開瀏覽器訪問(wèn)http://localhost:10002/server-order/order/submit_order?userId=1001&productId=1001&count=1,如下所示。

訪問(wèn)結(jié)果
可以看到,項(xiàng)目返回的結(jié)果為success,表示項(xiàng)目執(zhí)行成功。
5、再次查看數(shù)據(jù)表數(shù)據(jù)
(1)查看商品數(shù)據(jù)表,如下所示。
mysql> select * from t_product;
+------+------------+-------------+-------------+
| id   | t_pro_name | t_pro_price | t_pro_stock |
+------+------------+-------------+-------------+
| 1001 | 華為       |     2399.00 |          99 |
| 1002 | 小米       |     1999.00 |         100 |
| 1003 | iphone     |     4999.00 |         100 |
+------+------------+-------------+-------------+
3 rows in set (0.00 sec)
這里,id為1001的商品庫(kù)存為99,說(shuō)明庫(kù)存已經(jīng)減少了1。
(2)查詢訂單數(shù)據(jù)表,如下所示。
mysql> select * from t_order;
+-------------------+-----------+-------------+-------------+-----------+---------------+
| id                | t_user_id | t_user_name | t_phone     | t_address | t_total_price |
+-------------------+-----------+-------------+-------------+-----------+---------------+
| 96829539832958976 |      1001 | binghe      | 13212345678 | 北京      |       2399.00 |
+-------------------+-----------+-------------+-------------+-----------+---------------+
1 row in set (0.00 sec)
可以看到,在t_order表中新增了一張訂單數(shù)據(jù)表,訂單的總金額為2399.00元。
(3)查詢訂單條目數(shù)據(jù)表,如下所示。
mysql> select * from t_order_item;
+-------------------+-------------------+----------+------------+-------------+----------+
| id                | t_order_id        | t_pro_id | t_pro_name | t_pro_price | t_number |
+-------------------+-------------------+----------+------------+-------------+----------+
| 96829541082861568 | 96829539832958976 |     1001 | 華為       |     2399.00 |        1 |
+-------------------+-------------------+----------+------------+-------------+----------+
1 row in set (0.00 sec)
可以看到,訂單條目數(shù)據(jù)表中條了一條訂單條目數(shù)據(jù),商品的id為1001,商品名稱為華為,商品的價(jià)格為2399.00,下單的商品數(shù)量為1。
根據(jù)測(cè)試結(jié)果可以看出,我們已經(jīng)正確在SpringCloud Alibaba項(xiàng)目中整合了我們自己手寫的bhrpc框架。
6、總結(jié)?
實(shí)現(xiàn)了功能不總結(jié)下怎么行?
在完成整合Spring的篇章后,我們又開啟了整合SpringBoot的篇章,首先,我們完成了服務(wù)提供者整合SpringBoot的功能,并基于SpringBoot接入了服務(wù)提供者。同時(shí),實(shí)現(xiàn)了服務(wù)消費(fèi)者整合SpringBoot的功能,并且基于SpringBoot接入了服務(wù)消費(fèi)者。
在整合Docker章節(jié),我們實(shí)現(xiàn)了基于Docker接入了服務(wù)提供者和基于Docker接入了服務(wù)消費(fèi)者。
本章,我們更進(jìn)一步將手寫的bhrpc框架整合到SpringCloud Alibaba項(xiàng)目。
總之,我們寫的RPC框架正在一步步實(shí)現(xiàn)它該有的功能。
最后,我想說(shuō)的是:學(xué)習(xí)《RPC手?jǐn)]專欄》一定要塌下心來(lái),一步一個(gè)腳印,動(dòng)手實(shí)踐,認(rèn)真思考,遇到不懂的問(wèn)題,可以直接到星球發(fā)布主題進(jìn)行提問(wèn)。一定要記住:紙上得來(lái)終覺(jué)淺,絕知此事要躬行的道理。否則,一味的CP,或者光看不練,不僅失去了學(xué)習(xí)的意義,到頭來(lái)更是一無(wú)所獲。


