Python協程知多少
從概念上來說,我們都知道多進程和多線程,而協程其實是在單線程中實現多并發。從句法上看,協程與生成器類似,都是定義體中包含yield關鍵字的函數。區別在于協程的yield通常出現在表達式的右邊:datum = yield。這一下就讓初學者瞬間覺得yield關鍵字不香了,本來以為yield就是簡簡單單的暫停執行順手返回個值,結果還能放右邊?
從生成器到協程
先看一個可能是協程最簡單的使用示例:
- >>> def simple_coroutine():
- ... print("-> coroutine started")
- ... x = yield
- ... print("-> coroutine received:", x)
- ...
- >>> my_coro = simple_coroutine()
- >>> my_coro
- <generator object simple_coroutine at 0x0000019A681F27B0>
- >>> next(my_coro)
- -> coroutine started
- >>> my_coro.send(42)
- -> coroutine received: 42
- Traceback (most recent call last):
- File "<input>", line 1, in <module>
- StopIteration
之所以yield可以放右邊,是因為協程可以接收調用方使用.send()推送的值。
yield放在右邊以后,它的右邊還能再放個表達式,請看下面這個例子:
- def simple_coro2(a):
- b = yield a
- c = yield a + b
- my_coro2 = simple_coro2(14)
- next(my_coro2)
- my_coro2.send(28)
- my_coro2.send(99)
執行過程是:
- 調用next(my_coro2),執行yield a,產出14。
- 調用my_coro2.send(28),把28賦值給b,然后執行yield a + b,產出42。
- 調用my_coro2.send(99),把99賦值給c,協程終止。
由此得出結論,對于b = yield a這行代碼來說,= 右邊的代碼在賦值之前執行。
在示例中,需要先調用next(my_coro)啟動生成器,讓程序在yield語句處暫停,然后才可以發送數據。這是因為協程有四種狀態:
- 'GEN_CREATED' 等待開始執行
- 'GEN_RUNNING' 解釋器正在執行
- 'GEN_SUSPENDED' 在yield表達式處暫停
- 'GEN_CLOSED' 執行結束
只有在GEN_SUSPENDED狀態才能發送數據,提前做的這一步叫做預激,既可以調用next(my_coro)預激,也可以調用my_coro.send(None)預激,效果一樣。
預激協程
協程必須預激才能使用,也就是send前,先調用next,讓協程處于GEN_SUSPENDED狀態。但是這件事經常會忘記。為了避免忘記,可以定義一個預激裝飾器,比如:
- from functools import wraps
- def coroutine(func):
- @wraps(func)
- def primer(*args, **kwargs):
- gen = func(*args, **kwargs)
- next(gen)
- return gen
- return primer
但實際上Python給出了一個更優雅的方式,叫做yield from,它會自動預激協程。
自定義預激裝飾器和yield from是不兼容的。
yield from
yield from相當于其他語言中的await關鍵字,作用是:在生成器gen中使用yield from subgen()時,subgen會獲得控制權,把產出的值傳給gen的調用方,即調用方可以直接控制subgen。與此同時,gen會阻塞,等待subgen終止。
yield from可以用來簡化for循環中的yield:
- for c in "AB":
- yield c
- yield from "AB"
yield from x表達式對x做的第一件事就是,調用iter(x),從中獲取迭代器。
但yield from的作用遠不止于此,它更重要的作用是打開雙向通道。如下圖所示:
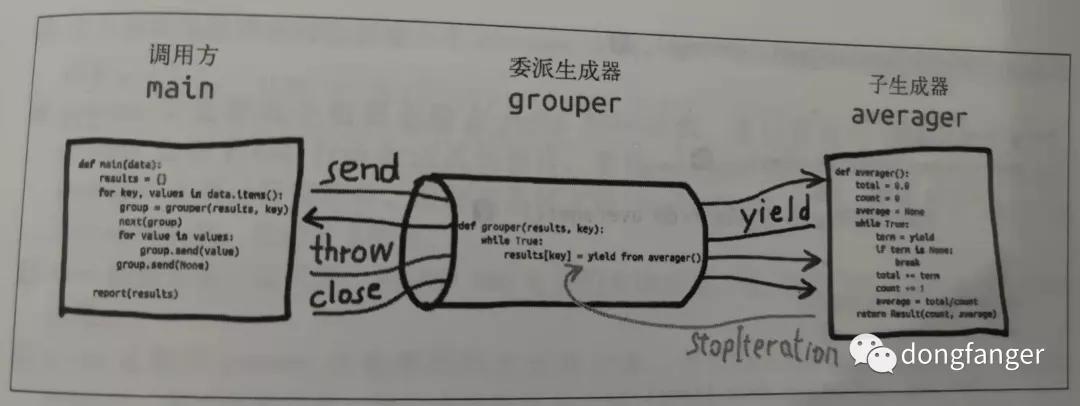
這個圖信息量很大,很難理解。
首先要理解這3個概念:調用方、委派生成器、子生成器。
- 調用方
說白了就是main函數,也就是眾所周知的程序入口main函數。
- # the client code, a.k.a. the caller
- def main(data): # <8>
- results = {}
- for key, values in data.items():
- group = grouper(results, key) # <9>
- next(group) # <10>
- for value in values:
- group.send(value) # <11>
- group.send(None) # important! <12>
- # print(results) # uncomment to debug
- report(results)
- 委派生成器
就是包含了yield from語句的函數,也就是協程。
- # the delegating generator
- def grouper(results, key): # <5>
- while True: # <6>
- results[key] = yield from averager() # <7>
- 子生成器
就是yield from語句右邊跟著的子協程。
- # the subgenerator
- def averager(): # <1>
- total = 0.0
- count = 0
- average = None
- while True:
- term = yield # <2>
- if term is None: # <3>
- break
- total += term
- count += 1
- average = total/count
- return Result(count, average) # <4>
這比術語看著舒服多了。
然后是5條線:send、yield、throw、StopIteration、close。
- send
協程在yield from表達式處暫停時,main函數可以通過yield from表達式把數據發給yield from語句右邊跟著的子協程。
- yield
yield from語句右邊跟著的子協程再把產出的值通過yield from表達式發給main函數。
- throw
main函數通過group.send(None),傳入一個None值,讓yield from語句右邊跟著的子協程的while循環終止,這樣控制權才會交回協程,才能繼續執行,否則會一直暫在yield from語句暫停。
- StopIteration
yield from語句右邊跟著的生成器函數返回之后,解釋器會拋出StopIteration異常。并把返回值附加到異常對象上,此時協程會恢復。
- close
main函數執行完以后,會調用close()方法退出協程。
大體流程搞清楚了,更多的技術細節就不繼續研究了,有時間的話,在以后的Python原理系列中再學習吧。
yield from經常與Python3.4標準庫里的@asyncio.coroutine裝飾器結合使用。
協程用作累加器
這是協程的常見用途,代碼如下:
- def averager():
- total = 0.0
- count = 0
- average = None
- while True: # <1>
- term = yield average # <2>
- total += term
- count += 1
- average = total/count
協程實現并發
這里例子有點復雜,源碼地址是:
https://github.com/fluentpython/example-code/blob/master/16-coroutine/taxi_sim.py
核心代碼片段是:
- # BEGIN TAXI_PROCESS
- def taxi_process(ident, trips, start_time=0): # <1>
- """Yield to simulator issuing event at each state change"""
- time = yield Event(start_time, ident, 'leave garage') # <2>
- for i in range(trips): # <3>
- time = yield Event(time, ident, 'pick up passenger') # <4>
- time = yield Event(time, ident, 'drop off passenger') # <5>
- yield Event(time, ident, 'going home') # <6>
- # end of taxi process # <7>
- # END TAXI_PROCESS
- def main(end_time=DEFAULT_END_TIME, num_taxis=DEFAULT_NUMBER_OF_TAXIS,
- seed=None):
- """Initialize random generator, build procs and run simulation"""
- if seed is not None:
- random.seed(seed) # get reproducible results
- taxis = {i: taxi_process(i, (i+1)*2, i*DEPARTURE_INTERVAL)
- for i in range(num_taxis)}
- sim = Simulator(taxis)
- sim.run(end_time)
這個示例說明了如何在一個主循環中處理事件,以及如何通過發送數據驅動協程。這是asyncio包底層的基本思想。使用協程代替線程和回調,實現并發。
參考資料:
《流暢的Python》第16章 協程 https://zhuanlan.zhihu.com/p/104918655