在命令行里也能使用 React
用過 React 的同學都知道,React 作為一個視圖庫,在進行 Web 開發的時候需要安裝兩個模塊。
- npm install react --save
- npm install react-dom --save
react 模塊主要提供了組件的生命周期、虛擬 DOM Diff、Hooks 等能力,以及將 JSX 轉換為虛擬 DOM 的 h 方法。而 react-dom 主要對外暴露一個 render 方法,將虛擬 DOM 轉化為真實 DOM。
- import React from 'react'
- import ReactDOM from 'react-dom'
- /* import ReactDOM from 'react-dom/server' //服務的渲染 */
- class Hello extends React.component {
- render() {
- return <h1>Hello, world!</h1>,
- }
- }
- ReactDOM.render(
- <Hello />,
- document.getElementById('root')
- )
如果我們將 react-dom 換成 react-native 就可以將虛擬 DOM 轉換為安卓或 iOS 的原生組件。我在之前的文章中介紹過,虛擬 DOM 最大的優勢并不是其 Diff 算法,而是將 JSX 轉換為統一的 DSL,通過其抽象能力實現了跨平臺的能力。除了官方提供的 react-dom、react-native ,甚至可以渲染到命令行上,這也是我們今天介紹的 ink。
- npm ink: https://www.npmjs.com/package/react-dom
ink內部使用 facebook 基于 C++ 開發的一款跨平臺渲染引擎 yoga,支持 Flex 布局,功能十分強大。另外,React Native 內部使用了該引擎。
初始化
這里有一個官方提供的腳手架,我們可以直接通過這個腳手架來創建一個項目。
- $ mkdir ink-app
- $ cd ink-app
- $ npx create-ink-app
如果你想使用 TypeScript 來編寫項目,你也可以使用如下命令:
- $ npx create-ink-app --typescript
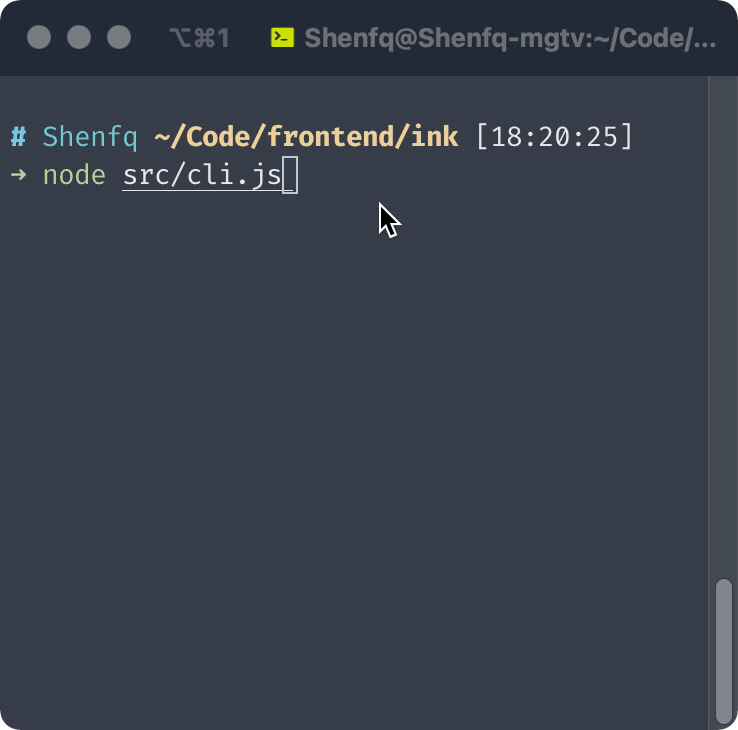
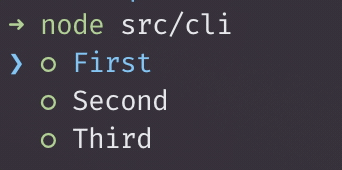
生成的代碼如下:
- // src/cli.js
- #!/usr/bin/env node
- const ink = require('ink')
- const meow = require('meow')
- const React = require('react')
- const importJsx = require('import-jsx')
- const ui = importJsx('./ui')
- const cli = meow(`
- Usage
- $ ink-cli
- Options
- --name Your name
- `)
- ink.render(React.createElement(ui, cli.flags))
- // src/ui.js
- const App = (props) => (
- <Text>
- Hello, <Text color = "green">
- { props.name || 'UserName' }
- </Text>
- </Text>
- )
- module.exports = App;
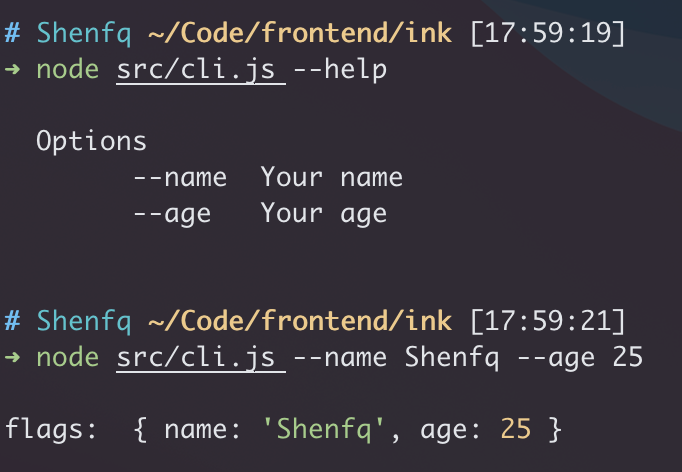
除了 ink 和 react,腳手架項目還引入了 meow、import-jsx 兩個庫。
meow 的主要作用是運行命令時,對參數進行解析,將解析的參數放到 flags 屬性中,其作用與 yargs、commander 一樣,是構建 CLI 工具的必備利器。
- const meow = require('meow')
- // 傳入的字符串,作為 help 信息。
- const cli = meow(`
- Options
- --name Your name
- --age Your age
- `)
- console.log('flags: ', cli.flags)
另一個 import-jsx 的主要作用,就是將 jsx 字符串轉化為 createElement 方法的形式。
- // ui.js
- const component = (props) => (
- <Text>
- Hello, <Text color = "green">
- { props.name || 'UserName' }
- </Text>
- </Text>
- )
- // cli.js
- const importJsx = require('import-jsx')
- const ui = importJsx('./ui')
- console.log(ui.toString()) // 輸出轉化后的結果
- // 轉化結果:
- props => /*#__PURE__*/React.createElement(
- Text,
- null,
- "Hello, ",
- /*#__PURE__*/React.createElement(
- Text, {
- color: "green"
- },
- props.name || 'UserName'
- )
- )
這一步的工作一般由 babel 完成,如果我們沒有通過 babel 轉義 jsx,使用 import-jsx 就相當于是運行時轉義,對性能會有損耗。但是,在 CLI 項目中,本身對性能要求也沒那么高,通過這種方式,也能更快速的進行項目搭建。
內置組件
由于是非瀏覽器的運行環境,ink 與 react-native 一樣提供了內置的一些組件,用于渲染終端中的特定元素。
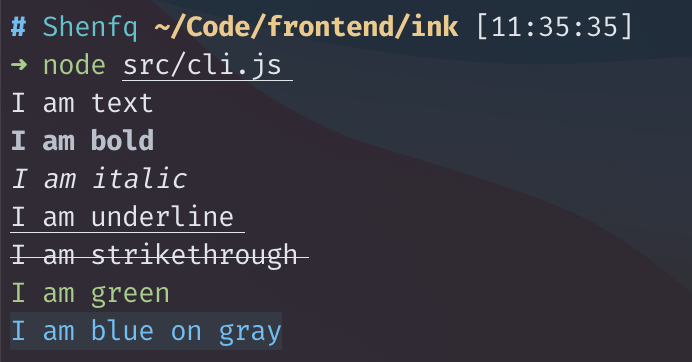
<Text>
DEMO:
- // ui.js
- const React = require('react')
- const { Text } = require('ink')
- moudle.exports = () => (<>
- <Text>I am text</Text>
- <Text bold>I am bold</Text>
- <Text italic>I am italic</Text>
- <Text underline>I am underline</Text>
- <Text strikethrough>I am strikethrough</Text>
- <Text color="green">I am green</Text>
- <Text color="blue" backgroundColor="gray">I am blue on gray</Text>
- </>)
- // cli.js
- const React = require('react')
- const importJsx = require('import-jsx')
- const { render } = require('ink')
- const ui = importJsx('./ui')
- render(React.createElement(ui))
其主要作用就是設置渲染到終端上的文本樣式,有點類似于 HTML 中的 標簽。
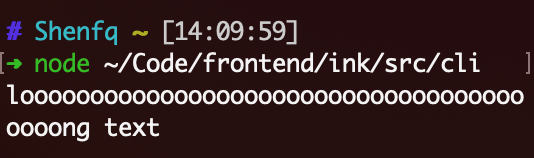
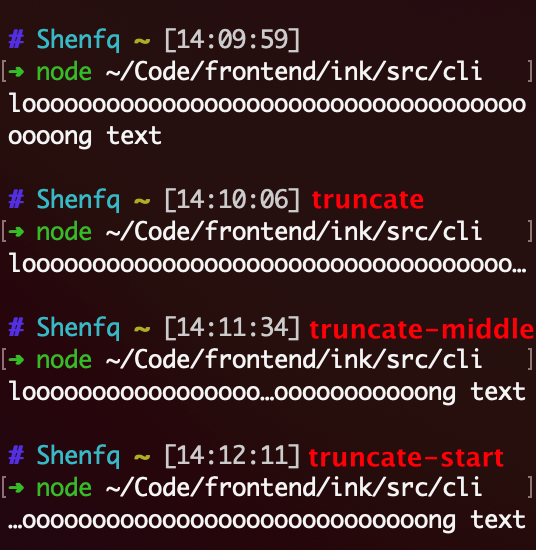
除了這種常見的 HTML 相關的文本屬性,還支持比較特殊的 wrap 屬性,用于將溢出的文本進行截斷。
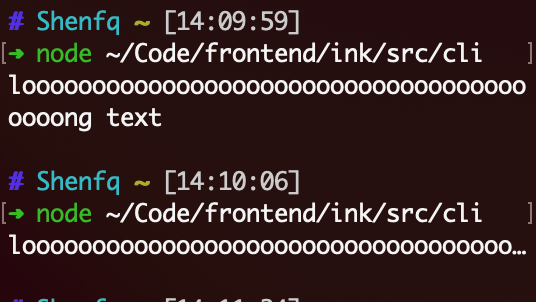
長文本在超出終端的長度時,默認會進行換行處理。
- <Text>loooooooooooooooooooooooooooooooooooooooong text</Text>
如果加上 wrap 屬性,會對長文本進行截斷。
- <Text wrap="truncate">
- loooooooooooooooooooooooooooooooooooooooong text
- </Text>
除了從尾部截斷文本,還支持從文本中間和文本開始處進行截斷。
- <Text wrap="truncate">
- loooooooooooooooooooooooooooooooooooooooong text
- </Text>
- <Text wrap="truncate-middle">
- loooooooooooooooooooooooooooooooooooooooong text
- </Text>
- <Text wrap="truncate-start">
- loooooooooooooooooooooooooooooooooooooooong text
- </Text>
<Box>
<Box> 組件用于布局,除了支持類似 CSS 中 margin、padding、border 屬性外,還能支持 flex 布局,可以將 <Box> 理解為 HTML 中設置了 flex 布局的 div ( <div style="display: flex;">)。
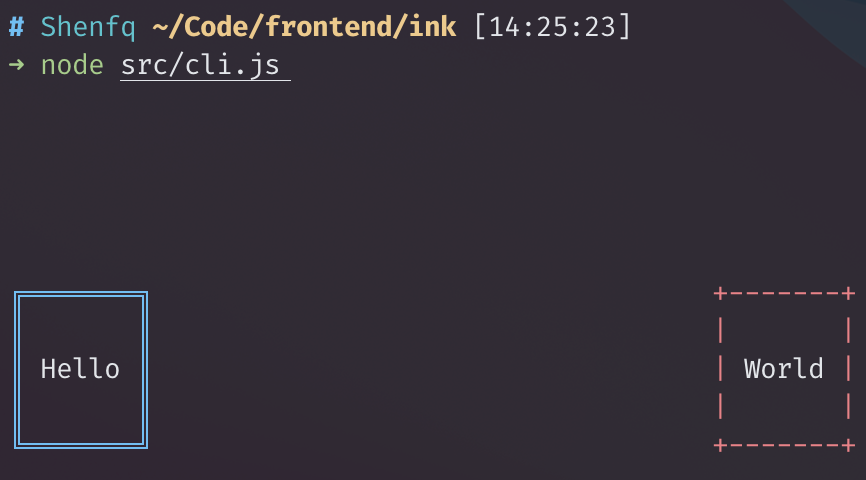
下面我們先給一個 <Box> 組件設置高度為 10,然后主軸方向讓元素兩端對齊,交叉軸方向讓元素位于底部對齊。
然后在給內部的兩個 <Box> 組件設置一個 padding 和一個不同樣式的邊框。
- const App = () => <Box
- height={10}
- alignItems="flex-end"
- justifyContent="space-between"
- >
- <Box borderStyle="double" borderColor="blue" padding={1} >
- <Text>Hello</Text>
- </Box>
- <Box borderStyle="classic" borderColor="red" padding={1} >
- <Text>World</Text>
- </Box>
- </Box>
最終效果如下:
比較特殊的屬性是邊框的樣式:borderStyle,和 CSS 提供的邊框樣式有點出入。
- <Box borderStyle="single">
- <Text>single</Text>
- </Box>
- <Box borderStyle="double">
- <Text>double</Text>
- </Box>
- <Box borderStyle="round">
- <Text>round</Text>
- </Box>
- <Box borderStyle="bold">
- <Text>bold</Text>
- </Box>
- <Box borderStyle="singleDouble">
- <Text>singleDouble</Text>
- </Box>
- <Box borderStyle="doubleSingle">
- <Text>doubleSingle</Text>
- </Box>
- <Box borderStyle="classic">
- <Text>classic</Text>
- </Box>
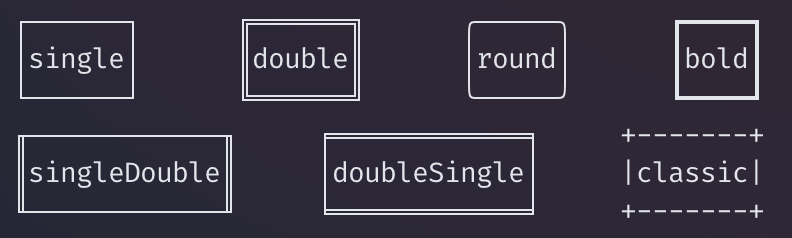
<Box> 組件提供的其他屬性和原生的 CSS 基本一致,詳細介紹可以查閱其文檔:
- 🔗 ink#Box:https://www.npmjs.com/package/ink#box
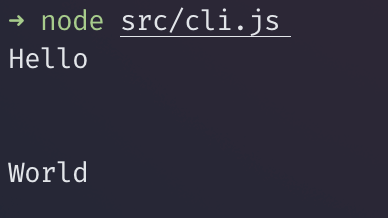
<Newline>
<NewLine> 組件相當于直接在終端中添加一個 \n 字符,用于換行(PS:只支持插入在 <Text> 元素之間);
- const App = () => (<>
- <Text>Hello</Text>
- <Text>World</Text>
- </>)
- const App = () => (<>
- <Text>Hello</Text>
- <Newline />
- <Text>World</Text>
- </>)
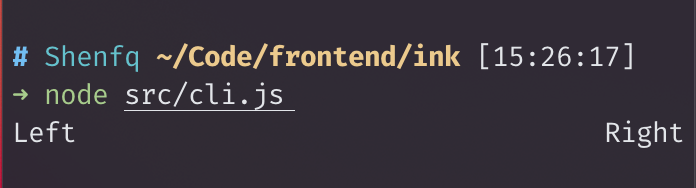
<Spacer>
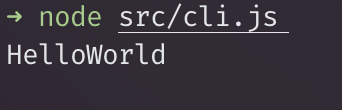
<Spacer> 組件用于隔開兩個元素,使用后,會將間隔開兩個元素隔開到終端的兩邊,效果有點類似于 flex 布局的兩端對齊(justify-content: space-between;)
- const App1 = () => <Box>
- <Text>Left</Text>
- <Spacer />
- <Text>Right</Text>
- </Box>;
- const App2 = () => <Box justifyContent="space-between">
- <Text>Left</Text>
- <Text>Right</Text>
- </Box>;
上面兩段代碼的表現形式一致:
內置 Hooks
ink 除了提供一些布局用的組件,還提供了一些 Hooks。
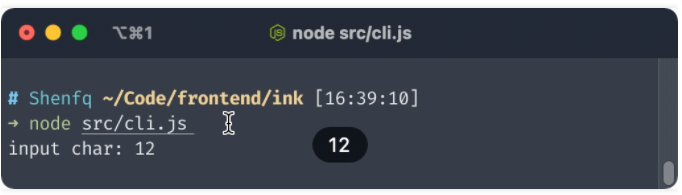
useInput
可用于監聽用戶的輸入,useInput 接受一個回調函數,用戶每次按下鍵盤的按鍵,都會調用 useInput 傳入的回調,并傳入兩個參數。
- useInput((input: string, key: Object) => void)
第一個參數:input ,表示按下按鍵對應的字符。第二個參數:key ,為一個對象,對應按下的一些功能鍵。
- 如果按下回車,key.return = true;
- 如果按下刪除鍵,key.delete = true;
- 如果按下esc鍵,key.escape = true;
具體支持哪些功能按鍵,可以參考官方文檔:
- 🔗ink#useInput:https://www.npmjs.com/package/ink#useinputinputhandler-options
下面通過一個 DEMO,展示其具體的使用方式,在終端上記錄用戶的所有輸出,如果按下的是刪除鍵,則刪除最近記錄的一個字符。
- const React = require('react')
- const { useInput, Text } = require('ink')
- const { useState } = React
- module.exports = () => {
- const [char, setChar] = useState('')
- useInput((input, key) => {
- if (key.delete) {
- // 按下刪除鍵,刪除一個字符
- setChar(char.slice(0, -1))
- return
- }
- // 追加最新按下的字符
- setChar(char + input)
- })
- return <Text>input char: {char}</Text>
- }
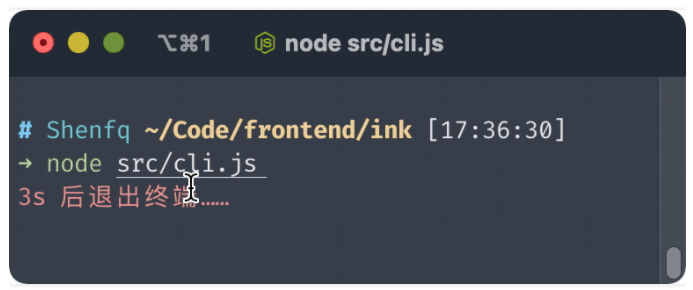
useApp
對外暴露一個 exit 方法,用于退出終端。
- const React = require('react')
- const { useApp } = require('ink')
- const { useEffect } = React
- const App = () => {
- const { exit } = useApp()
- // 3s 后退出終端
- useEffect(() => {
- setTimeout(() => {
- exit();
- }, 3000);
- }, []);
- return <Text color="red">3s 后退出終端……</Text>
- }
useStdin
用于獲取命令行的輸入流。這里用一個簡單的案例,來模擬用戶登錄。
- const React = require('react')
- const { useStdin } = require('ink')
- const { useState, useEffect } = React
- module.exports = () => {
- const [pwd, setPwd] = useState('')
- const { stdin } = useStdin()
- useEffect(() => {
- // 設置密碼后,終止輸入
- if (pwd) stdin.pause()
- }, [pwd])
- stdin.on('data', (data) => {
- // 提取 data,設置到 pwd 變量中
- const value = data.toString().trim()
- setPwd(value)
- })
- // pwd 為空時,提示用戶輸入密碼
- if (!pwd) {
- return <Text backgroundColor="blue">password:</Text>
- }
- return pwd === 'hk01810'
- ? <Text color="green">登錄成功</Text>
- : <Text color="red">有內鬼,終止交易</Text>
- }
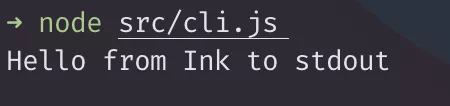
useStdout
用于獲取命令行的輸出流。會暴露 stdout 的寫入流,還會暴露一個 write 方法,用于在終端進行輸入。
- const React = require('react')
- const { useStdout } = require('ink')
- const { useEffect } = React
- module.exports = () => {
- const { write } = useStdout()
- useEffect(() => {
- // 在終端進行寫入
- write('Hello from Ink to stdout')
- }, [])
- return null
- }
第三方組件
除了內置的這些組件和 Hooks 外,還有豐富的第三方生態。比如:Loading組件、超鏈接組件、表格組件、高亮組件、多選組件、圖片組件……
- 🔗 ink#第三方組件:https://www.npmjs.com/package/ink#useful-components
ink-spinner

ink-link
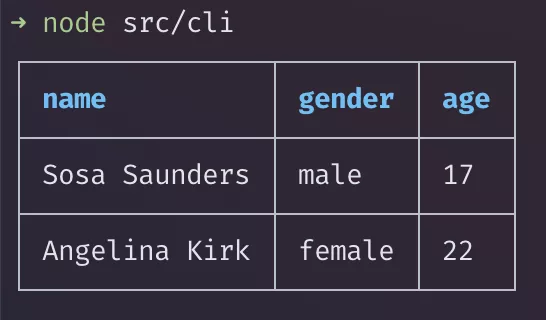
ink-table
ink-syntax-highlight

ink-muti-select
調試工具
ink 屬于 React 生態,自然能夠支持 React 官方提供的調試工具 React Devtools。
- $ npm install react-devtools # 安裝調試工具
- $ npx react-devtools # 啟動調試工具
然后,在啟動應用時,在前面設置 DEV 全局變量。
- DEV=true node src/cli
運行后的效果如下:

總結
React 確實是視圖開發的一把利器,再加上 Hooks 的加持,其抽象能力得到了進一步的提升,統一的 DSL 加上 虛擬 DOM,照理來說,是可以在任何平臺進行渲染的。甚至,微軟官方都開發了一個 React Native for Windows,關鍵是這個東西不僅僅能開發 Windows 的桌面軟件,還可以開發 mac 的桌面軟件。
有點跑題,說回 ink,大家熟知的 Gatsby 的命令行工具也是通過 ink 進行開發的。如果大家后續有本地的 CLI 工具需要實現,可以考慮這款工具,至少不必煩惱如何在命令行進行文本對齊。