一篇學會使用 SwiftUI 創建萬花尺
本文轉載自微信公眾號「Swift社區」,作者韋弦Zhy。轉載本文請聯系Swift社區公眾號。
為了完成一些真正意義上的繪圖工作,我將帶您通過創建一個簡單的帶 SwiftUI 的 spirograph。“Spirograph”是一種玩具的商標名稱,你把一支鉛筆放在一個圓圈里,然后繞著另一個圓圈的圓周旋轉,創造出各種幾何圖案,稱為輪盤賭——就像賭場游戲一樣。
這段代碼包含一個非常具體的公式。我會解釋的,但是如果你不感興趣的話,跳過這一章是完全可以的——這只是為了好玩,這里沒有介紹新的 Swift 或 SwiftUI。
我們的算法有四個輸入:
- 內圈的半徑。
- 外圈的半徑。
- 虛擬筆與外圓中心的距離。
- 要畫多少輪盤賭。這是可選的,但我認為它確實有助于顯示算法工作時發生的情況。
因此,讓我們開始吧:
- struct Spirograph: Shape {
- let innerRadius: Int
- let outerRadius: Int
- let distance: Int
- let amount: CGFloat
- }
然后,我們從數據中準備三個值,從內半徑和外半徑的最大公約數(GCD)開始。計算兩個數字的GCD通常是用Euclid算法完成的,它的形式稍微簡化如下:
- func gcd(_ a: Int, _ b: Int) -> Int {
- var a = a
- var b = b
- while b != 0 {
- let temp = b
- b = a % b
- a = temp
- }
- return a
- }
把這個方法添加到Spirograph結構體中。
另外兩個值是內半徑和外半徑之間的差異,以及我們需要執行多少步驟來繪制輪盤——這是360度乘以外半徑除以最大公約數,再乘以我們的數量輸入。我們所有的輸入以整數形式提供時效果最好,但是在繪制輪盤賭時,我們需要使用CGFloat,因此我們還將創建輸入的CGFloat副本。
現在將這個path(in:)方法添加到Spirograph結構體:
- func path(in rect: CGRect) -> Path {
- let divisor = gcd(innerRadius, outerRadius)
- let outerRadius = CGFloat(self.outerRadius)
- let innerRadius = CGFloat(self.innerRadius)
- let distance = CGFloat(self.distance)
- let difference = innerRadius - outerRadius
- let endPoint = ceil(2 * CGFloat.pi * outerRadius / CGFloat(divisor)) * amount
- // more code to come
- }
最后,我們可以通過循環從 0 到我們的終點來畫輪盤賭,并放置在精確的 X/Y 坐標點。計算循環中給定點的 X/Y 坐標(稱為“theta:θ”)是真正的數學來源,但老實說,我只是把維基百科上的標準方程式轉換成 Swift ——這不是我夢寐以求的記憶!
- X等于半徑差乘以 θ 的余弦,再乘以半徑差的余弦除以外半徑乘以θ的距離。
- Y等于半徑差乘以 θ 的正弦,減去距離乘以半徑差的正弦除以外半徑乘以 θ。
這是核心算法,但我們要做兩個小的改變:我們要分別將繪圖矩形的一半寬度或高度添加到X和Y,使其在繪圖空間中居中;如果 θ 為 0,即如果這是輪盤中繪制的第一個點,我們將我們的路徑中調用move(to:)而不是addLine(to:)。
以下是path(in:)方法的最后一個代碼——用以下內容替換// more code to come注釋:
- var path = Path()
- for theta in stride(from: 0, through: endPoint, by: 0.01) {
- var x = difference * cos(theta) + distance * cos(difference / outerRadius * theta)
- var y = difference * sin(theta) - distance * sin(difference / outerRadius * theta)
- x += rect.width / 2
- y += rect.height / 2
- if theta == 0 {
- path.move(to: CGPoint(x: x, y: y))
- } else {
- path.addLine(to: CGPoint(x: x, y: y))
- }
- }
- return path
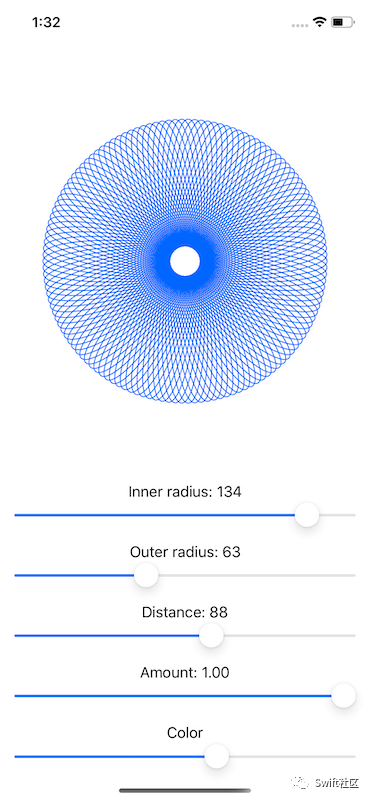
我意識到這有很多繁重的數學,但回報即將到來:我們現在可以在視圖中使用該形狀,添加各種滑塊來控制內半徑、外半徑、距離、數量,甚至顏色:
- struct ContentView: View {
- @State private var innerRadius = 125.0
- @State private var outerRadius = 75.0
- @State private var distance = 25.0
- @State private var amount: CGFloat = 1.0
- @State private var hue = 0.6
- var body: some View {
- VStack(spacing: 0) {
- Spacer()
- Spirograph(innerRadius: Int(innerRadius), outerRadius: Int(outerRadius), distance: Int(distance), amount: amount)
- .stroke(Color(hue: hue, saturation: 1, brightness: 1), lineWidth: 1)
- .frame(width: 300, height: 300)
- Spacer()
- Group {
- Text("Inner radius: \(Int(innerRadius))")
- Slider(value: $innerRadius, in: 10...150, step: 1)
- .padding([.horizontal, .bottom])
- Text("Outer radius: \(Int(outerRadius))")
- Slider(value: $outerRadius, in: 10...150, step: 1)
- .padding([.horizontal, .bottom])
- Text("Distance: \(Int(distance))")
- Slider(value: $distance, in: 1...150, step: 1)
- .padding([.horizontal, .bottom])
- Text("Amount: \(amount, specifier: "%.2f")")
- Slider(value: $amount)
- .padding([.horizontal, .bottom])
- Text("Color")
- Slider(value: $hue)
- .padding(.horizontal)
- }
- }
- }
- }
這是很多代碼,但我希望你花時間運行應用程序,并欣賞有多么美麗的輪盤。你所看到的其實只是一種輪盤賭形式,被稱為 hypotrochoid ——通過對算法的小調整,你可以生成 epitrochoids 等,它們以不同的方式很漂亮。
在我結束之前,我想提醒你,這里使用的參數方程是數學標準,而不是我剛剛發明的東西——我真的去百度了關于 hypotrochoids[1] 的頁面,并將它們轉換為 Swift。
參考資料
[1]hypotrochoids: http://www.durangobill.com/Trochoids.html