SpringCloud Alibaba微服務實戰之 禁止直接訪問后端服務
本文轉載自微信公眾號「JAVA日知錄」,作者單一色調 。轉載本文請聯系JAVA日知錄公眾號。
前言
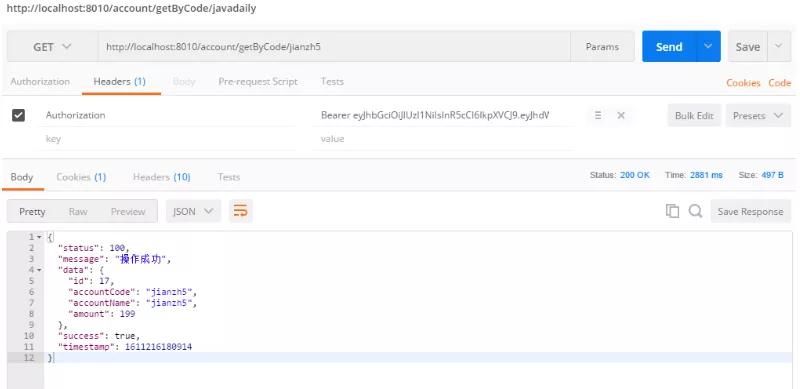
使用SpringCloud架構后我們希望所有的請求都需要經過網關才能訪問,在不作任何處理的情況下我們是可以繞過網關直接訪問后端服務的。如下,我們繞過網關直接訪問后端服務也是可以獲取到數據的。
那我們今天的議題就是 如何防止請求繞過網關直接訪問后端服務?
解決方案
我覺得防止繞過網關直接請求后端服務的解決方案主要有三種:
- 使用Kubernetes部署
在使用Kubernetes部署SpringCloud架構時我們給網關的Service配置NodePort,其他后端服務的Service使用ClusterIp,這樣在集群外就只能訪問到網關了。
- 網絡隔離
后端普通服務都部署在內網,通過防火墻策略限制只允許網關應用訪問后端服務。
- 應用層攔截
請求后端服務時通過攔截器校驗請求是否來自網關,如果不來自網關則提示不允許訪問。
這里我們著重關注在應用層攔截這種解決方案。
實現思路
實現思路其實也很簡單,在請求經過網關的時候給請求頭中增加一個額外的Header,在后端服務中寫一個攔截器,判斷請求頭是否與在網關設置的請求Header一致,如果不一致則不允許訪問并給出提示。
當然為了防止在每個后端服務都需要編寫這個攔截器,我們可以將其寫在一個公共的starter中,讓后端服務引用即可。而且為了靈活,可以通過配置決定是否只允許后端服務訪問。
接下來我們看看核心代碼。(代碼中涉及 SpringBoot 編寫公共Starter的套路,相信看過我博客的同學肯定是會的,因為之前文章有詳細說過。)
實現過程
在網關cloud-gateway模塊編寫網關過濾器
- @Component
- @Order(0)
- public class GatewayRequestFilter implements GlobalFilter {
- @Override
- public Mono<Void> filter(ServerWebExchange exchange, GatewayFilterChain chain) {
- byte[] token = Base64Utils.encode((CloudConstant.GATEWAY_TOKEN_VALUE).getBytes());
- String[] headerValues = {new String(token)};
- ServerHttpRequest build = exchange.getRequest()
- .mutate()
- .header(CloudConstant.GATEWAY_TOKEN_HEADER, headerValues)
- .build();
- ServerWebExchange newExchange = exchange.mutate().request(build).build();
- return chain.filter(newExchange);
- }
- }
在請求經過網關時添加額外的Header,為了方便這里直接設置成固定值。
建立公共Starter模塊cloud-component-security-starter
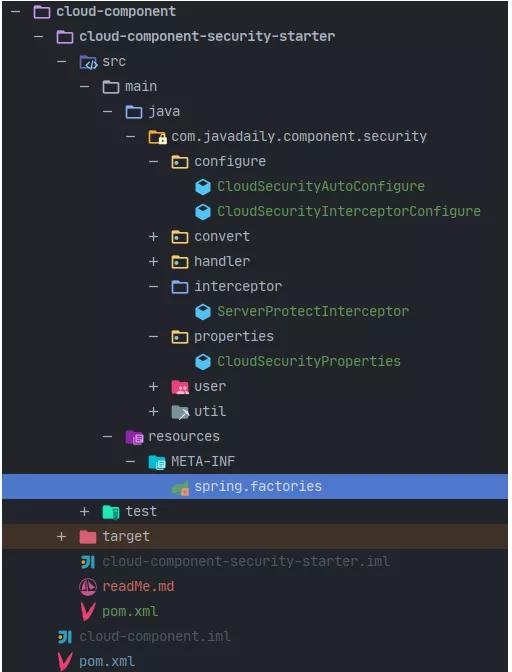
- 編寫配置類,用于靈活控制服務是否允許繞過網關
- @Data
- @ConfigurationProperties(prefix = "javadaily.cloud")
- public class CloudSecurityProperties {
- /**
- * 是否只能通過網關獲取資源
- * 默認為True
- */
- private Boolean onlyFetchByGateway = Boolean.TRUE;
- }
- 編寫攔截器,用于校驗請求是否經過網關
- public class ServerProtectInterceptor implements HandlerInterceptor {
- private CloudSecurityProperties properties;
- @Override
- public boolean preHandle(@NonNull HttpServletRequest request, @NonNull HttpServletResponse response, @NonNull Object handler){
- if (!properties.getOnlyFetchByGateway()) {
- return true;
- }
- String token = request.getHeader(CloudConstant.GATEWAY_TOKEN_HEADER);
- String gatewayToken = new String(Base64Utils.encode(CloudConstant.GATEWAY_TOKEN_VALUE.getBytes()));
- if (StringUtils.equals(gatewayToken, token)) {
- return true;
- } else {
- ResultData<String> resultData = new ResultData<>();
- resultData.setSuccess(false);
- resultData.setStatus(HttpServletResponse.SC_FORBIDDEN);
- resultData.setMessage("請通過網關訪問資源");
- WebUtils.writeJson(response,resultData);
- return false;
- }
- }
- public void setProperties(CloudSecurityProperties properties) {
- this.properties = properties;
- }
- }
- 配置攔截器
- public class CloudSecurityInterceptorConfigure implements WebMvcConfigurer {
- private CloudSecurityProperties properties;
- @Autowired
- public void setProperties(CloudSecurityProperties properties) {
- this.properties = properties;
- }
- @Bean
- public HandlerInterceptor serverProtectInterceptor() {
- ServerProtectInterceptor interceptor = new ServerProtectInterceptor();
- interceptor.setProperties(properties);
- return interceptor;
- }
- @Override
- public void addInterceptors(InterceptorRegistry registry) {
- registry.addInterceptor(serverProtectInterceptor());
- }
- }
- 編寫starter裝載類
- @EnableConfigurationProperties(CloudSecurityProperties.class)
- public class CloudSecurityAutoConfigure{
- @Bean
- public CloudSecurityInterceptorConfigure cloudSecurityInterceptorConfigure() {
- return new CloudSecurityInterceptorConfigure();
- }
- }
- 建立資源文件spring.factories,配置Bean的自動加載
- org.springframework.boot.autoconfigure.EnableAutoConfiguration=\
- com.javadaily.component.security.configure.CloudSecurityAutoConfigure
在后端服務配置文件中添加屬性配置,默認只能通過網關訪問
- javadaily:
- cloud:
- onlyFetchByGateway: true
經過以上幾步,一個公共的Starter模塊就構建完成了。
后端服務引用此公共Starter模塊即可,以account-service為例
- <dependency>
- <groupId>com.jianzh5.cloud</groupId>
- <artifactId>cloud-component-security-starter</artifactId>
- </dependency>
實現效果
直接訪問后端服務接口
http://localhost:8010/account/getByCode/jianzh5
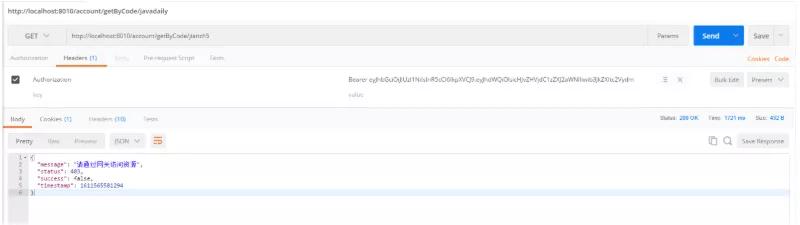
返回結果:
- "message": "請通過網關訪問資源",
- "status": 403,
- "success": false,
- "timestamp": 1611660015830
- }