淺析iOS單元測(cè)試
單元測(cè)試作為敏捷開(kāi)發(fā)實(shí)踐的組成之一,其目的是提高軟件開(kāi)發(fā)的效率,維持代碼的健康性。其目標(biāo)是證明軟件能夠正常運(yùn)行,而不是發(fā)現(xiàn)bug(發(fā)現(xiàn)bug這一目的與開(kāi)發(fā)成本是正相關(guān)的,雖然發(fā)現(xiàn)bug是保證軟件質(zhì)量的一種手段,但是很顯然這與降低軟件開(kāi)發(fā)成本這一目的背道而馳)。
單元測(cè)試是對(duì)軟件質(zhì)量的一種保證,例如重構(gòu)之后我們需要保證軟件產(chǎn)品的正常運(yùn)行。而iOS非常幸運(yùn),蘋(píng)果開(kāi)發(fā)工具Xcode在創(chuàng)建項(xiàng)目是就能夠自帶XCTest,包含單元測(cè)試和UI測(cè)試,這次我們從兩個(gè)方面講一下單元測(cè)試。
一、 開(kāi)發(fā)
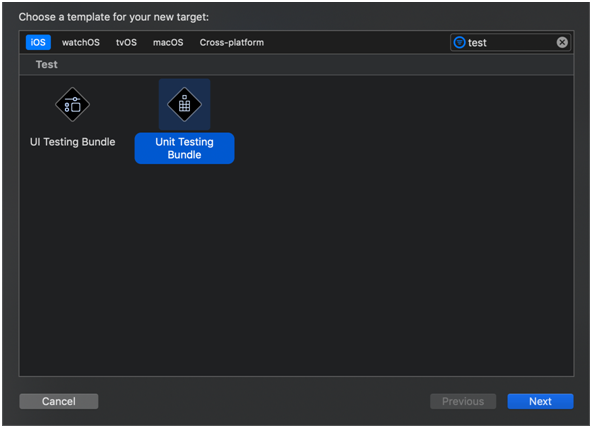
如果創(chuàng)建工程時(shí)自帶,則可以在工程項(xiàng)目文件中的TARGETS看到有一個(gè)對(duì)應(yīng)工程名,以Tests結(jié)尾的項(xiàng)目,如果沒(méi)有,也可以自己創(chuàng)建,點(diǎn)擊下方的加號(hào),輸入test即可看到對(duì)應(yīng)的bundle,這里我們選擇Unit Testing Bundle。
創(chuàng)建后會(huì)多一個(gè)文件夾,在其中創(chuàng)建和剛創(chuàng)建的項(xiàng)目名稱(chēng)相同,在里面就可以創(chuàng)建每個(gè)文件的單元測(cè)試了。
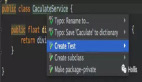
對(duì)文件夾右鍵點(diǎn)擊NewFile,選擇Unit Test Case Class即可創(chuàng)建一個(gè)單元測(cè)試文件。

創(chuàng)建過(guò)程就到這里了。接下來(lái)針對(duì)單元測(cè)試一些使用進(jìn)行簡(jiǎn)單描述。
首先單元測(cè)試是為了測(cè)試方法的可行性,所以需要斷言來(lái)看是否正確,XCTest提供了許多斷言可用,這里就列舉一些常見(jiàn)的斷言:
XCTAssertNotNil(expression, ...)
XCTAssertNil(expression, ...)
XCTAssertTrue(expression, ...)
XCTAssertFalse(expression, ...)
XCTAssertEqualObjects(expression1, expression2, ...)
XCTAssertEqual(expression1, expression2, ...)
XCTAssertGreaterThan(expression1, expression2, ...)
還有更多可以通過(guò)XCTestAssertions.h來(lái)查找。
這里的斷言很容易理解,可以通過(guò)方法名釋義,比如第一個(gè)XCTAssertNotNil就是必須表達(dá)式或?qū)ο蟛粸榭詹拍芡ㄟ^(guò),否則測(cè)試失敗。
接下來(lái)我們用一個(gè)簡(jiǎn)單的例子來(lái)看一下:
這兒有個(gè)簡(jiǎn)單的實(shí)現(xiàn)加法的類(lèi)以及方法。
- #import <Foundation/Foundation.h>
- NS_ASSUME_NONNULL_BEGIN
- @interface CalcMethod : NSObject
- + (NSInteger)plus:(NSInteger)a andB:(NSInteger)b;
- @end
- NS_ASSUME
- #import "CalcMethod.h"
- @implementation CalcMethod
- + (NSInteger)plus:(NSInteger)a andB:(NSInteger)b {
- return a + b;
- }
- @end
實(shí)現(xiàn)它的單元測(cè)試
首先先新建單元測(cè)試文件,這個(gè)只有.m,沒(méi)有頭文件。
- #import <XCTest/XCTest.h>
- @interface CalcMethodTests : XCTestCase
- @end
- @implementation CalcMethodTests
- - (void)setUp {
- // Put setup code here. This method is called before the invocation of each test method in the class.
- }
- - (void)tearDown {
- // Put teardown code here. This method is called after the invocation of each test method in the class.
- }
- - (void)testExample {
- // This is an example of a functional test case.
- // Use XCTAssert and related functions to verify your tests produce the correct results.
- }
- - (void)testPerformanceExample {
- // This is an example of a performance test case.
- [self measureBlock:^{
- // Put the code you want to measure the time of here.
- }];
可以看到系統(tǒng)給出了幾個(gè)方法,其中setUp是每個(gè)方法執(zhí)行測(cè)試前會(huì)調(diào)用用來(lái)初始化一些參數(shù);tearDown是每個(gè)方法執(zhí)行完成之后實(shí)行的一些銷(xiāo)毀方法;testExample是用來(lái)具體測(cè)試的方法,也可以自己定義,但必須以test開(kāi)頭;testPerformanceExample是用來(lái)測(cè)試性能的,放在measureBlock中,會(huì)運(yùn)行10次測(cè)每次所使用的時(shí)間,一般用來(lái)或者大量計(jì)算所產(chǎn)生的耗時(shí)。
這里只是單純的加法運(yùn)算,就不需要了。添加測(cè)試方法:
- - (void)testCalcMethod {
- XCTAssertEqual([CalcMethod plus:1 andB:2], 3, @"1+2=3");
- }
然后切換Scheme到對(duì)應(yīng)的Test中,如果沒(méi)有則可以在管理Scheme中添加,然后點(diǎn)擊方法前的菱形塊即可測(cè)試該方法,或者點(diǎn)command+u將所有測(cè)試文件和方法進(jìn)行單元測(cè)試。

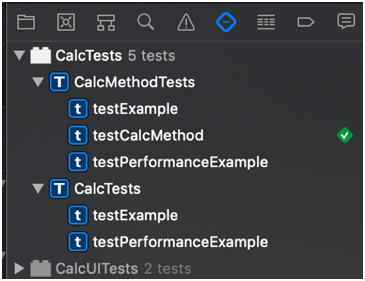
左側(cè)切到測(cè)試欄,這樣可以更便捷的點(diǎn)擊測(cè)試,測(cè)試通過(guò)就會(huì)顯示勾。
二、 常見(jiàn)問(wèn)題處理
1. 在第一次執(zhí)行單元測(cè)試時(shí)發(fā)現(xiàn)編譯不過(guò),報(bào)找不到類(lèi)型
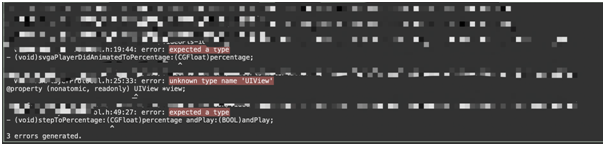
原因是單元測(cè)試對(duì)引用要求更嚴(yán)格,以前在編譯中可能會(huì)直接通過(guò),但單元測(cè)試不行,解決辦法也很簡(jiǎn)單,對(duì)所有相關(guān)文件引入對(duì)應(yīng)頭文件即可。

這個(gè)只是針對(duì)上方的報(bào)錯(cuò),也可能有更多的錯(cuò)誤,需要自己進(jìn)行配對(duì)。
如果有在A(yíng)pp中有接入自己開(kāi)發(fā)的Framework工程,并且要對(duì)Framework進(jìn)行單元測(cè)試,接下來(lái)是針對(duì)Framework中的一些單元測(cè)試問(wèn)題
2. 找不到第三方庫(kù)或者pod的頭文件

這是因?yàn)槿绻愕膄ramework通過(guò)pod引入,那么pod頭文件管理不需要你自己來(lái)處理,pod會(huì)處理完并集成到App中。但單元測(cè)試不行,所以需要對(duì)你自己的Framework以及單元測(cè)試的bundle添加headers。

切到工程文件的Build SettingsàHeader Search Paths,加入你自己對(duì)應(yīng)Pod的頭文件路徑,包括單元測(cè)試的bundle與單元測(cè)試對(duì)應(yīng)的Framework工程都需要添加。
3. 報(bào)Include of non-modular header inside framework module

這個(gè)仍舊在單元測(cè)試bundle的Build SettingsàAllow Non-modular Includes In Framework Modules,將此設(shè)置改為YES即可。

4. 使用pod集成后,App調(diào)試報(bào)找不到XCTest

這是因?yàn)閜od包含文件太粗糙,使用**代替所有子目錄,導(dǎo)致單元測(cè)試的.m都一起被包含到pod文件中。
解決辦法一:精確pod需要的文件路徑
解決辦法二:規(guī)范單元測(cè)試文件命名,并在pod配置中排除

5. 如果要測(cè)一些網(wǎng)絡(luò)請(qǐng)求或異步操作怎么辦?
如果直接在test方法中寫(xiě)入一些異步方法,在回調(diào)中在進(jìn)行斷言,會(huì)發(fā)現(xiàn)無(wú)論正確與否都會(huì)直接通過(guò)。所以蘋(píng)果也提供了一個(gè)為單元測(cè)試準(zhǔn)備的異步阻斷。
- /*!
- * @method -waitForExpectationsWithTimeout:handler:
- *
- * @param timeout
- * The amount of time within which all expectations must be fulfilled.
- *
- * @param handler
- * If provided, the handler will be invoked both on timeout or fulfillment of all
- * expectations. Timeout is always treated as a test failure.
- *
- * @discussion
- * -waitForExpectationsWithTimeout:handler: creates a point of synchronization in the flow of a
- * test. Only one -waitForExpectationsWithTimeout:handler: can be active at any given time, but
- * multiple discrete sequences of { expectations -> wait } can be chained together.
- *
- * -waitForExpectationsWithTimeout:handler: runs the run loop while handling events until all expectations
- * are fulfilled or the timeout is reached. Clients should not manipulate the run
- * loop while using this API.
- */
- - (void)waitForExpectationsWithTimeout:(NSTimeInterval)timeout handler:(nullable XCWaitCompletionHandler)handler;
- /*!
- * @method -expectationForNotification:object:handler:
- *
- * @discussion
- * A convenience method for asynchronous tests that observe NSNotifications from the default
- * NSNotificationCenter.
- *
- * @param notificationName
- * The notification to register for.
- *
- * @param objectToObserve
- * The object to observe.
- *
- * @param handler
- * Optional handler, /see XCNotificationExpectationHandler. If not provided, the expectation
- * will be fulfilled by the first notification matching the specified name from the
- * observed object.
- *
- * @return
- * Creates and returns an expectation associated with the test case.
- */
- - (XCTestExpectation *)expectationForNotification:(NSNotificationName)notificationName
方法我單獨(dú)提出來(lái)常用的兩個(gè),這樣可以阻塞線(xiàn)程,并在收到通知或者超時(shí)后再繼續(xù),更多方法詳見(jiàn)XCTestCase+AsynchronousTesting.h。
下面是使用方法:
- (void)testAsync {
- dispatch_async(dispatch_get_global_queue(0, 0), ^{
- // Do Some things async
- // XCAssert
- [[NSNotificationCenter defaultCenter] postNotificationName:@"UnitTestsNotify" object:nil];
- });
- do {
- [self expectationForNotification:@"UnitTestsNotify" object:nil handler:nil];
- [self waitForExpectationsWithTimeout:30 handler:nil];
- } while (0);
- }
也可以使用宏定義將這方法簡(jiǎn)化,更直觀(guān),也更方便多次調(diào)用。
- #define WAIT do {\
- [self expectationForNotification:@"UnitTestsNotify" object:nil handler:nil];\
- [self waitForExpectationsWithTimeout:30 handler:nil];\
- } while (0);
- #define NOTIFY \
- [[NSNotificationCenter defaultCenter] postNotificationName:@"UnitTestsNotify" object:nil];
- - (void)testAsync {
- dispatch_async(dispatch_get_global_queue(0, 0), ^{
- // Do Some things async
- // XCAssert
- NOTIFY
- });
- WAIT
- }
【本文是51CTO專(zhuān)欄機(jī)構(gòu)“AiChinaTech”的原創(chuàng)文章,微信公眾號(hào)( id: tech-AI)”】