有關于Java Map,應該掌握的8個問題
前言
最近幾天看了幾篇有關于Java Map的外國博文,寫得非常不錯,所以整理了Java map 應該掌握的8個問題,都是日常開發司空見慣的問題,希望對大家有幫助;如果有不正確的地方,歡迎提出,萬分感謝哈~
本章節所有代碼demo已上傳github
1、如何把一個Map轉化為List
日常開發中,我們經常遇到這種場景,把一個Map轉化為List。map轉List有以下三種轉化方式:
- 把map的鍵key轉化為list
- 把map的值value轉化為list
- 把map的鍵值key-value轉化為list
偽代碼如下:
- // key list
- List keyList = new ArrayList(map.keySet());
- // value list
- List valueList = new ArrayList(map.values());
- // key-value list
- List entryList = new ArrayList(map.entrySet());
示例代碼:
- public class Test {
- public static void main(String[] args) {
- Map<Integer, String> map = new HashMap<>();
- map.put(2, "jay");
- map.put(1, "whx");
- map.put(3, "huaxiao");
- //把一個map的鍵轉化為list
- List<Integer> keyList = new ArrayList<>(map.keySet());
- System.out.println(keyList);
- //把map的值轉化為list
- List<String> valueList = new ArrayList<>(map.values());
- System.out.println(valueList);
- 把map的鍵值轉化為list
- List entryList = new ArrayList(map.entrySet());
- System.out.println(entryList);
- }
- }
運行結果:
- [1, 2, 3]
- [whx, jay, huaxiao]
- [1=whx, 2=jay, 3=huaxiao]
2、如何遍歷一個Map
我們經常需要遍歷一個map,可以有以下兩種方式實現:
通過entrySet+for實現遍歷
- for(Entry entry: map.entrySet()) {
- // get key
- K key = entry.getKey();
- // get value
- V value = entry.getValue();
- }
實例代碼:
- public class EntryMapTest {
- public static void main(String[] args) {
- Map<Integer, String> map = new HashMap<>();
- map.put(2, "jay");
- map.put(1, "whx");
- map.put(3, "huaxiao");
- for(Map.Entry entry: map.entrySet()) {
- // get key
- Integer key = (Integer) entry.getKey();
- // get value
- String value = (String) entry.getValue();
- System.out.println("key:"+key+",value:"+value);
- }
- }
- }
通過Iterator+while實現遍歷
- Iterator itr = map.entrySet().iterator();
- while(itr.hasNext()) {
- Entry entry = itr.next();
- // get key
- K key = entry.getKey();
- // get value
- V value = entry.getValue();
- }
實例代碼:
- public class IteratorMapTest {
- public static void main(String[] args) {
- Map<Integer, String> map = new HashMap<>();
- map.put(2, "jay");
- map.put(1, "whx");
- map.put(3, "huaxiao");
- Iterator itr = map.entrySet().iterator();
- while(itr.hasNext()) {
- Map.Entry entry = (Map.Entry) itr.next();
- // get key
- Integer key = (Integer) entry.getKey();
- // get value
- String value = (String) entry.getValue();
- System.out.println("key:"+key+",value:"+value);
- }
- }
- }
運行結果:
- key:1,value:whx
- key:2,value:jay
- key:3,value:huaxiao
3、如何根據Map的keys進行排序
對Map的keys進行排序,在日常開發很常見,主要有以下兩種方式實現。
把Map.Entry放進list,再用Comparator對list進行排序
- List list = new ArrayList(map.entrySet());
- Collections.sort(list, (Entry e1, Entry e2)-> {
- return e1.getKey().compareTo(e2.getKey());
- });
實例代碼:
- public class SortKeysMapTest {
- public static void main(String[] args) {
- Map<String, String> map = new HashMap<>();
- map.put("2010", "jay");
- map.put("1999", "whx");
- map.put("3010", "huaxiao");
- List<Map.Entry<String,String>> list = new ArrayList<>(map.entrySet());
- Collections.sort(list, (Map.Entry e1, Map.Entry e2)-> {
- return e1.getKey().toString().compareTo(e2.getKey().toString());
- });
- for (Map.Entry entry : list) {
- System.out.println("key:" + entry.getKey() + ",value:" + entry.getValue());
- }
- }
- }
使用SortedMap+TreeMap+Comparator實現
- 1. SortedMap sortedMap = new TreeMap(new Comparator() {
- 2. @Override
- 3. public int compare(K k1, K k2) {
- 4. return k1.compareTo(k2);
- 5. }
- 6. });
- 7. sortedMap.putAll(map);
實例代碼:
- public class SortKeys2MapTest {
- public static void main(String[] args) {
- Map<String, String> map = new HashMap<>();
- map.put("2010", "jay");
- map.put("1999", "whx");
- map.put("3010", "huaxiao");
- SortedMap sortedMap = new TreeMap(new Comparator<String>() {
- @Override
- public int compare(String k1, String k2) {
- return k1.compareTo(k2);
- }
- });
- sortedMap.putAll(map);
- Iterator itr = sortedMap.entrySet().iterator();
- while(itr.hasNext()) {
- Map.Entry entry = (Map.Entry) itr.next();
- // get key
- String key = (String) entry.getKey();
- // get value
- String value = (String) entry.getValue();
- System.out.println("key:"+key+",value:"+value);
- }
- }
- }
運行結果:
- key:1999,value:whx
- key:2010,value:jay
- key:3010,value:huaxiao
4、如何對Map的values進行排序
- List list = new ArrayList(map.entrySet());
- Collections.sort(list, (Entry e1, Entry e2) ->{
- return e1.getValue().compareTo(e2.getValue());
- });
實例代碼:
- public class SortValuesMapTest {
- public static void main(String[] args) {
- Map<String, String> map = new HashMap<>();
- map.put("2010", "jay");
- map.put("1999", "whx");
- map.put("3010", "huaxiao");
- List <Map.Entry<String,String>>list = new ArrayList<>(map.entrySet());
- Collections.sort(list, (Map.Entry e1, Map.Entry e2)-> {
- return e1.getValue().toString().compareTo(e2.getValue().toString());
- }
- );
- for (Map.Entry entry : list) {
- System.out.println("key:" + entry.getKey() + ",value:" + entry.getValue());
- }
- }
- }
運行結果:
- key:3010,value:huaxiao
- key:2010,value:jay
- key:1999,value:whx
5、如何初始化一個靜態/不可變的Map
初始化一個靜態不可變的map,單單static final+static代碼塊還是不行的,如下:
- public class Test1 {
- private static final Map <Integer,String>map;
- static {
- map = new HashMap<Integer, String>();
- map.put(1, "one");
- map.put(2, "two");
- }
- public static void main(String[] args) {
- map.put(3, "three");
- Iterator itr = map.entrySet().iterator();
- while(itr.hasNext()) {
- Map.Entry entry = (Map.Entry) itr.next();
- // get key
- Integer key = (Integer) entry.getKey();
- // get value
- String value = (String) entry.getValue();
- System.out.println("key:"+key+",value:"+value);
- }
- }
- }
這里面,map繼續添加元素(3,"three"),發現是OK的,運行結果如下:
- key:1,value:one
- key:2,value:two
- key:3,value:three
真正實現一個靜態不可變的map,需要Collections.unmodifiableMap,代碼如下:
- public class Test2 {
- private static final Map<Integer, String> map;
- static {
- Map<Integer,String> aMap = new HashMap<>();
- aMap.put(1, "one");
- aMap.put(2, "two");
- map = Collections.unmodifiableMap(aMap);
- }
- public static void main(String[] args) {
- map.put(3, "3");
- Iterator itr = map.entrySet().iterator();
- while(itr.hasNext()) {
- Map.Entry entry = (Map.Entry) itr.next();
- // get key
- Integer key = (Integer) entry.getKey();
- // get value
- String value = (String) entry.getValue();
- System.out.println("key:"+key+",value:"+value);
- }
- }
- }
運行結果如下:

可以發現,繼續往map添加元素是會報錯的,實現真正不可變的map。
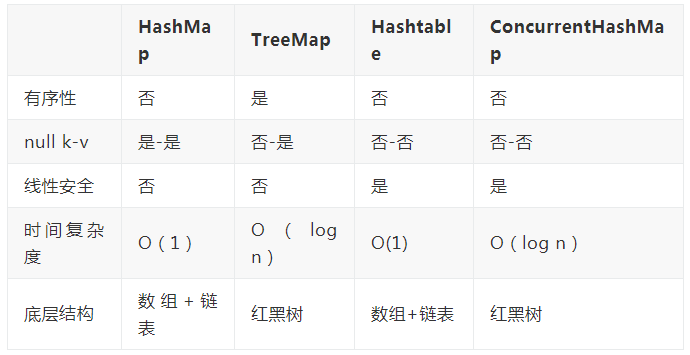
6、HashMap, TreeMap, and Hashtable,ConcurrentHashMap的區別
7、如何創建一個空map
如果map是不可變的,可以這樣創建:
- Map map=Collections.emptyMap();
- or
- Map<String,String> map=Collections.<String, String>emptyMap();
- //map1.put("1", "1"); 運行出錯
如果你希望你的空map可以添加元素的,可以這樣創建
- Map map = new HashMap();
8、有關于map的復制
有關于hashmap的復制,在日常開發中,使用也比較多。主要有 =,clone,putAll,但是他們都是淺復制,使用的時候注意啦,可以看一下以下例子:
例子一,使用=復制一個map:
- public class CopyMapAssignTest {
- public static void main(String[] args) {
- Map<Integer, User> userMap = new HashMap<>();
- userMap.put(1, new User("jay", 26));
- userMap.put(2, new User("fany", 25));
- //Shallow clone
- Map<Integer, User> clonedMap = userMap;
- //Same as userMap
- System.out.println(clonedMap);
- System.out.println("\nChanges reflect in both maps \n");
- //Change a value is clonedMap
- clonedMap.get(1).setName("test");
- //Verify content of both maps
- System.out.println(userMap);
- System.out.println(clonedMap);
- }
- }
運行結果:
- {1=User{name='jay', age=26}, 2=User{name='fany', age=25}}
- Changes reflect in both maps
- {1=User{name='test', age=26}, 2=User{name='fany', age=25}}
- {1=User{name='test', age=26}, 2=User{name='fany', age=25}}
從運行結果看出,對cloneMap修改,兩個map都改變了,所以=是淺復制。
例子二,使用hashmap的clone復制:
- {
- public static void main(String[] args) {
- HashMap<Integer, User> userMap = new HashMap<>();
- userMap.put(1, new User("jay", 26));
- userMap.put(2, new User("fany", 25));
- //Shallow clone
- HashMap<Integer, User> clonedMap = (HashMap<Integer, User>) userMap.clone();
- //Same as userMap
- System.out.println(clonedMap);
- System.out.println("\nChanges reflect in both maps \n");
- //Change a value is clonedMap
- clonedMap.get(1).setName("test");
- //Verify content of both maps
- System.out.println(userMap);
- System.out.println(clonedMap);
- }
- }
運行結果:
- {1=User{name='jay', age=26}, 2=User{name='fany', age=25}}
- Changes reflect in both maps
- {1=User{name='test', age=26}, 2=User{name='fany', age=25}}
- {1=User{name='test', age=26}, 2=User{name='fany', age=25}}
從運行結果看出,對cloneMap修改,兩個map都改變了,所以hashmap的clone也是淺復制。
例子三,通過putAll操作
- public class CopyPutAllMapTest {
- public static void main(String[] args) {
- HashMap<Integer, User> userMap = new HashMap<>();
- userMap.put(1, new User("jay", 26));
- userMap.put(2, new User("fany", 25));
- //Shallow clone
- HashMap<Integer, User> clonedMap = new HashMap<>();
- clonedMap.putAll(userMap);
- //Same as userMap
- System.out.println(clonedMap);
- System.out.println("\nChanges reflect in both maps \n");
- //Change a value is clonedMap
- clonedMap.get(1).setName("test");
- //Verify content of both maps
- System.out.println(userMap);
- System.out.println(clonedMap);
- }
- }
運行結果:
- {1=User{name='jay', age=26}, 2=User{name='fany', age=25}}
- Changes reflect in both maps
- {1=User{name='test', age=26}, 2=User{name='fany', age=25}}
- {1=User{name='test', age=26}, 2=User{name='fany', age=25}}
從運行結果看出,對cloneMap修改,兩個map都改變了,所以putAll還是淺復制。
那么,如何實現深度復制呢?
可以使用序列化實現,如下為谷歌Gson序列化HashMap,實現深度復制的例子:
- public class CopyDeepMapTest {
- public static void main(String[] args) {
- HashMap<Integer, User> userMap = new HashMap<>();
- userMap.put(1, new User("jay", 26));
- userMap.put(2, new User("fany", 25));
- //Shallow clone
- Gson gson = new Gson();
- String jsonString = gson.toJson(userMap);
- Type type = new TypeToken<HashMap<Integer, User>>(){}.getType();
- HashMap<Integer, User> clonedMap = gson.fromJson(jsonString, type);
- //Same as userMap
- System.out.println(clonedMap);
- System.out.println("\nChanges reflect in only one map \n");
- //Change a value is clonedMap
- clonedMap.get(1).setName("test");
- //Verify content of both maps
- System.out.println(userMap);
- System.out.println(clonedMap);
- }
- }
運行結果:
- {1=User{name='jay', age=26}, 2=User{name='fany', age=25}}
- Changes reflect in only one map
- {1=User{name='jay', age=26}, 2=User{name='fany', age=25}}
- {1=User{name='test', age=26}, 2=User{name='fany', age=25}}
從運行結果看出,對cloneMap修改,userMap沒有被改變,所以是深度復制。