如何在iOS 5中定制用戶界面
讓我們先來了解下iOS 5中定制用戶界面的妙用吧!
為了在App Store中取得成功,我們所開發的應用必須讓人眼前一亮。如果使用千篇一律的蘋果標準用戶界面,無疑難以從已經擁擠不堪的應用商店中得到消費者的青睞。
事實上,App Store中很多流行應用都以一種非標準的形式來呈現標準的iOS 用戶界面元素:
1.Twitter使用了定制的UITabBar
2.Instagram使用了定制的UITabBar和UINavigationBar
3.Epicurious(iPad版)使用了標準split-view的定制元素
在iOS5推出之前,要實現標準界面的定制化設計,對開發者來說可沒那么簡單。盡管創建drawRect的子類或覆蓋drawRect類是個不錯的辦法,但開發者會被這么事情搞得頭昏腦脹。
現在有了iOS5,開發者終于看到了黎明的曙光!iOS5中包含了眾多的新API,可以輕松定制不同UIKit界面控制元素的外觀。
為了展示這些功能,本文會使用一個名為“
Surf’s Up”的示例項目,讓界面顯得更具備“沙灘風格”。
當然,在學習本教程之前,需要你了解iOS開發的基礎知識。
開始前的準備
首先請下載這個初始項目(http://www.raywenderlich.com/downloads/SurfsUpStarter.zip)
我已經創建好了一個簡單的應用,這樣大家就可以把重點放在學習如何定制UIKit界面元素上。
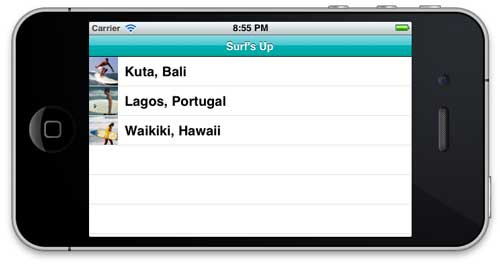
當你打開項目之后,先看看其中的代碼和XIB文件。你會發現主視圖呈現了一個沖浪之旅的列表,而細節視圖則勻速我們獲取每個沖浪之旅的詳細信息。
看完基本代碼和XIB文件后,讓我們編譯運行項目,會看到以下的兩個視圖。
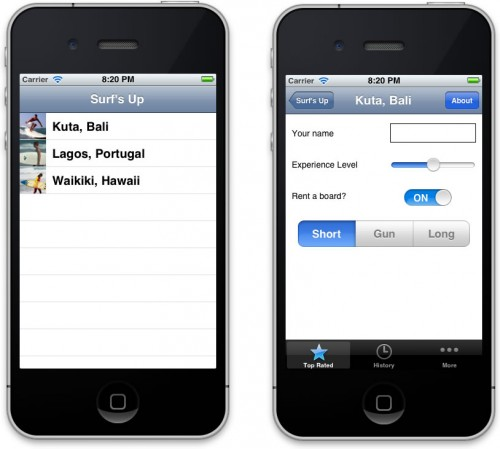
現在這個應用勉強可用,但從界面上一點感覺不到海灘沖浪的氛圍。
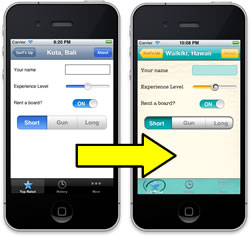
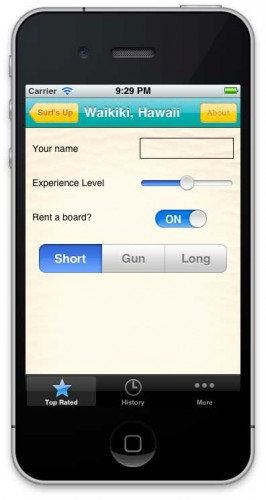
讓我們從detail(細節)頁面上開始改造吧。現在它看起來相當的標準。
首先是頂部UINavigationBar(導航欄)上的平淡無奇的UIBarButtonItem,然后是底部的幾個UITabBar元素,接著就是幾個標準的數據輸入元素:
1.使用了系統Helvetica字體的UILabel(標簽)
2.UITextField(文本輸入框)
3.UISlider(滑動條)
4.UISwitch(切換開關)
5.UISegmentedControl(分段控制)
我們要做的事情是,把這些完全“標準”的界面改造成具有獨特風格的定制界面。
添加背景圖片
事實上,我們已經把所需要的資源圖片都放在Resources里面了,所以要做的只是添加代碼而已。
在images文件夾中有一個bg_sand.png圖片。我們打算用它當做細節視圖的背景圖片。
打開DetailViewController.m,創建一個viewDidLoad方法如下:
-(void)viewDidLoad{
[superviewDidLoad];
[[selfview]setBackgroundColor:[UIColorcolorWithPatternImage:[UIImageimageNamed:@"bg_sand"]]];
}
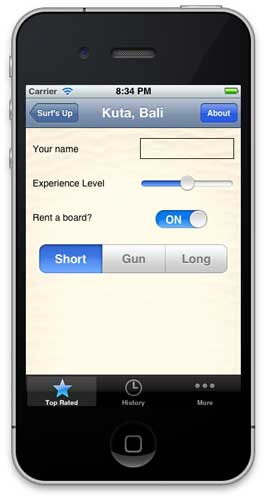
無疑,這是設置背景圖片的最佳方式,雖然沒有backgroundImage這樣的屬性,但是使用backgroundColor屬性我們同樣可以實現這個目的!
編譯運行項目,可以看到以下界面:
定制UINavigationBar
在images文件夾中,我們將使用以下兩個圖片來定制導航欄:surf_gradient_textured_32.png和surf_gradident_textured_44.png。
我們希望在導航欄中從左到右重復鋪設這些圖片。之所有用了兩個不同的高度,是因為當導航欄切換到橫屏模式時會縮小。
要實現以上效果,iOS提供了兩個新的API:
1.UINavigationbar現在可以設置backgroundImage屬性
2.UIImage提供了新的resizableImageWithCapInsets方法,方便創建可調整大小的圖片。
當然,我們可以進入細節視圖,并使用以上API來直接設置導航欄的背景圖片。但如果這樣做,那就得在列表視圖或應用的其它視圖中手動修改。
幸運的是,iOS5允許我們一次性定制用戶界面元素,從而讓“處于同一級別的”界面元素使用類似的定制。
在SurfsUpAppDelegate.m文件中,在application:didFinishLaunchingWithOptions:方法的上面添加一個新的方法如下:
-(void)customizeAppearance{
//create resizable images創建可調整大小的圖像
UIImage *gradientImage44 = [[UIImageimageNamed:@"surf_gradient_textured_44"] resizableImageWithCapInsets:UIEdgeInsetsMake(0, 0, 0, 0)];
UIImage *gradientImage32 = [[UIImageimageNamed:@"surf_gradient_textured_32"] resizableImageWithCapInsets:UIEdgeInsetsMake(0, 0, 0, 0)];
//set the background image for *all* UINavigationBars為所有導航欄設置背景圖片
[[UINavigationBarappearance]setBackgroundImage:gradientImage44forBarMetrics:UIBarMetricsDefault];
[[UINavigationBarappearance]setBackgroundImage:gradientImage32forBarMetrics:UIBarMetricsLandscapePhone];
//customize the title text for *all* UINavigationBars為所有導航欄設置標題文本
[[UINavigationBarappearance]setTitleTextAttributes:
[NSDictionarydictionaryWithObjectsAndKeys:
[UIColorcolorWithRed:255.0/255.0green:255.0/255.0blue:255.0/255.0alpha:1.0],
UITextAttributeTextColor,
[UIColorcolorWithRed:0.0green:0.0blue:0.0alpha:0.8],
UITextAttributeTextShadowColor,
[NSValuevalueWithUIOffset:UIOffsetMake(0, -1)],
UITextAttributeTextShadowOffset,
[UIFontfontWithName:@"Arial-Bold"size:0.0],
UITextAttributeFont,
nil]];
}
在以上的代碼中,頭兩行的作用是使用resizableImageWithCapInsets方法創建了可伸縮的圖像。需要注意的是,該方法取代了之前版本中使用的stretchableImageWithLeftCapWidth:topCapHeight:方法(已被刪除)。
關于cap insets,我們只需簡單的設置指定圖像在頂部,左端,右端和下部的固定區域。在這里,我們希望整個圖片都伸縮,所以為每個端都設置了0。
接下來的兩行代碼使用appearance(外觀)代理將可伸縮圖片設置為背景圖片,并指定了導航欄的測量方式。
最后幾行代碼指定了細節視圖中的標題樣式。我們傳入了標題文本屬性詞典,相關的可用鍵值包括:
UITextAttributeFont
UITextAttributeTextColor
UITextAttributeTextShadowColor
UITextAttributeTextShadowOffset
Ok,差不多搞定了,只需要在application:didFinishLaunchingWithOptions:方法的頂部添加一行代碼:
[selfcustomizeAppearance];
編譯運行應用,并切換設備的朝向,可以看到以下畫面:
定制UIBarButtonItem
打開images,找到button_textured_24.png和button_textured_30.png兩個文件,我們將用它們來設置導航欄中的按鈕外觀。
注意我們需要將按鈕圖像設置為可調整大小的,因為按鈕的寬度取決于其中的文本。
對于這些按鈕,我們不需要最左和最右的5個像素也伸縮,所以需要將left和right cap insets設置為5。
在customizeAppearance方法的最后添加以下代碼:
//customize the apperance for UIBarButtonItems
UIImage *button30 = [[UIImageimageNamed:@"button_textured_30"] resizableImageWithCapInsets:UIEdgeInsetsMake(0, 5, 0, 5)];
UIImage *button24 = [[UIImageimageNamed:@"button_textured_24"] resizableImageWithCapInsets:UIEdgeInsetsMake(0, 5, 0, 5)];
[[UIBarButtonItemappearance] setBackgroundImage:button30forState:UIControlStateNormalbarMetrics:UIBarMetricsDefault];
[[UIBarButtonItemappearance] setBackgroundImage:button24forState:UIControlStateNormalbarMetrics:UIBarMetricsLandscapePhone];
[[UIBarButtonItemappearance]setTitleTextAttributes:
[NSDictionarydictionaryWithObjectsAndKeys:
[UIColorcolorWithRed:220.0/255.0green:104.0/255.0blue:1.0/255.0alpha:1.0],
UITextAttributeTextColor,
[UIColorcolorWithRed:1.0green:1.0blue:1.0alpha:1.0],
UITextAttributeTextShadowColor,
[NSValuevalueWithUIOffset:UIOffsetMake(0, 1)],
UITextAttributeTextShadowOffset,
[UIFontfontWithName:@"AmericanTypewriter"size:0.0],
UITextAttributeFont,
nil]
forState:UIControlStateNormal];
以上代碼其實和定制導航欄的差不多。首先我們還是為按鈕創建了可伸縮的圖像,并設置為背景圖片。然后我們指定了文本的格式。
其中的”back”按鈕需要特殊定制,因為它需要看起來與眾不同。
讓我們在customizeApperance方法的最后添加以下代碼來特殊對待back按鈕:
//customize the appeance for "back" on UIBarButtonItems
UIImage *buttonBack30 = [[UIImageimageNamed:@"button_back_textured_30"]resizableImageWithCapInsets:UIEdgeInsetsMake(0, 13, 0, 5)];
UIImage *buttonBack24 = [[UIImageimageNamed:@"button_back_textured_24"]resizableImageWithCapInsets:UIEdgeInsetsMake(0, 12, 0, 5)];
[[UIBarButtonItemappearance]setBackButtonBackgroundImage:buttonBack30forState:UIControlStateNormalbarMetrics:UIBarMetricsDefault];
[[UIBarButtonItemappearance]setBackButtonBackgroundImage:buttonBack24forState:UIControlStateNormalbarMetrics:UIBarMetricsLandscapePhone];
需要注意的是,我們為back按鈕設置了不同的cap inset值。同時,UIBarButtonItem還有一個專門的backButtonBackgroundImage屬性可以使用。
編譯運行,可以看到下圖:
定制UITabBar
在iOS5中提供了一個API來設置UITabBar的背景圖片,以及表示選中的圖片。
在customizeAppearance方法的底部添加以下代碼:
//customize the apperance for UITabBar
UIImage *tabBackground = [[UIImageimageNamed:@"tab_bg"] resizableImageWithCapInsets:UIEdgeInsetsMake(0, 0, 0, 0)];
[[UITabBarappearance]setBackgroundImage:tabBackground];
[[UITabBarappearance]setSelectionIndicatorImage:[UIImageimageNamed:@"tab_select_indicator"]];
我想這三行代碼基本不需要再解釋了。
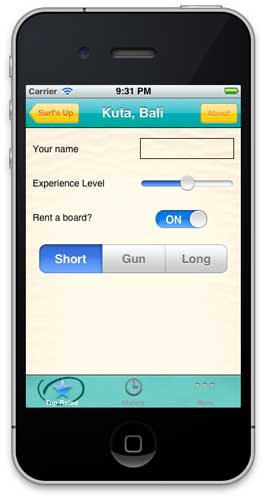
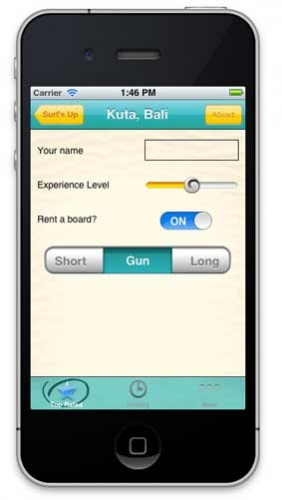
編譯運行項目,會看到以下界面:
定制UISlider
在iOS5中,我們只需設置maximusTrackImage,minimumTrackImage和thumbImage屬性即可輕松定制滑動控制。
讓我們在customizeAppearance方法的底部添加以下代碼:
//customize the apperance for UISlider
UIImage *minImage = [[UIImageimageNamed:@"slider_minimum"] resizableImageWithCapInsets:UIEdgeInsetsMake(0, 5, 0, 0)];
UIImage *maxImage = [[UIImageimageNamed:@"slider_maximum"] resizableImageWithCapInsets:UIEdgeInsetsMake(0, 5, 0, 0)];
UIImage *thumbImage = [UIImageimageNamed:@"thumb"];
[[UISliderappearance]setMaximumTrackImage:maxImageforState:UIControlStateNormal];
[[UISliderappearance]setMinimumTrackImage:minImageforState:UIControlStateNormal];
[[UISliderappearance]setThumbImage:thumbImageforState:UIControlStateNormal];
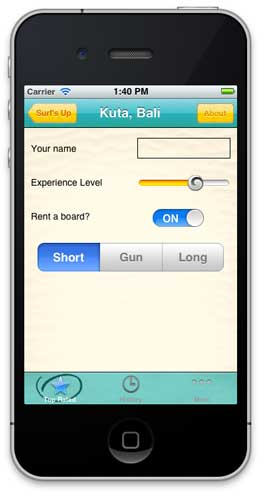
編譯運行,就可以看到定制后的UISlider滑動條!
定制UISegmentedControl
接下來讓我們來定制分段控制。這個元素稍微復雜一點。因為我們需要使用選中和非選中的背景,以及鄰近區域的不同狀態(如左邊選中,右邊未選中;左邊未選中和右邊選中,以及兩邊都沒有選中)。
在customizeAppearance方法的底部添加以下代碼:
//customize the appearance for UISegmentedControl
UIImage *segmentSelected =[[UIImageimageNamed:@"segcontrol_sel"]resizableImageWithCapInsets:UIEdgeInsetsMake(0, 15, 0, 15)];
UIImage *segmentUnselected =[[UIImageimageNamed:@"segcontrol_uns"]resizableImageWithCapInsets:UIEdgeInsetsMake(0, 15, 0, 15)];
UIImage *segmentSelectedUnselected =[UIImageimageNamed:@"segcontrol_sel-uns"];
UIImage *segUnselectedSelected = [UIImageimageNamed:@"segcontrol_uns-sel"];
UIImage *segmentUnselectedUnselected =[UIImageimageNamed:@"segcontrol_uns-uns"];
[[UISegmentedControlappearance]setBackgroundImage:segmentUnselectedforState:UIControlStateNormalbarMetrics:UIBarMetricsDefault];
[[UISegmentedControlappearance]setBackgroundImage:segmentSelectedforState:UIControlStateSelectedbarMetrics:UIBarMetricsDefault];
[[UISegmentedControlappearance]setDividerImage:segmentUnselectedUnselectedforLeftSegmentState:UIControlStateNormalrightSegmentState:UIControlStateNormalbarMetrics:UIBarMetricsDefault];
[[UISegmentedControlappearance]setDividerImage:segmentSelectedUnselectedforLeftSegmentState:UIControlStateSelectedrightSegmentState:UIControlStateNormalbarMetrics:UIBarMetricsDefault];
[[UISegmentedControlappearance]setDividerImage:segUnselectedSelectedforLeftSegmentState:UIControlStateNormalrightSegmentState:UIControlStateSelectedbarMetrics:UIBarMetricsDefault];
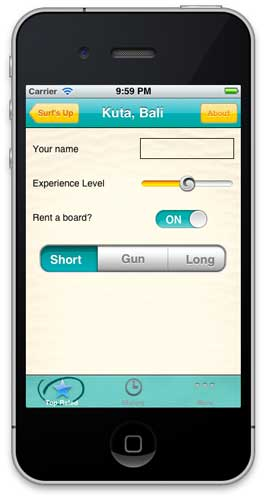
編譯運行項目,可以看到UISegmentedControl現在是舊貌換新顏了!
定制UISwitch
截止目前為止,我們還沒有找到定制UISwitch的合適方法,但要修改它的tintColor屬性還是輕而易舉的。
注意到在DetailViewController中,已經有一個IBOutlet- rentSwitch的聯系將切換開關和DetailView.xib聯系起來。
我們只需在DetailViewController的viewDidLoad方法中添加以下代碼即可:
-(void)viewDidLoad{
[superviewDidLoad];
[[selfview]setBackgroundColor:[UIColorcolorWithPatternImage:[UIImageimageNamed:@"bg_sand"]]];
[rentSwitchsetOnTintColor:[UIColorcolorWithRed:0green:175.0/255.0blue:176.0/255.0alpha:1.0]];
}
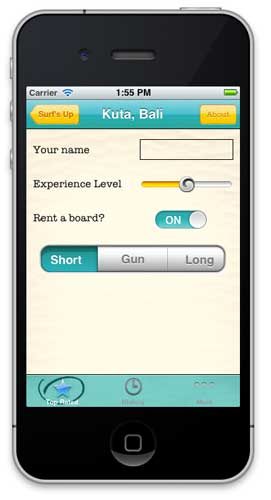
編譯運行項目,會看到切換開關有了新的顏色!
定制UILabel
標簽是細節視圖中的重要組成部分,但我們不會通過appearance代理來進行定制。
打開DetailView.xib,在主視圖中選中第一個標簽(比如name),然后在右側面板選擇Attributes Inspector,并進行以下設置:
Font: Custom
Family: American Typewriter
Style: Regular
Size: 16
同時再修改剩下的兩個標簽屬性:“Experience Level”和”Rent a board”
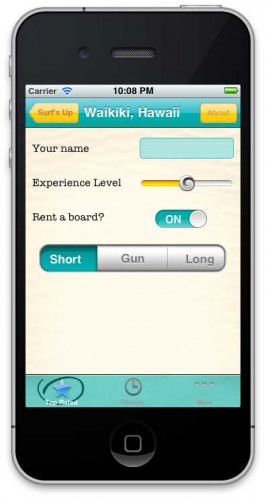
編譯運行項目,會看到標簽的外觀更養眼一些了。
定制UITextField
現在,我們的UITextField(文本輸入框)已經被設置為使用UITextBorderStyleLine.讓我們在Interface Builder中將字體設置為American Typewriter,Size 12,Regular。
切換到Identity Inspector,你會看到現在的類型是CustomTextField。
現在又該用到drawRect:方法了。為了提供青色的背景,我們需要覆蓋drawRect方法。
現在在Xcode中找到我們為此所創建的CustomTextField.m文件,使用以下代碼替換drawRect:方法:
- (void)drawRect:(CGRect)rect
{
// [superdrawRect:rect];
UIImage *textFieldBackground = [[UIImageimageNamed:@"text_field_teal"]resizableImageWithCapInsets:UIEdgeInsetsMake(15, 5, 15, 5)];
[textFieldBackgrounddrawInRect:[selfbounds]];
}
這里我們創建了另一個可伸縮的圖像,并在視圖邊界定義的矩形中繪制。現在可以編譯運行項目了。
當然,這個項目示例中,我們有點為了改變而改變的味道,主要是為了讓大家熟悉各個界面元素的定制化設計方法。如果你需要了解更多這方面的知識,請繼續保持關注。